Jump to content

My Painting Sucks...how To Fix?


10 replies to this topic

#1 Stelio Kontos

    Member

  • Pip
  • Knight Errant
  • Knight Errant
  • 19 posts

Posted 09 January 2017 - 08:29 AM

So...short story is, I'm looking on where to find a primer on how to paint models well. I've gotten back into it forthe first time in a long time and I've encountered a TON of issues.

Here are some
  • Applying the base coat was too think, and it is obscuring model details
  • When thinning the paint to match, the paint simply runs into crevices and leaves those details un-painted with the metal town showing through
  • Covering them with a thicker paint resulted in obscured details and visible brush strokes
  • I can't paint straight line to save my life, and multiple details have specks of missed paint. other details don't match exactly to the shape I was painting them on.

Right now it sucks. Does anyone have any recommendations or general tips to move from something that looks like a 12 year old painted it...to something like this?

Posted Image

#2 Dandred

    Member

  • PipPip
  • The Money Maker
  • The Money Maker
  • 28 posts

Posted 09 January 2017 - 08:42 AM

Uh well I'm not sure this is the best place for this thread.

However, some general tips.

Use a primer. Acrylic paint will not adhere to metal very well.

Keep your paint thin including the primer. I use a brush on primer but if you don't keep it watery you can get brush strokes from the very beginning. Alternatively most folks use a spray primer. (This can be bad for your health, use a filter and stay in open or ventilated air.)

It is not necessary to completely color the mini to the point of opacity with a single coat, use thin coats. Your paint should be like milk, not watery.

Don't overload the brush. Just dip the bristles and keep the ferrule (metal collar) clean.

Work light colors to dark colors, inner most detail to outer. That will help you keep a clean paint job.

Use washes to enhance recessed detail.

Practice. Posted Image

You tube has a huge number of videos that can help you learn about painting miniatures. Check them out too.

Edited by Dandred, 09 January 2017 - 08:59 AM.


#3 Juodas Varnas

    Member

  • PipPipPipPipPipPipPipPipPipPip
  • Ace Of Spades
  • Ace Of Spades
  • 7,534 posts
  • LocationGrand Duchy of Lithuania

Posted 09 January 2017 - 10:09 AM

Check out this Youtube channel:
https://www.youtube....bZVaZ6jw/videos
(Especially take a look at the "From Blister to Battle" series)
You might find help there.

#4 Metus regem

    Member

  • PipPipPipPipPipPipPipPipPipPipPip
  • The Sureshot
  • The Sureshot
  • 10,282 posts
  • LocationNAIS College of Military Science OCS courses

Posted 09 January 2017 - 10:45 AM

View PostLamp erouge, on 09 January 2017 - 08:29 AM, said:

So...short story is, I'm looking on where to find a primer on how to paint models well. I've gotten back into it forthe first time in a long time and I've encountered a TON of issues.

Here are some
  • Applying the base coat was too think, and it is obscuring model details
  • When thinning the paint to match, the paint simply runs into crevices and leaves those details un-painted with the metal town showing through
  • Covering them with a thicker paint resulted in obscured details and visible brush strokes
  • I can't paint straight line to save my life, and multiple details have specks of missed paint. other details don't match exactly to the shape I was painting them on.
Right now it sucks. Does anyone have any recommendations or general tips to move from something that looks like a 12 year old painted it...to something like this?

Posted Image


Practice, and lots of it...

When I look at the first WH40k figure I painted when I was 12, more than twenty years ago, (Dark Angel Space Marine) to the last Guardsman I painted two years ago (Wehrmacht themed Air-Cav, ultizing an urban cammo scheem), the difference is massive.

#5 Pariah Devalis

    Member

  • PipPipPipPipPipPipPipPipPipPip
  • The Clan Cat
  • The Clan Cat
  • 7,655 posts
  • Google+: Link
  • Twitter: Link
  • LocationAboard the NCS True Path

Posted 09 January 2017 - 11:16 AM

View PostLamp erouge, on 09 January 2017 - 08:29 AM, said:

So...short story is, I'm looking on where to find a primer on how to paint models well. I've gotten back into it forthe first time in a long time and I've encountered a TON of issues.

Here are some
  • Applying the base coat was too think, and it is obscuring model details
  • When thinning the paint to match, the paint simply runs into crevices and leaves those details un-painted with the metal town showing through
  • Covering them with a thicker paint resulted in obscured details and visible brush strokes
  • I can't paint straight line to save my life, and multiple details have specks of missed paint. other details don't match exactly to the shape I was painting them on.

  • Multiple thin coats with a spray on primer is better than one thick coat. Hold the model or models at enough of a distance so that they are mostly getting misted by the primer, and don't just hold the button down. Spray in an arc, stop, repeat several times. The idea is to build up several thin layers of primer, not coat the model in a cocoon of paint. Speaking of primer, I highly suggest a grey primer, as opposed to white or black, as the neutral color can easily be painted brighter or darker as needed.
  • Won't really need to do the thinning if your primer job went well. The exception would be for final detail work or weathering. Also, adding a small drop of liquid soap to your paints will break up surface tension, so if you needed it to be only in cracks then you can do this.
  • Work light to dark, generally speaking. You will need less paint to go dark over a light base. That said, if an area doesn't need a specific color, don't paint it that color at all. Save the paint and the detail.
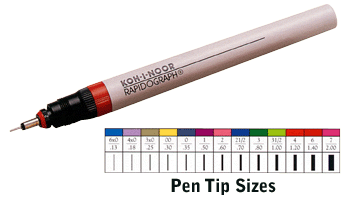
  • Technical pens are a life saver: Posted Image You can literally draw on the model, write words, make straight lines, you name it. When you finish (or get close to finishing) the model, seal it in a gloss or mat varnish to protect both the paint and the pen marks. Use the same rules as spray on primer if using a spray on varnish.


#6 Anunknownlurker

    Member

  • PipPipPipPipPipPip
  • Bad Company
  • Bad Company
  • 362 posts
  • LocationBetween here and there

Posted 09 January 2017 - 11:26 AM

Most of the useful stuff has been said above but my 2 cents:

1. Undercoat - I've used lots of different undercoats but have found the best results with ordinary, acrylic, spray undercoat available from shops like Halfords (in the UK). A couple of thin coats of this and you should have a great surface to paint on. Depending on the model, the desired finish and the palette you are using you can use either black or light grey undercoat; black is great for strong colours - blue, brown, natural colours - and creates a natural shading. If you are going for a lighter finish then grey may be better.

2. Quality brushes - OK, the good ones are pricey but, if looked after correctly (stored with the bristles protected and properly cleaned after use) good brushes not only last longer but also give good results for longer. Try a few different brands; different brushes suit different paints and painting styles but I use Windsor and Newton sable but there are many others

3. Quality paints - GW make a great range of very good paints, a bit overpriced for in my opinion but, hey, it's GW! The only thing that lets them down are the pots. My personal choice, which I think offers a great combination of coverage and finish, is the Vallejo Model Colour series. These are acrylics which come in a really nice dropper style bottle so it's easy to control the amount of paint on the palette without caking the pot to the point where you can't get the lid back on :D

4. Use a simple palette - some colours are much easier to use than others; blue and green for example. They are very simple to shade and highlight and tend to cover reasonably well, whereas yellow, white and black are somewhat trickier.

5. Watch lots of videos, or talk to more experienced painters, about different techniques; blending, drybrushing, highlighting, lowlighting etc. I had no idea how to paint gems for example until a more experienced painter demonstrated an "easy" way to paint them.

6. Use source materials - don't be afraid to copy other painters ideas, it's the best way to learn and you will develop your own style over time.

7. Practice - painting a straight line is enormously difficult - second only to painting a perfect circle - so don't beat yourself up if you find you can't do it. Keep trying. If you are using metal miniatures you can always get the paint off afterwards anyway and try again. You can even get paint off plastics if you are careful (I've been told Dettol works well for this).

8 & finally, no work of art is ever finished, it is simply abandoned. There are no bad paintjobs as anything you have already painted can be improved on as your technique improves. By the way, your Marauder doesn't look that bad to me anyway!

Keep the faith and paint away!

#7 Karl Streiger

    Member

  • PipPipPipPipPipPipPipPipPipPipPipPipPip
  • Wrath
  • Wrath
  • 20,369 posts
  • LocationBlack Dot in a Sea of Blue

Posted 09 January 2017 - 11:52 PM

Use a wet palette or if you somehow are able to get the technique of the "old masters" paint wet on wet on the miniature (i have tried but never was able to do - my girl got her first miniature painted for 1h and the outcome is still better than anything i ever created)

like mwo its training, training, training - i didn't found much time to paint in the last years to go on painting - but when i did my skill was horrible degraded

Simpe techniques like line highlights and a final wash add some visual fidelity without working on multiple layers - I also think those techniques works best for war machines were you don't need a organic look - they might not stand a closer look but on the table with some distance the miniatures look great

#8 Stelio Kontos

    Member

  • Pip
  • Knight Errant
  • Knight Errant
  • 19 posts

Posted 10 January 2017 - 09:18 AM

Appreciate the tips, especially the Youtube link and knowing about ink pens. The pens might be great.

Biggest problem I'm having is being able to neatly block in "highlight" areas like the raised panels that most mechs have without the ink looking like it was blotched on. I've got some old ones from when I was a kid...a few actually are decent with perfect highlighting(don't remember how I did it). I've also got about a half dozen or so that look like *** and are soaking in a cleaner solution as we speak(including an EBJ and several IS mechs).

Some of the rest I'm already doing, such as priming the mech with several light sprays of gray.I'm a bit **** about that to begin with because I remember losing detail to excess priming.

#9 Anunknownlurker

    Member

  • PipPipPipPipPipPip
  • Bad Company
  • Bad Company
  • 362 posts
  • LocationBetween here and there

Posted 10 January 2017 - 09:31 AM

Pin Wash
If you have lines engraved or recessed into the body of a model, you can use a pretty simple technique - simple but it does require a steady hand - which relies on capillary action to work. With a fine pointed but full bodied brush, you use thinned down black (maybe 4-1 water to paint - this will vary depending on the paint used). With a pretty loaded brush just touch the point at one end of the recessed line, the paint should flow along it without you having to move the brush. This can work on the edges of raised panels too but needs a bit more care to place the tip of the brush in the right place.

Just search for tutorials on Pin Wash on the interwebz!

Regarding primer - take your time and keep an eye on the model. Don't forget, primer is there to give a good "grip" to the main paint and, to a lesser extent, bring out some of the detail to make it clearer to see.

#10 Pariah Devalis

    Member

  • PipPipPipPipPipPipPipPipPipPip
  • The Clan Cat
  • The Clan Cat
  • 7,655 posts
  • Google+: Link
  • Twitter: Link
  • LocationAboard the NCS True Path

Posted 10 January 2017 - 10:30 AM

You can also highlight a panel edge an easier way than manually stroking the line on with the tip of the brush. Simply run the side of the brush along the edge of the panel. Bam. Instant edge highlight that is incredibly thin. Can be difficult to do if the panel in question has insufficient gap between it and things next to it, but it allows for a clean edge highlight.

Some ridiculously old photos of my necrons showing some of the highlight tricks. I also would often go back with a very watered down pass on those highlights, to try and more smoothly blend the harsh line into the color of the main body color.

Spoiler


Drybrushing, by the way, is super simple. Paint the model. Then take a brush that has a lighter highlight color you wish to apply. Clean most of it off the brush with a piece of paper, then lightly run the brush over the surface of the model where you want to highlight. All the raised portions will get a disproportionately higher amount of paint. Not only does it bring out details, but it tends to make the area look weathered.

Edited by Pariah Devalis, 10 January 2017 - 10:33 AM.


#11 Pariah Devalis

    Member

  • PipPipPipPipPipPipPipPipPipPip
  • The Clan Cat
  • The Clan Cat
  • 7,655 posts
  • Google+: Link
  • Twitter: Link
  • LocationAboard the NCS True Path

Posted 10 January 2017 - 10:35 AM

Also, as to that MAD-IIC in your original post, it actually looks like a different technique altogether. It appears to have been subjected to an ink wash. Basically, the entire mech was painted in that metallic gunmetal that you see on the legs, but after the paint dried a teal ink was used on it. Inks tend to tint colors, as opposed to override them like paints. By applying more watered down ink towards the bottom and less watered down ink (or additional coats) towards the top, one can get that transition from gunmetal to metallic teal.

Edited by Pariah Devalis, 10 January 2017 - 10:35 AM.


1 user(s) are reading this topic

0 members, 1 guests, 0 anonymous users