wait, wait, this i a REAL golden Atlas model? shiiiiit, why even paint it?

50 replies to this topic
#22
-

-

- The 1 Percent

- 129 posts
Member
- LocationSoutheast of Disorder
Posted 28 May 2014 - 08:34 AM
Okay I just realized I have a few pics of some minis I worked on/currently working on in my crappy phone. I cannot or have yet to learn how to adjust the camera on this phone compared to a DSLR so the pictures here are crude. For the golem I will take a picture of I will use my DSLR so I can control the settings, especially the flash as it is way too much on these pics.
Also real quick check out a website called fighting pirannha graphics if it has not already been mentioned. You can get decals there in all scales for the different houses/clans/units in the battletech universe as well as a myriad of other decals like black/yellow warning stripes, skulls, etc...
Anyway here is a pack horse sent to me already primed in grey.

Here it is completed and based. Now I took these pictures after my first coat of finish which is "gloss"; I always use gloss first as it is the toughest of the finishes. Then I come back and use dulcoat or other matte finishes on top to kill the gloss/sheen and make it flat.


Here is a hobbit thief I was working on. The good thing about taking pictures is you can find some flaws you cant see sometimes with just your eyes.


Next couple of pictures is a ranger and a warrior. They are supposed to look dirty in case anyone was wondering. With the pictures I could notice the little dab of 2-part epoxy that leaked off the rangers bow hand as I should have pin vised it. The hand part there is very fragile on that mini.


The last picture I had on the camera phone is a spider 5V I am currently working on. He is based in dark military green and washed. I also blocked in the cockpit with the bluish hues I want to use there. Next will be blending/drybrushing/glazing it to flesh out the mini.

P.S. If you noticed in that last picture. I have the spider and splig (miniature from descent journeys in the dark board game) sitting on top of old pill bottle/craft paint bottles. These are great for painting. You put a little of that tacky poster putty on the tops and you do not need to actually hold the minis when painting. which is good to keep oils off the minis and not mess up any paint that is not dry. just a f.y.i thing.
PieRat
Also real quick check out a website called fighting pirannha graphics if it has not already been mentioned. You can get decals there in all scales for the different houses/clans/units in the battletech universe as well as a myriad of other decals like black/yellow warning stripes, skulls, etc...
Anyway here is a pack horse sent to me already primed in grey.
Here it is completed and based. Now I took these pictures after my first coat of finish which is "gloss"; I always use gloss first as it is the toughest of the finishes. Then I come back and use dulcoat or other matte finishes on top to kill the gloss/sheen and make it flat.
Here is a hobbit thief I was working on. The good thing about taking pictures is you can find some flaws you cant see sometimes with just your eyes.
Next couple of pictures is a ranger and a warrior. They are supposed to look dirty in case anyone was wondering. With the pictures I could notice the little dab of 2-part epoxy that leaked off the rangers bow hand as I should have pin vised it. The hand part there is very fragile on that mini.
The last picture I had on the camera phone is a spider 5V I am currently working on. He is based in dark military green and washed. I also blocked in the cockpit with the bluish hues I want to use there. Next will be blending/drybrushing/glazing it to flesh out the mini.
P.S. If you noticed in that last picture. I have the spider and splig (miniature from descent journeys in the dark board game) sitting on top of old pill bottle/craft paint bottles. These are great for painting. You put a little of that tacky poster putty on the tops and you do not need to actually hold the minis when painting. which is good to keep oils off the minis and not mess up any paint that is not dry. just a f.y.i thing.
PieRat
Edited by PieRat, 28 May 2014 - 09:28 AM.
#23
-
-
- The 1 Percent
- 129 posts
Member
- LocationSoutheast of Disorder
Posted 28 May 2014 - 08:52 AM
There is A LOT, a lot of good information in this thread. I really only got a chance just now to go through it as I wrote to long war and peace posts in here and missed a bunch of good information...
Another tip on practicing. Go the dollar general or family dollar and pick up one of those .99 cent bags of plastic army soldiers.... wash them (soap and water)and prime them. You now have an army to practice on. I have done a few reaper bone series minis including the golem I am currently working on and so far as reaper has stated you can paint them without priming. I have heard of mixed results happening though out there on the interwebs. So far though that statement has held up in my experience. As others have said though. Plastic/metal/resin...etc... Wash them good with soap and water first to remove any releasing agent/residue.
Another tip on practicing. Go the dollar general or family dollar and pick up one of those .99 cent bags of plastic army soldiers.... wash them (soap and water)and prime them. You now have an army to practice on. I have done a few reaper bone series minis including the golem I am currently working on and so far as reaper has stated you can paint them without priming. I have heard of mixed results happening though out there on the interwebs. So far though that statement has held up in my experience. As others have said though. Plastic/metal/resin...etc... Wash them good with soap and water first to remove any releasing agent/residue.
#24
-
-
- Elite Founder

- 2,592 posts
Member
- LocationLexington, KY USA
Posted 28 May 2014 - 09:19 AM
Absolutely forgot about the plastic army men. Those things are invaluable for trying to get the transition from skin tone to clothing down as well as painting the tank/jet that sometimes comes with them.
If I get some time this afternoon I will dig out what I still have and see if I can get some good pictures.
If I get some time this afternoon I will dig out what I still have and see if I can get some good pictures.
#25
-
-
- The 1 Percent
- 129 posts
Member
- LocationSoutheast of Disorder
Posted 28 May 2014 - 09:35 AM
 Barantor, on 28 May 2014 - 09:19 AM, said:
Absolutely forgot about the plastic army men. Those things are invaluable for trying to get the transition from skin tone to clothing down as well as painting the tank/jet that sometimes comes with them.
If I get some time this afternoon I will dig out what I still have and see if I can get some good pictures.
If I get some time this afternoon I will dig out what I still have and see if I can get some good pictures.
Yeah I am using army men alot trying out new techniques and stuff. I learned my lesson working on a femalf elf sorceress. Trying to do some layering/blending on her skintone. Totally fouled it up and had to soak it in oven cleaner for a good 4-5 hours to remove the paint and primer (also safe on the plastic reaper bones as well). I do keep simple green around for that now though.
Another tip! Not sure if you use a magnifying glass or reading glasses or anything, but these have become invaluable to me.
magnifying headset
I wish I had those from the beginning. I do not use all 3 lenses I only use the two large square ones and not the little round one. In order to use all three I would have to be holding the mini on top of my nose for it to be in focus. They work excellent and cheap to boot. Pretty much what the old man from toy story 3 used to fix up woody.
I really like that pair there as the light attached up top is adjustable to what angle you need it to be.
Edited by PieRat, 28 May 2014 - 09:44 AM.
#26
-
-
- The 1 Percent

- 102 posts
Member
- LocationLancashire, United Kingdom

Posted 28 May 2014 - 10:36 AM
Some great information here and some excellent models, too!
Regarding the army men practice, I'm suprised I never thought of that before! I'd have to look a bit deeper to find some as I've not seen any in shops around here for years [I'm English]
And nah, I wish it was solid gold.
I just got metallic gold spray paint and thought I'd get a kick from having a gold mech rather than a digital one.
Regarding the army men practice, I'm suprised I never thought of that before! I'd have to look a bit deeper to find some as I've not seen any in shops around here for years [I'm English]
Grimmrog, on 28 May 2014 - 07:35 AM, said:
wait, wait, this i a REAL golden Atlas model? shiiiiit, why even paint it?
And nah, I wish it was solid gold.
I just got metallic gold spray paint and thought I'd get a kick from having a gold mech rather than a digital one.
#27
-
- Bridesmaid

- 3 posts
Rookie
Posted 28 May 2014 - 10:55 AM
I recomend the army men as well, it really helps. Something I found that really helps the mech look better is jewling the cockpit. It is slightly more dificult so you might want to wait till you're comfortable with basic painting but this is well worth the time it takes. There's a good tutorial here to get you started when you're ready. Also before you try this it is helpful to have some really small brushes, 10/0 and 20/0 are what i use, especially on the smaller mechs.
#28
-
-
- The 1 Percent
- 129 posts
Member
- LocationSoutheast of Disorder
Posted 28 May 2014 - 11:03 AM
+1
So agree with the Jeweling technique. It is something I am going to be trying on that spider and the raven minis. +1
So agree with the Jeweling technique. It is something I am going to be trying on that spider and the raven minis. +1
#29
-

-
- The Seeker

- 8,586 posts
Member
- LocationSeraphim HQ: Asuncion

Posted 28 May 2014 - 12:28 PM
Well... I probably can't say anything that hasn't already been said here. However, I'll say what I do with my own painting.
Personally, I used Americana paints, as I find them thin and smooth enough to apply well to my models. I also sometimes throw in a Citadel wash over some parts/models. I paint up personally a variety of models, from Warhammer 40k, Warhammer (fantasy), Firestorm Aramada, and even Battletech minitures.
For Battletech models, I like to do a "panel" effect on them to help increase the look of replaced panels or panels that got painted with a "near same" color. How I do this is I will paint up my model with my base color. Then, with a color that is almost the same color (like if I did an off white (Americana Bleached Sand), I'd "panel" with a pure white (Americana Snow (Titanium) White)). From there, I do any lines or cammo workings over my base coat.
I also tend to do an edging over some panels or, well, edging. I normally try to "pick a light direction" and hit the edges that would face that light with a brighter color (and/or hit the other side with a darker color if I don't have a suitable brighter color). I have even been known to edge with a light source color (like if it was a "yellow" light I wanted hitting the mech, I'd edge with a yellow (Americana Bright Yellow is great for this, as it tends to apply very thin, blending with the colors underneath it).
If you know what a "dry brushing" technique is, I also sometimes (depending upon what effect I wish to do) preform this on my models. Dry brushing is great for pulling textures out in a model, such as hair as an example. Can also be useful in thin lines for a nice blended cammo effect. (I even painted up my Dark Angels with a starting of a blue color, and then dry brushed several greens on them. Looking at the end result, you get some nice green colors, with the darker crevasses being a dark blue color, making it look really nice.)
I'll post my Battletech (unfinished) crab colors (I call them my Ghosts of Avalon colors), and link my other examples for viewing.
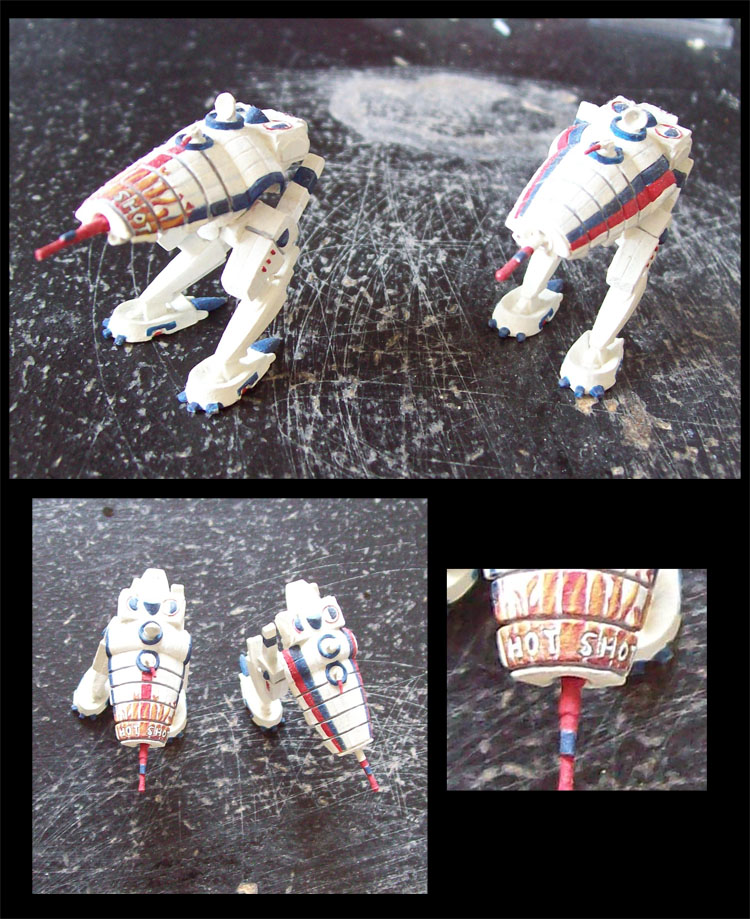
These Crabs are waiting (or at least one is) for me to create some custom arms, to make Alex's drawing of the Crabs (which have been floating around the MWO forums for a while). These crabs had edging, paneling and drybrushing done on them for a base coat. The white (which is hard to photograph by the way) was Bleached Sand base, with a snow white drybrushing, then with some panels pulled out with Snow White. I edged with a slate gray in the shadowy recesses. I did the same (minus the drybrushing) with the red and blue sections as well, with a similar blue and red color "panel" job. (Lance Commander for my Crabs has FLAMES! If you are interested in flame work, I can explain how I did that, maybe even make a tutorial for it... It's actually very easy.)
A better example of panel work (with edging). White doesn't photograph all that well... so here is an example with black. (And the first model I did a "panel" effect on too.) This is a model from a game called Firestorm Armada. Look closely at the blues and black/grays... You want the colors to typically be close.
http://tesunie.devia...F24798988&qo=19
Drybrushing example:
http://tesunie.devia...ocess-209325848
(Stone work, with dry brushing from black all the way to a light gray. Blue glazing used in the crevasses. Tree "things" was black base with brown dryburshings (bark) and green drybrushings (leaves).)
http://tesunie.devia...F24798988&qo=32
Drybrushing for a Cammo type effect:
http://tesunie.devia...2F24798988&qo=0
A black wash on neutral gray with a slate gray drybrush:
http://tesunie.devia...2F24798988&qo=3
Edging example (With a lot of "glass sensor" effects, not mentioned here. Geming article probably covered this already):
http://tesunie.devia...F24798988&qo=17
To view more of my work, click this link. It should send you to my Miniature Model collection in my Deviant Art account...
http://tesunie.devia...allery/24798988
(Sorry if it looks like I'm trying to show off. Hard to show what I mean without, well... showing what I do... )
Personally, I used Americana paints, as I find them thin and smooth enough to apply well to my models. I also sometimes throw in a Citadel wash over some parts/models. I paint up personally a variety of models, from Warhammer 40k, Warhammer (fantasy), Firestorm Aramada, and even Battletech minitures.
For Battletech models, I like to do a "panel" effect on them to help increase the look of replaced panels or panels that got painted with a "near same" color. How I do this is I will paint up my model with my base color. Then, with a color that is almost the same color (like if I did an off white (Americana Bleached Sand), I'd "panel" with a pure white (Americana Snow (Titanium) White)). From there, I do any lines or cammo workings over my base coat.
I also tend to do an edging over some panels or, well, edging. I normally try to "pick a light direction" and hit the edges that would face that light with a brighter color (and/or hit the other side with a darker color if I don't have a suitable brighter color). I have even been known to edge with a light source color (like if it was a "yellow" light I wanted hitting the mech, I'd edge with a yellow (Americana Bright Yellow is great for this, as it tends to apply very thin, blending with the colors underneath it).
If you know what a "dry brushing" technique is, I also sometimes (depending upon what effect I wish to do) preform this on my models. Dry brushing is great for pulling textures out in a model, such as hair as an example. Can also be useful in thin lines for a nice blended cammo effect. (I even painted up my Dark Angels with a starting of a blue color, and then dry brushed several greens on them. Looking at the end result, you get some nice green colors, with the darker crevasses being a dark blue color, making it look really nice.)
I'll post my Battletech (unfinished) crab colors (I call them my Ghosts of Avalon colors), and link my other examples for viewing.
These Crabs are waiting (or at least one is) for me to create some custom arms, to make Alex's drawing of the Crabs (which have been floating around the MWO forums for a while). These crabs had edging, paneling and drybrushing done on them for a base coat. The white (which is hard to photograph by the way) was Bleached Sand base, with a snow white drybrushing, then with some panels pulled out with Snow White. I edged with a slate gray in the shadowy recesses. I did the same (minus the drybrushing) with the red and blue sections as well, with a similar blue and red color "panel" job. (Lance Commander for my Crabs has FLAMES! If you are interested in flame work, I can explain how I did that, maybe even make a tutorial for it... It's actually very easy.)
A better example of panel work (with edging). White doesn't photograph all that well... so here is an example with black. (And the first model I did a "panel" effect on too.) This is a model from a game called Firestorm Armada. Look closely at the blues and black/grays... You want the colors to typically be close.
http://tesunie.devia...F24798988&qo=19
Drybrushing example:
http://tesunie.devia...ocess-209325848
(Stone work, with dry brushing from black all the way to a light gray. Blue glazing used in the crevasses. Tree "things" was black base with brown dryburshings (bark) and green drybrushings (leaves).)
http://tesunie.devia...F24798988&qo=32
Drybrushing for a Cammo type effect:
http://tesunie.devia...2F24798988&qo=0
A black wash on neutral gray with a slate gray drybrush:
http://tesunie.devia...2F24798988&qo=3
Edging example (With a lot of "glass sensor" effects, not mentioned here. Geming article probably covered this already):
http://tesunie.devia...F24798988&qo=17
To view more of my work, click this link. It should send you to my Miniature Model collection in my Deviant Art account...
http://tesunie.devia...allery/24798988
(Sorry if it looks like I'm trying to show off. Hard to show what I mean without, well... showing what I do... )
#30
-
-
- Elite Founder
- 2,592 posts
Member
- LocationLexington, KY USA
Posted 28 May 2014 - 01:09 PM
Tesunie, your beastman is contest worthy from the pictures I saw and your Tau are super clean. Well done.
#31
-

-
- Knight Errant

- 240 posts
Member
- LocationUTAH
Posted 28 May 2014 - 01:39 PM
I've not painted anything in a while, but 1. wash your minis before and after assembly in a mild detergent. 2. good primer. 3. good paints. 4. thin paints (milk-like consistency). 5. good brushes (don't remember a name to drop here, but my favs have a triangle shaped handle). Good luck!


#32
-
-
- The Seeker
- 8,586 posts
Member
- LocationSeraphim HQ: Asuncion
Posted 28 May 2014 - 02:17 PM
Barantor, on 28 May 2014 - 01:09 PM, said:
Tesunie, your beastman is contest worthy from the pictures I saw and your Tau are super clean. Well done.
Why thank you.

(I was trying not to show too much off, which was why I did links. The focus of this thread should be the OP's work, and Battletech related works...)
I wont tell you how easy those Beastmen are to paint up... Cause then you probably wouldn't believe me or it would take away from the piece...
I've worked a long time in my painting. I still need to find a way to do "chipped paint" effects. I think I know how, but I haven't had the gumption/courage to try it yet...
#33
-
-
- The 1 Percent
- 129 posts
Member
- LocationSoutheast of Disorder
Posted 28 May 2014 - 03:17 PM
More pictures!!! 
Some sweet Mech mini's in here! I also agree with using craft paints. As stated earlier here is the Golem I am working on. I am debating on moving on to finish his loin cloth then going in for the details of the face, etc.. or doing one more round of an extreme highlight. I wanted to post the pics of this at this stage to show what you can do with just the craft acrylic paints. I prefer the Delta Ceramcoats and also the Americanas that I will post a picture of here that I have used so far in the painting of this mini. I also have some Folkart, and Anitas as well, but do not like them compared to the previous two I mentioned, as I find the consistency of the last two not the same.
Here is the paints used so far at this stage of the Golem.

Here is the results so far as I still have a lot more to do to this mini. Just a side note also. This is one of the Reaper Bones line. They are plastic and Reaper claims no priming is necessary. In regards to that this mini was not primed, and I am finding so far in the couple of Bones I have done so far that they do not need it, though YMMV.
Front of Golem.

Back of Golem

You can see on the back of the Golem there is a spot or two that resulted in "pits" from the molding process. I should have used modeling putty and filled them in. Alas I did not and you can spot that flaw. As I am doing this one mainly for my son to mess around with I am probably not going to go back and fix it. That is one thing I need to get better at is the preperation (removing flash and filling molding flaws) after a wash and before painting. Past that I am pretty happy with the results so far. I do need to go back and touch up where some of the brown paint on the loin cloth had contacted the thighs.
Anyway the process so far in this one was to make a wash (not soap and water kind) of the dark brown and the orange paints and gave it a couple good washes to work in the shadows, then I did about 3 layers of dry brushing on top of that going light in orange color each time to flesh out the body and highlights. I just started working on the loin cloth so it is not as detailed yet.
So if you cannot locate some of the higher end miniature/model paints do not overlook the better craft store acrylics out there. Mainly Ceramcoat and Americana. One more note on that. I tend to stay away from the Martha Stewart line of paints as they all are like either pearlized, gloss, etc.. There are uses for the pearlized ones, but Ceramcoat and Americana make those as well. Anyway her line does make one paint called "brushed pewter" That is one damned good slightly metallic paint. I have used it on shields and armor and it is pretty darn good.
PieRat
Some sweet Mech mini's in here! I also agree with using craft paints. As stated earlier here is the Golem I am working on. I am debating on moving on to finish his loin cloth then going in for the details of the face, etc.. or doing one more round of an extreme highlight. I wanted to post the pics of this at this stage to show what you can do with just the craft acrylic paints. I prefer the Delta Ceramcoats and also the Americanas that I will post a picture of here that I have used so far in the painting of this mini. I also have some Folkart, and Anitas as well, but do not like them compared to the previous two I mentioned, as I find the consistency of the last two not the same.
Here is the paints used so far at this stage of the Golem.
Here is the results so far as I still have a lot more to do to this mini. Just a side note also. This is one of the Reaper Bones line. They are plastic and Reaper claims no priming is necessary. In regards to that this mini was not primed, and I am finding so far in the couple of Bones I have done so far that they do not need it, though YMMV.
Front of Golem.
Back of Golem
You can see on the back of the Golem there is a spot or two that resulted in "pits" from the molding process. I should have used modeling putty and filled them in. Alas I did not and you can spot that flaw. As I am doing this one mainly for my son to mess around with I am probably not going to go back and fix it. That is one thing I need to get better at is the preperation (removing flash and filling molding flaws) after a wash and before painting. Past that I am pretty happy with the results so far. I do need to go back and touch up where some of the brown paint on the loin cloth had contacted the thighs.
Anyway the process so far in this one was to make a wash (not soap and water kind) of the dark brown and the orange paints and gave it a couple good washes to work in the shadows, then I did about 3 layers of dry brushing on top of that going light in orange color each time to flesh out the body and highlights. I just started working on the loin cloth so it is not as detailed yet.
So if you cannot locate some of the higher end miniature/model paints do not overlook the better craft store acrylics out there. Mainly Ceramcoat and Americana. One more note on that. I tend to stay away from the Martha Stewart line of paints as they all are like either pearlized, gloss, etc.. There are uses for the pearlized ones, but Ceramcoat and Americana make those as well. Anyway her line does make one paint called "brushed pewter" That is one damned good slightly metallic paint. I have used it on shields and armor and it is pretty darn good.
PieRat
#34
-
-
- The Seeker
- 8,586 posts
Member
- LocationSeraphim HQ: Asuncion
Posted 28 May 2014 - 03:37 PM
Folkart is a thicker paint. If you use it, it will work in a single coat, but may "mask" details within the model. (It's also more durable sooner.) They work well for a base coat, but I'd suggest Americana pesonally. Ceramcoat has given me problems with extremely weak paint that flaked off when "looked at" it seemed. (I love their Quaker Gray, and was using that on my Tau. But it kept flaking off. I now use Citadel Administratum gray layer paint. It goes on smoother and stays on, but is more expensive and I don't feel it is worth the extra expense. Citadel paints tend to dry easily in their "pots"... I hate them for that, but otherwise are nice paints.)
I have to admit something... I don't wash my model pieces (like I should to get the releasing agent off) and I don't primer them unless they are metal... I should do each, but...
A wash is very water downed paint. I tend to sometimes do what I refer to as "wet painting". I'll get paint on my brush, and then dip it into water. Then either start painting or mix it a little on my painting board to even out the water and pigment. I find this to be good with lenses and glass effects, as well as some other effects here or there to help blend two (or more) colors together.
For metallics, I like to do an actual shiny metallic paint, such as silver, copper or gold (even brass). I tend to do a matching base coat, such as a gray under the silver, for large areas of metallic paint. After I get a coat of metallic (and sometimes just a drybrushing of it over the base coat (for silver) is all you need) on, I'll take a citadel wash (normally black for silver, and brown for gold. Copper depends upon the effect I want, normally black) over it. This helps to tone down the brightness and gloss of the metal paint. Makes for a great silver or gold at least. (Look at my Beastmen for Copper and a black wash.)
last thing (for this post). Folkart does produce some nice metallic paints as well as Ceramcoat. (I find that base acrylic paints are great for modeling tasks. I will mention, the longer they sit and dry, the stronger the paints seem to become. My older models no longer scratch and chip, but newly painted (within a month normally) seem to sometimes chip easily.) (Another tip for protecting models, strangely enough, is to place a citadel wash over your base coat (if it will work for your colors). It not only tends to help bring out the details, but it seems to strengthen the base coat of paint and make it nearly unchipable. I haven't had a Beastmen chip his paint yet!)
#35
-
-
- The 1 Percent
- 129 posts
Member
- LocationSoutheast of Disorder
Posted 28 May 2014 - 03:38 PM
Oh man those are some bad @ss paint jobs there. Thanks for the link to your gallery. I still have much to learn and work on and looking at what others have done just helps in the whole learning process!
I have not tried Folk Arts metallics. I will definitely take a look at them. I guess to a degree it can be hit or miss on the craft acrylics. I have yet to have a issue with the Ceramcoats, but it might be color dependent on them, or just bad quality control sometimes. I also as stated love the Americanas as well.
Also and more for fun especially if you have kids that like painting minis, etc... Some of the craft acrylics make neon, and glow series. My 2 boys have an interesting collection of neon rainbow glowing in the dark elves,robots,dragons, etc... Kids will eat that stuff up!
Edited by PieRat, 28 May 2014 - 03:46 PM.
#36
-
-
- The Seeker
- 8,586 posts
Member
- LocationSeraphim HQ: Asuncion
Posted 28 May 2014 - 03:40 PM
PieRat, on 28 May 2014 - 03:17 PM, said:
Removed to length
That looks like a lot of drybrushes... And the "dots" in the back don't look bad. I tend to find I can't see any mold lines (or the sneaky ones) or pits like that until I at least have a base coat, if not a drybrushing into the project. Then I'm wishing I had fixed it before I put all that work in. (Be thankful it wasn't a first gen Citadel "finecast" piece of garbage, I mean wonderfully sculpted model... Stupid eagle was missing half his forehead... among the misaligned center torso piece...)
#37
-
-
- The Seeker
- 8,586 posts
Member
- LocationSeraphim HQ: Asuncion
Posted 28 May 2014 - 03:44 PM
PieRat, on 28 May 2014 - 03:38 PM, said:
Oh man those are some bad @ss paint jobs there. Thanks for the link to your gallery. I still have much to learn and work on and looking at what others have done just helps in the whole learning process!
Hey. What I've seen of your pictures, you do a nice job too. PS: That hobbit you posted... I have the same exact model. I painted him back when I was using model oil paint... till I got tired of the lack of selection...
Art is a never ending project. It is a skill one can never truly "master", as you will always have something more and new to learn.
#38
-
-
- The 1 Percent
- 129 posts
Member
- LocationSoutheast of Disorder
Posted 29 May 2014 - 04:27 AM
Just some added tip/fun info here for anybody getting into this. There is a product out there called "instant mold". You can buy it from the cool mini or not store or like I did find a seller on Ebay. This stuff is the awesome sauce. It comes in sticks. You get I forgot how many to a pack. Anyway they are about as thick as a 5 stick pack of chewing gum and made of a silicone material. The great thing about them is you drop them in hot water and after a few seconds to a minute they turn into a non-stick silicone putty that you can mold items with. A lot of miniature hobbyist use them to mold replacement parts, etc... for their minis. Supposedly some put there are making complete molds of minis. Not sure the legal implications of that but it is also almost a morals type of thing.
Anyway nothing sticks to this molding material...Nothing sticks to this stuff...seriously. No releasing agent like baby powder/corn starch or anything is needed. Some people actually make their parts with super glue. That is how non-stick this stuff is. And if you are done using the stuff as a certain type of mold you can put it back in hot water and re-shape and re-use over and over.
Reason I a talking about this is I have always preferred using the metal hex-shaped battletech bases. These can be hard to come by from time to time. So I finally decided to mold one and it has been great. I make the home made bases out of 2-part 5 minute setup epoxy putty like the Loctite stuff. Also have made bases with oven bake clay from the craft stores, and even 2 part liquid epoxy. I have used some of the bases in the pictures I posted. Anyway just more f.y.I. stuff to add here.

PieRat
Anyway nothing sticks to this molding material...Nothing sticks to this stuff...seriously. No releasing agent like baby powder/corn starch or anything is needed. Some people actually make their parts with super glue. That is how non-stick this stuff is. And if you are done using the stuff as a certain type of mold you can put it back in hot water and re-shape and re-use over and over.
Reason I a talking about this is I have always preferred using the metal hex-shaped battletech bases. These can be hard to come by from time to time. So I finally decided to mold one and it has been great. I make the home made bases out of 2-part 5 minute setup epoxy putty like the Loctite stuff. Also have made bases with oven bake clay from the craft stores, and even 2 part liquid epoxy. I have used some of the bases in the pictures I posted. Anyway just more f.y.I. stuff to add here.
PieRat
Edited by PieRat, 29 May 2014 - 04:31 AM.

#40
-
- Bridesmaid
- 3 posts
Rookie
Posted 29 May 2014 - 02:03 PM
Tesunie an easy way to do paint chiping is to use the foam pannels that come in most blister packs.tear a small peice off dip it in a metalic paint then remove most of the paint the way you would for a dry brush. Then you dab the faom on the mini around the joints were there would be a lot of rubbing, and any where else you want the effect. then you go in with a small brush and highlight/shade to give the illusion of depth. there are some good tutorials/demos here, here and here. I have used all of these techniques at various times.


1 user(s) are reading this topic
0 members, 1 guests, 0 anonymous users


