Vulture 3D model attempt
#1
Posted 07 January 2012 - 03:49 PM
Okies... here is my second attempt to throw up my Vulture 3D model. I was afraid that the naked girl nose art would be too risky for the site, but I thought to myself, 'They're cartoon *******... they should be ok.' Well, I was wrong, and the good folks here told me so! So here is my Censored Vulture 3D model, sans boobies. Done while I'm attempting to learn Maya with low detail levels. I just wanted to get the basic shape, test out some UV options/tactics, Photoshop, etc. Logos done in photoshop, as was the camo pattern. The female is a doctored Heavy Metal clip art, which seemed to fit what one might find on a Mech, sort of like the nose art on a WWII heavy bomber. Hope you like it, and those in the know can feel free to comment on my edge loops, etc. I'm open to suggestions.
#2
Posted 07 January 2012 - 03:55 PM
#3
Posted 07 January 2012 - 03:56 PM
#4
Posted 07 January 2012 - 03:56 PM
#5
Posted 07 January 2012 - 03:57 PM
#6
Posted 07 January 2012 - 03:59 PM
#7
Posted 07 January 2012 - 04:03 PM
#8
Posted 07 January 2012 - 05:33 PM
#9
Posted 07 January 2012 - 05:52 PM
#10
Posted 08 January 2012 - 05:28 AM
I'm a professional Maya artist, so if you want any help, give me a shout.
Tal.
#11
Posted 08 January 2012 - 08:29 AM
#12
Posted 08 January 2012 - 03:15 PM
#13
Posted 08 January 2012 - 04:02 PM
It is a plain old Lambert shader, Webclaw, with multiple parts grouped together, much like a model kit. Since making this I have learned about other, more flexible shaders, though. Maj. D. Winters is indeed a tip of the hat to Band of Brothers. I thought he was such a great center piece to the whole series. Glad you picked up on that, Teacher. Here is the frontal shot that Wulfbane was looking for, side by side with my ref image. Looking at them side by side, it really points out some of the flaws I made! Great suggestion, Wulf.
#14
Posted 08 January 2012 - 04:04 PM
Edited by StaggerCheck, 08 January 2012 - 04:07 PM.
#16
Posted 08 January 2012 - 04:29 PM
Karyudo-ds, on 08 January 2012 - 04:10 PM, said:
LoL Kary,
Yes, I was refering to "Proportionality" of the mech in reference to the video not the actual content. It was a good low/no budget short film though that was released back in the day....I think it was released in about 2004ish?
#17
Posted 08 January 2012 - 04:45 PM
StaggerCheck, on 08 January 2012 - 04:04 PM, said:
It depends how you want to display the finished model. If you intend on rendering it, then I would recommend a layered shader that has a metalic lower layer and then put your paint on top and use an alpha map to weather the edges, essentially causing the upper layer to become invisible at the edges, revealing the metallic properties underneath.
Alternatively, you can do the same thing in photoshop, outputting a single colour map that can be used in something like a Blinn, and control the shininess of the worn away metallic edges using a specular map. There are a number of tutorials if you google them, but this is an excellent one and really not as complex as it first appears:
CGTALK Hard Surface Texturing Tutorial.
Personally I don't really like Maya's renderer and as I'm a game modeller, I've taken to using CGFX shaders and simply taking a screengrab of the viewport as the results are actually better! This isn't good enough if you want a full-on scene render with global illumination and all that malarky, though.
It's the start of a long and challenging road, but I admire you for it. Far too many people stop after modelling the mesh and won't even try texturing.
As I say, any questions, just post them here or PM me. I'm happy to help.
Tal.
Edited by Taliesin, 08 January 2012 - 11:32 PM.
#18
Posted 08 January 2012 - 05:50 PM
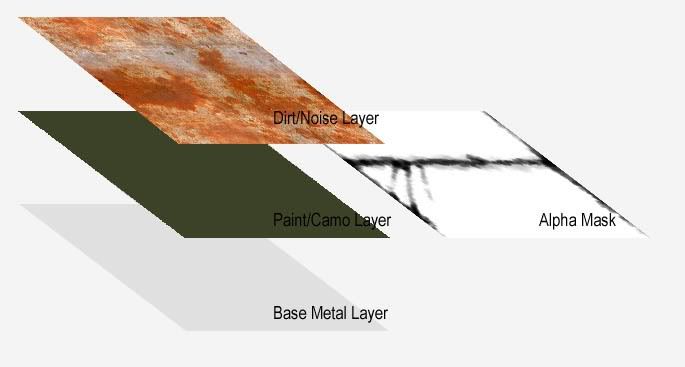
Start in Photoshop with a base metal colour (ie grey), then place a new layer on top with the paint colour - camoflage if you like. On this layer, add a quick mask and use it to paint in weathering using a nice rough brush. Paint in black on raised edges to allow the metal/grey layer to show through. I prefer to use a mask like this rather than using the eraser brush because it's a simple matter to restore the paint layer at a later date by simply painting it back in white. On top of this, paste in a nice dirt/noise layer and set it to soft light and drop it's opacity. Essentially you want just a hint of it to add some natural variation to the surface.
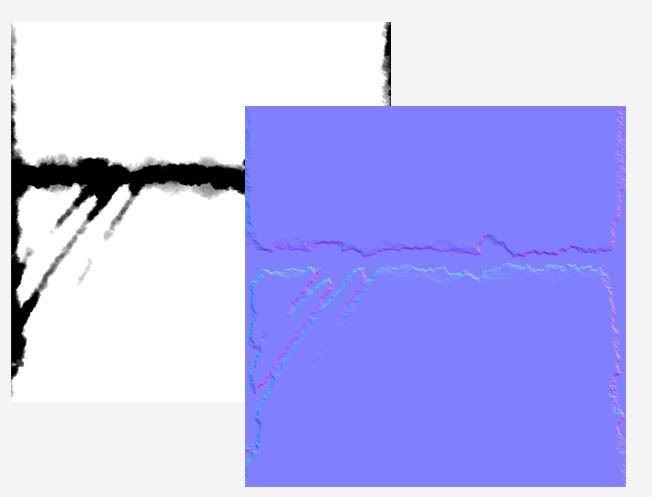
Next, to create the Normal Map, copy the transparency mask you created on to a new layer and increase the contrast. Use an adjustment layer for this to avoid permanent alteration of the original mask. It also allows you to tweak the intensity of the Normal Map back and forth without damaging the original layer. Then use a filter to turn the grayscale image into a normal map: NVIDIA do a free one for Photoshop, or get a copy of xNormal (also free) that installs better Normal filters into Photoshop.
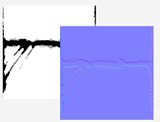
Finally, copy the alpha mask again and invert it to create a specular map where the exposed areas are shiny and the painted areas not so much. The end result is something like this:
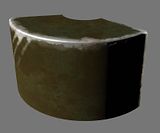
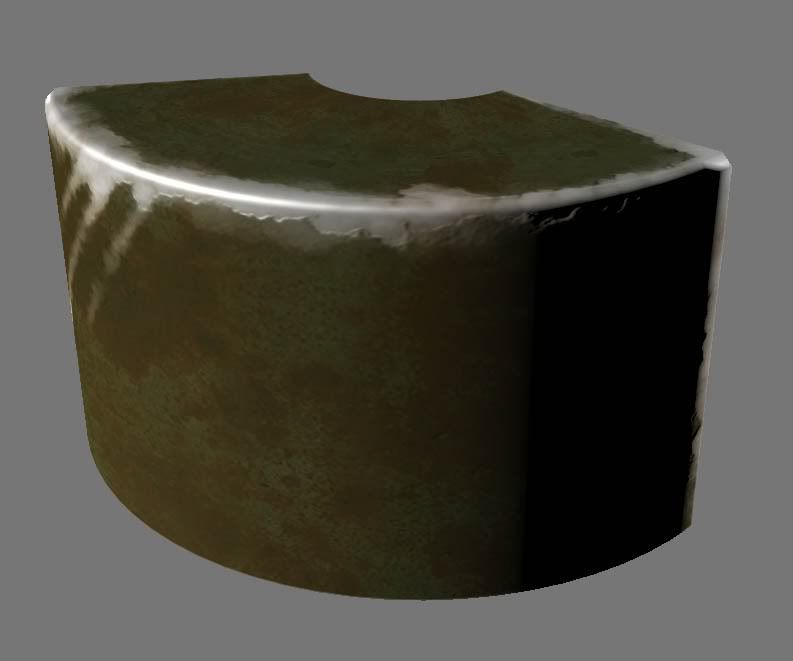
As I say, it's quick and crude and the 'metal' looks more like marble but it gives you an idea of where to start. You can further refine it by experimenting with dirt/noise layers, not only on the colour map but on the specular and normal layers too to create chips, dents and scratches. At a later date, you can lay in the decals using the same technique on a higher layer.
Again, any questions, ask away.
Tal
[Thumbnailed the images because the post felt a bit hijacky]
Edited by Taliesin, 08 January 2012 - 11:23 PM.
#20
Posted 08 January 2012 - 11:31 PM
The CGFX shader I use is by a chap called Leocov. It's his 'uber shader' - lcUberShader_3.0.cgfx that's simple to use and has an extensive range of options - hence the name.
Tal
1 user(s) are reading this topic
0 members, 1 guests, 0 anonymous users