
3D Printing...Welcome to the XXIst century. This is just one of the things that is changing society. Some for the good...some for the bad.

3D Printing Fun
Started by Reven, Mar 28 2015 06:49 AM
87 replies to this topic
#22
-

-


- 1,492 posts
Member
- LocationLost in The Warp

Posted 30 March 2015 - 07:05 PM
If a Battlemaster one happened to show up in a package at my house.........
#23
-
-
- The People's Hero

- 33 posts
Member

Posted 30 March 2015 - 07:47 PM
 LordLosh, on 30 March 2015 - 06:39 PM, said:
mind sharing what printer you have or helping me pick a starter printer? This is something i would really like to start doing.
LordLosh,
There are quite a few different printers out there. My experiences have been really just with my Printrbot Simple and a few different Makerbots at work and the one I have at home.
First off there are two primary materials most commonly used in the standard Fused Filament / Filament deposition style printers right now; PLA or polylactic acid (organic plant-based plastic) or ABS which is the same plastic lego's are made from. Both types of plastic have advantages and disadvantages.
ABS requires a heated printing bed and hopefully a fully enclosed printing area (for decent results) which will typically increases the printer cost...I prefer ABS as I prefer its finish and feel.
PLA is simpler to print with and I would recommend it unless you're 100% certain that you are willing to shell out nearly $1,000 for a hobby (without trying it first).
That said, the Printrbot Simple or Metal simple are a great place to start. Check them out on Amazon for pricing. They are pretty accurate and I've enjoyed mine. The best part for me was that I bought a kit. It takes longer to get it printing, but because I built it myself, I know how it works intimately and can tell when something is wrong and how to fix it myself.
It was this knowledge that allowed me to salvage the damaged Makerbot printer I got free and repair it.
I've also heard about the XYZ Da Vinci as being pretty good as well and I've seen it in action at a local store here.
Lastly, don't skimp on the filament. For both PLA and ABS it should cost around $30 / kg. The really cheap stuff is that, really cheap and you'll waste alot of it trying to get it to work. That said, there is some bad filament at the higher price too. So do some research on seller...you can't go wrong with Makerbot filament. It's the best I've worked with so far (the yellow in the images above was Makerbot), BUT it is about 50% more expensive ($48 / kg)
Sorry for the book.
Edited by Reven, 30 March 2015 - 07:48 PM.
#24
-

-
- Knight Errant

- 446 posts
Member
- LocationDetroit
Posted 31 March 2015 - 02:35 AM
Mech42Ace, on 30 March 2015 - 06:40 PM, said:
Very nice work! I admire your work on the yellow, I know how tough a color it is to get right! Did you hand paint the aces wild symbol, It turned out very nicely.
Thanks!
Both the yellow and the white were done with the thin and lots of layers technique. I did the base yellow first, then a very light grey for the white side, then the lighter yellow and white. Finally I put the black line down the middle. If you look real closely that line is also down the seam from the join. It's one of the tricks you can use to help cover the 3D printing minor issues.
As for the AW symbol, it's hand painted. Small brush, concentrate on the main color locations, the viewers mind will often fool them and add in the rest of the detail. For instance while the cards are there, they aren't really perfect dimensions, and the symbols on the cards are just small dots of the right color.
#25
-

-
- Bad Company

- 428 posts
Member
- LocationPoland
Posted 31 March 2015 - 02:44 AM
Wow amazing 
Waiting for more
Waiting for more
#26
-

- 1 posts
Rookie
Posted 31 March 2015 - 08:15 AM
Hi guys!
I hop on this thread and share some of my 3D printed mechs.
But first: great work Reven and TheFuzzyBunny!
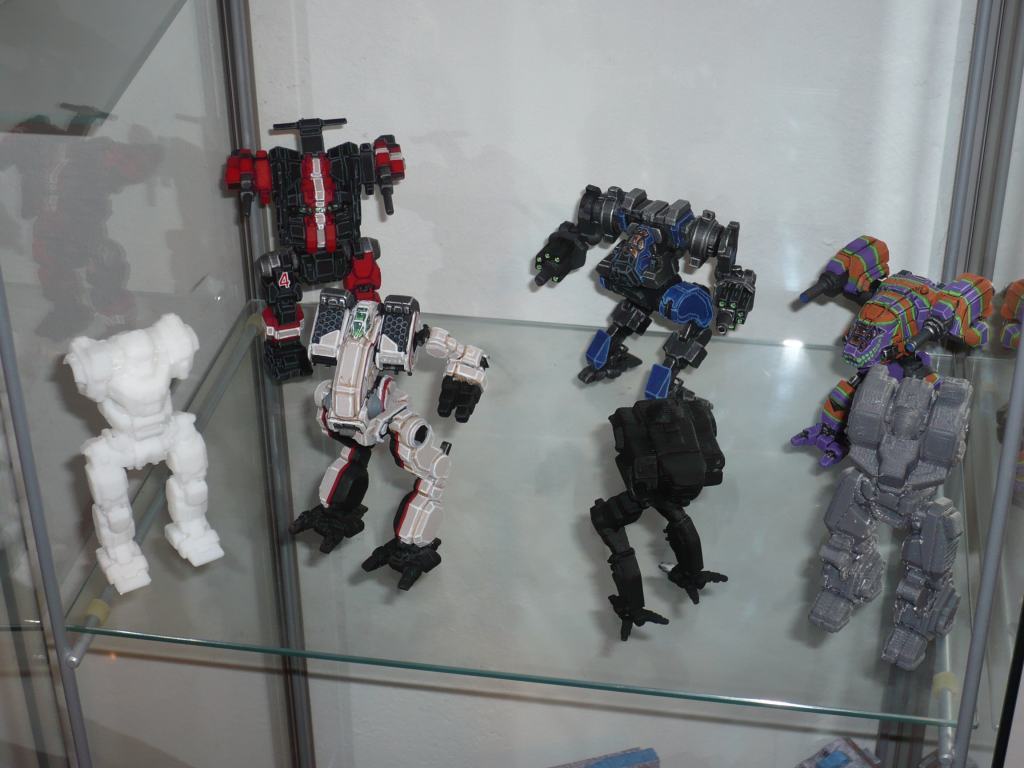
Jager is finished. Jester, Vulture and Nova are in painting stage. Hellbringer, cicada and kintaro are in "production".
Weapon config on all my mechs is Fantasy, just what I liked most in terms of optic.
Greetings from Germany!
stomtom
I hop on this thread and share some of my 3D printed mechs.
But first: great work Reven and TheFuzzyBunny!
Jager is finished. Jester, Vulture and Nova are in painting stage. Hellbringer, cicada and kintaro are in "production".
Weapon config on all my mechs is Fantasy, just what I liked most in terms of optic.
Greetings from Germany!
stomtom
#27
-

-
- Ace Of Spades
- 437 posts
Member
- Locationbottom left of canaduh
Posted 31 March 2015 - 09:58 AM
beautiful stuff all.
It would be amazing however if these files were made available for anyone to print their own.
It would be amazing however if these files were made available for anyone to print their own.
#28
-
-
- Bad Company
- 917 posts
Member
Posted 31 March 2015 - 11:36 AM
Beautiful work stomtom! Would it be possible to get up close pictures of the nova, vulture and jester? I'd like to see them.
#29
-
-
- The People's Hero
- 33 posts
Member
Posted 31 March 2015 - 01:21 PM
Stomtom, I love the Nova especially! Nice work on the arm lasers.
Are you using PLA / ABS or something else to print them in?
Thank you for sharing!
Are you using PLA / ABS or something else to print them in?
Thank you for sharing!
#30
-
-
- The Sureshot

- 10,282 posts
Member
- LocationNAIS College of Military Science OCS courses
Posted 31 March 2015 - 01:53 PM
Marack Drock, on 31 March 2015 - 01:23 PM, said:
I'd like to know what they use to extract the Computer models from the game files.
Me too, if I knew, then I could use some of the 7 axis machines at work, (during down time) to bang off some models
#31
-
-
- Overlord

- 1,964 posts
Member
Posted 31 March 2015 - 02:09 PM
Reven, on 28 March 2015 - 03:04 PM, said:
Sorry no articulation. My skills/modeling tools are not up to the challenge...at least for the moment.
Valcrow, the maker of fully articulated models is my hero!
Long term intentions are for my 4 battletech obsessed boys and I to have a tabletop game that is no longer the size of a table but the size of a large living room with these mechs.
I've already printed an extra large hex for the Ember and mounted it there...ready to play.
Did you forget to equip the arm actuators?
#32
-
-
- The People's Hero
- 33 posts
Member
Posted 31 March 2015 - 04:01 PM
Alright, in this same forum exists a fantastic post to help you extract the game files. I still need to put together a thread on the process I use after getting the files in the basic .obj format and how I make them "printable".
This link takes you to the topic on using the PGI assets.
http://mwomercs.com/...ing-pgis-mechs/
This link takes you to the topic on using the PGI assets.
http://mwomercs.com/...ing-pgis-mechs/

#34
-
-
- The People's Hero
- 33 posts
Member
Posted 03 April 2015 - 07:22 PM
So as I had promised, here is my step-by-step process to creating 3D printable files from the MWO game assets.
Let me preface this by saying that I am not an expert, this is the result of much trial and error on my part. If you have other ways to accomplish the same thing, I WELCOME any improvements / suggestions. Please share…I would love to get better at this.
Software tools used:
Netfabb - http://www.netfabb.com/basic.php
Meshmixer - http://www.meshmixer.com/
First step: Get the files into .obj format.
Rather than rewriting what has already been documented amazingly well, the process I use is virtually identical to what is outlined in the following thread below.
http://mwomercs.com/...ing-pgis-mechs/
Step two assemble the .obj files.
So I am a bit on the paranoid side and not an adept coder, so I use a manual process for this with the tool netfabb Basic. I am well aware that there are tools available to auto-position each of the parts, but I don’t like running code from the interwebs on my computer
I assemble and repair each of the following parts independently:
1 – Torso and pelvis
2 – Arms, if symmetric, just one and then mirror it, if asymmetric got to do the work
3 – Legs as they are always symmetric, I just build one then mirror it, unless I’m going with an asymmetric pose.
An item to note is that I like to determine the mech weapons configuration I plan on using prior to beginning and creating a folder with only the .obj’s I need to avoid cluttering up the project.
I’ll demonstrate with a Battlemaster torso/pelvis as I’m working on this model right now for a unit-mate of mine. The nice part about the torso’s is that they are for the most part already properly positioned and need very little tweaking. The hips / pelvis are another story though.
First I’ll add each of the base torso .obj’s into my netfabb project as shown below:
So I like to start with the Center torso front (remember to add both front and back), but order really doesn’t matter

So all these parts here in the center, right and left torso’s require no movement as they load up perfectly aligned as shown in the image below.

Now for the pelvis and “twist”. As you see in the picture here, these parts are not positioned properly relative to the torso’s. I’m certain that this is because they are part of a different in game object that animates separately.

I then shift the parts away from the main model and lay them out. Very important at this point to have a good reference. I usually will have MWO booted up to have the basic model laid out to get an idea of how the parts are positioned.

I then adjust the parts until they match my reference AND also try to block off any non-solid faces (they show up as red in nettfabb). This is one area where I try to help make the model more “watertight” through minor adjustments.

As you see in the image below, I like to increment in movements of 0.1mm based upon the initial model scale. I adjust to a more fine movement if needed. The parts WILL and SHOULD overlap.

This next step is one I’ve recently tried and doesn’t always work well. I take each individual component and “repair” them using the nettfabb default repair. This tries to address the biggest problem I’ve experienced in getting parts “printable”…making them watertight, without “fattening” up the parts and making the model look like a marshmallow.


Go through each individual component and apply these repairs.
Once all the individual components are repaired, the next step is to combine the parts together. This is accomplished by exporting the parts in their current state as .STL’s (could do .obj’s as well…doesn’t seem to matter).

Now shift to Autodesk’s Meshmixer software and load in each of the repaired .STL’s or .obj’s (click this import button) and after the first select “append”. If you get a dialogue saying the part seems small and/or far away, ignore it and do NOT let it fix it. This usually happens with energy hardpoints.

Once all the parts have been imported, select them all in the object browser and then select the “Combine” action. Now export as an .STL.

You now have combined all the parts into one file.
Now go back to nettfab and open the combined file into a new window. The next step I like to do is to scale the model up 40x. This way if you do want to apply a “thickening” repair, it will be applied to a larger model with less “marshmallow’ing” as meshmixer can only apply that type of repair to so small a model without having that kind of impact.
After scaling up, there are two paths I usually take depending upon how water tight the model is at this point.
If the model slices up well (is water tight) in its current state, then I will now section the model into two pieces to maximize the amount of “flat surface” and improve its printability and minimize the amount of support material.

I’ll try to slice the pieces and see how the results look. If there are no crazy gaps, then I’ll test print.
In this case the model was not water tight (at least not enough for my taste) and so I’ll take the second path. If you’re familiar with 3D printing notice all the support material being used for the “inside” of the model….not good.

Load the scaled up model into Meshmixer again and click the “Print” option.
This will bring up the repair operation. Click the “Tool” button to the right of Repair.

Now adjust the “Fix for minimum thickness” to 0.1mm and click “Done” Wait for it to bake and this will soften up some of the sharp edges, but not so much since the part is scaled so large.

Notice, however, how the image has changed as it thickens up. This should now have made the model watertight unless it is a “lost cause” to my process as the Banshee has become.
Export the model from Meshmixer and load it into netfabb.
I then apply the same splitting the model process as done before to improve printability and then test again. This time the print is MUCH more water tight.

Last step I usually take is to print out a small version as a test print. This helps me to see if I could improve where I split the part for printing or any other problem points to help me refine the print.
Those of you who 3D print, will likely have some “low quality” print filament to do these kinds of tests with.
I’ll add pictures of the initial test print and first production print of the torso when they’re done.
Note that you then rinse and repeat this same process for each of the other limbs / parts you wish to print.
Let me preface this by saying that I am not an expert, this is the result of much trial and error on my part. If you have other ways to accomplish the same thing, I WELCOME any improvements / suggestions. Please share…I would love to get better at this.
Software tools used:
Netfabb - http://www.netfabb.com/basic.php
Meshmixer - http://www.meshmixer.com/
First step: Get the files into .obj format.
Rather than rewriting what has already been documented amazingly well, the process I use is virtually identical to what is outlined in the following thread below.
http://mwomercs.com/...ing-pgis-mechs/
Step two assemble the .obj files.
So I am a bit on the paranoid side and not an adept coder, so I use a manual process for this with the tool netfabb Basic. I am well aware that there are tools available to auto-position each of the parts, but I don’t like running code from the interwebs on my computer
I assemble and repair each of the following parts independently:
1 – Torso and pelvis
2 – Arms, if symmetric, just one and then mirror it, if asymmetric got to do the work
3 – Legs as they are always symmetric, I just build one then mirror it, unless I’m going with an asymmetric pose.
An item to note is that I like to determine the mech weapons configuration I plan on using prior to beginning and creating a folder with only the .obj’s I need to avoid cluttering up the project.
I’ll demonstrate with a Battlemaster torso/pelvis as I’m working on this model right now for a unit-mate of mine. The nice part about the torso’s is that they are for the most part already properly positioned and need very little tweaking. The hips / pelvis are another story though.
First I’ll add each of the base torso .obj’s into my netfabb project as shown below:
So I like to start with the Center torso front (remember to add both front and back), but order really doesn’t matter
So all these parts here in the center, right and left torso’s require no movement as they load up perfectly aligned as shown in the image below.
Now for the pelvis and “twist”. As you see in the picture here, these parts are not positioned properly relative to the torso’s. I’m certain that this is because they are part of a different in game object that animates separately.
I then shift the parts away from the main model and lay them out. Very important at this point to have a good reference. I usually will have MWO booted up to have the basic model laid out to get an idea of how the parts are positioned.
I then adjust the parts until they match my reference AND also try to block off any non-solid faces (they show up as red in nettfabb). This is one area where I try to help make the model more “watertight” through minor adjustments.
As you see in the image below, I like to increment in movements of 0.1mm based upon the initial model scale. I adjust to a more fine movement if needed. The parts WILL and SHOULD overlap.
This next step is one I’ve recently tried and doesn’t always work well. I take each individual component and “repair” them using the nettfabb default repair. This tries to address the biggest problem I’ve experienced in getting parts “printable”…making them watertight, without “fattening” up the parts and making the model look like a marshmallow.
Go through each individual component and apply these repairs.
Once all the individual components are repaired, the next step is to combine the parts together. This is accomplished by exporting the parts in their current state as .STL’s (could do .obj’s as well…doesn’t seem to matter).
Now shift to Autodesk’s Meshmixer software and load in each of the repaired .STL’s or .obj’s (click this import button) and after the first select “append”. If you get a dialogue saying the part seems small and/or far away, ignore it and do NOT let it fix it. This usually happens with energy hardpoints.
Once all the parts have been imported, select them all in the object browser and then select the “Combine” action. Now export as an .STL.
You now have combined all the parts into one file.
Now go back to nettfab and open the combined file into a new window. The next step I like to do is to scale the model up 40x. This way if you do want to apply a “thickening” repair, it will be applied to a larger model with less “marshmallow’ing” as meshmixer can only apply that type of repair to so small a model without having that kind of impact.
After scaling up, there are two paths I usually take depending upon how water tight the model is at this point.
If the model slices up well (is water tight) in its current state, then I will now section the model into two pieces to maximize the amount of “flat surface” and improve its printability and minimize the amount of support material.
I’ll try to slice the pieces and see how the results look. If there are no crazy gaps, then I’ll test print.
In this case the model was not water tight (at least not enough for my taste) and so I’ll take the second path. If you’re familiar with 3D printing notice all the support material being used for the “inside” of the model….not good.
Load the scaled up model into Meshmixer again and click the “Print” option.
This will bring up the repair operation. Click the “Tool” button to the right of Repair.
Now adjust the “Fix for minimum thickness” to 0.1mm and click “Done” Wait for it to bake and this will soften up some of the sharp edges, but not so much since the part is scaled so large.
Notice, however, how the image has changed as it thickens up. This should now have made the model watertight unless it is a “lost cause” to my process as the Banshee has become.
Export the model from Meshmixer and load it into netfabb.
I then apply the same splitting the model process as done before to improve printability and then test again. This time the print is MUCH more water tight.
Last step I usually take is to print out a small version as a test print. This helps me to see if I could improve where I split the part for printing or any other problem points to help me refine the print.
Those of you who 3D print, will likely have some “low quality” print filament to do these kinds of tests with.
I’ll add pictures of the initial test print and first production print of the torso when they’re done.
Note that you then rinse and repeat this same process for each of the other limbs / parts you wish to print.
Edited by Reven, 04 April 2015 - 06:05 AM.
#35
-
-
- FP Veteran - Beta 1

- 1,214 posts
Member
Posted 04 April 2015 - 03:51 AM
Freakin awesome. Mechs and 3D printing.
I have a Solidoodle 3 and have thought about this but my modelling skills are basic.
The rig I game with was actually built to run CAD, playing MWO on beautiful settings was just a bonus.
Thanks for the walk thru on extracting the models from the game files.
My printer is a couple years old now and I am rebuilding it, soon as I get it up and running this is now the top of my list of things to print.
Technology is neither good or bad, that is the realm of intentions of the individual.
I have a Solidoodle 3 and have thought about this but my modelling skills are basic.
The rig I game with was actually built to run CAD, playing MWO on beautiful settings was just a bonus.
Thanks for the walk thru on extracting the models from the game files.
My printer is a couple years old now and I am rebuilding it, soon as I get it up and running this is now the top of my list of things to print.
Sonny Black, on 30 March 2015 - 06:55 PM, said:
3D Printing...Welcome to the XXIst century. This is just one of the things that is changing society. Some for the good...some for the bad.
Technology is neither good or bad, that is the realm of intentions of the individual.
#36
-
-
- Civil Servant

- 6,558 posts
Member
- LocationUSA
Posted 04 April 2015 - 04:08 AM
stomtom, on 31 March 2015 - 08:15 AM, said:
<picture, etc>
It would be a beautiful sight if somebody... anybody... printed the MWO Mad Dog but with the proper length barrels on the arms instead of PGI Dynamic Hardpoint Stubs™.
#37
-
-
- The People's Hero
- 33 posts
Member
Posted 05 April 2015 - 07:06 AM
Alright,
Made it through with a couple prints using test material. The finish is much better with the better material.

Made it through with a couple prints using test material. The finish is much better with the better material.
#38

Posted 05 April 2015 - 10:17 AM
Do you acetone fume them when the final product is complete to smooth out the print lines? Or do you manually sand them down?
Edited by Pariah Devalis, 05 April 2015 - 10:18 AM.
#39
-
-
- The People's Hero
- 33 posts
Member
Posted 05 April 2015 - 11:45 AM
Pariah,
I've tried a number of different methods for finishing.
1 - Sanding physically....typically doesn't work too well unless you print very solidly so that you actually have material underneath. Otherwise, I end up sanding holes in the prints.
2 - Epoxy resin. Works pretty well, but is tricky to work with. Only stays liquid for a 1/2 hr window or so and by the end it's pretty thick. Also if you mix it wrong or not well enough, you get a vigorous exothermic reaction. I noticed the material was smoking and suddenly realized that the plastic cup it was in had begun to melt and was sagging really badly.
I used this on the King Crab, Ember, and Grey Centurion
3 - Best way so far has been to simply layer primer coat and then also the paint. The surface ends up pretty nice this way.
4 - TheFuzzyBunny is trying his hand with "Liquid Green Stuff" this one is still tbd as to its effectiveness.
I've not tried acetone vapor for two reasons:
1 - It seems to work well for rounded surfaces, but for sharp edge details like those found on mechs, It looks like it'd turn them into marshmallow looking.
2 - Boiling a combustible gas no matter how cool the results just seems a bit...unwise.
#40
-
-
- Bad Company
- 917 posts
Member
Posted 05 April 2015 - 12:07 PM
Hey have you tried 'green stuff' putty? Could be what you're looking for. Fill the gaps with it, then file/sand it off.


1 user(s) are reading this topic
0 members, 1 guests, 0 anonymous users


