Sorry but i don't know anything about how to make a video or editing.
So we will have to make do with a map and windows paint.
Keep in mind that this following example is mostly to show how far you have to relocate after every shot to stay at least somewhat unpredictable.
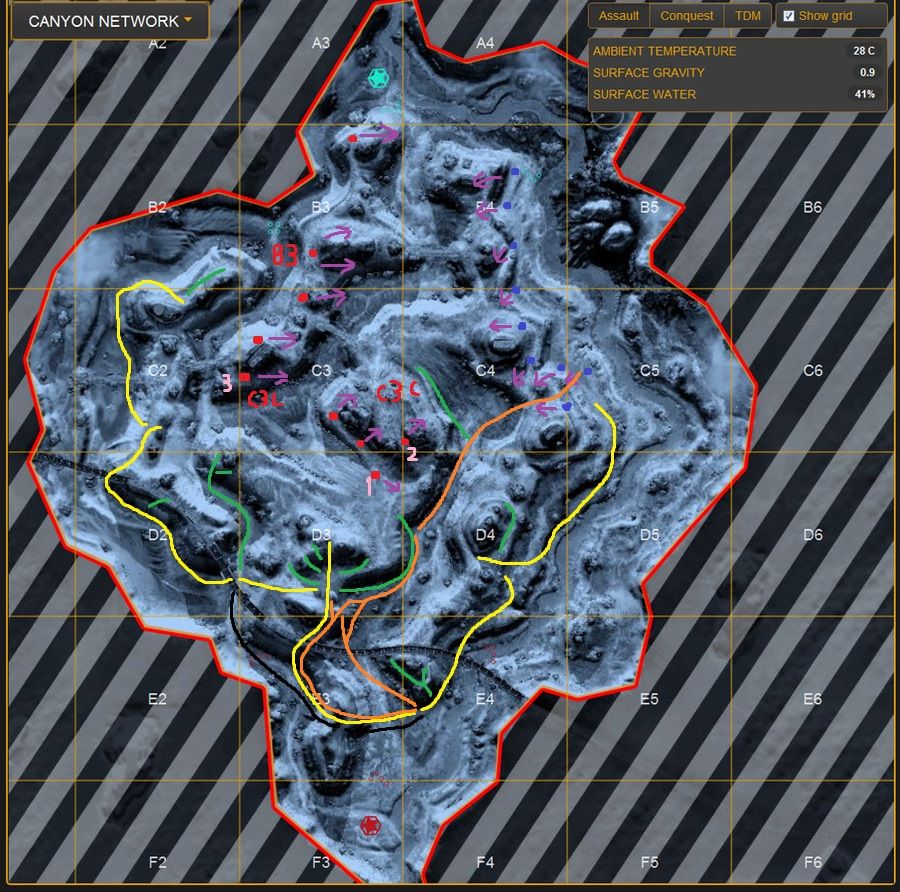
Let's look at a hypotetical situation. Here is a map of Canyon Network.

I'm thinking about my Jack of all ranges Firestarter which i mentioned above in this example
It's skirmish mode so ignore those stars representing bases please.
The enemies are red dots. Allies blue. Purple arrows shows where their general line of sight/focus is.
Numbers in pink is to give enemies numbers for easier reference.
Yellow lines shows where you generaly move. Green movement indicate somewhat risky moves.
Orange is for lines of retreat if something goes wrong. I'll talk about retreats and feints to throw the enemy of your trail later.
Many will probably think:
"There is no way a light won't have hunted you down long before you've done all this and the LRM rain would have killed you."
This is true to a certain point. There are most certainly risks. But
nothing is certain.
I've played this way for almost since the very first time i played on the Canyon Network map and it worked out rather well.
Do i use this exact movement pattern? No. But it shows how far you have to move in order to stay rather unpredictable and ahead of the enemy.
C3C is the Center hill group. C3L is the 2 guys on the border of C3 and C2 etc.
Keep in mind that taking all those risky moves makes you spend more time in one area.
The more of these risks you take the more likely you will receive the attention of an enemy light or a the horror that is a Clan mech with loads of Streak SRMs or get too much attention in general.
The match has gone for long enough in this example that you know at least somewhat where the majority of the enemies are when you start out.
Keep in mind that these dots are just to show the general areas the players stay in.
You run from C5 through D5, D4 and E4 using the wall at your right to prevent line of sight to the any enemy appearing on your right.
You cycle through the enemies with R to read their weapons/damage info on the enemy while underway.
You could take a small risk at D4 to shoot at the group on the C3Center hill. I would shoot nr.1 walking towards you once.
You could also try another shot from the position on the green line. Nr.2 is a likely target.
But make certain you stay out of line of sight from nr.1 whom you shot first.
Move onwards towards E4.
Slow down briefly to look for enemies at the E4/E3 border if you think it's necessary.
Run over the hill at E3 using JJ's and run up to D3 hill (this is not of course your only option for where you could shoot from).
You could take a risk and shoot from the places indicated by the green lines.
But remember that shooting once is ok. Multiple shots is always risk.
Move on to E3 to D3. Get into position on top of the hill in D3. This place covers you from LoS (Line of Sight) on your sides.
If possible shoot an enemy that the others don't have a line of sight to.
This means everyone except the guy you shot are less likely to know where you are.
(unless they are active with their comms. They take longer to respond regardless.)
Now you got multiple possibilities. I would take the route to the valley between C3/C4 to unleash an alpha strike for sure unless the guys on the C3 hill are fast mechs since you would have to get back behind the D3 hill before they can shoot you.
If something goes wrong you got 2 lines of retreat marked in orange.
If you go towards your allies they can cover you which might make the enemy reluctant to pursue.
A possible opportunity there to shoot someone at B3 if you go that way.
I'd go back towards D3 though personally.
The 2 shoots on the left of the hill closest to the center gives you a very nice firing long range shot at enemy nr.3 in C3 Left.
But i would not take anymore than 2 of these opportunity shots. And preferably none of them against the same enemy.
Too risky and you spend too much time in one area.
But let's say everything worked out fine. You go from D3 towards D2. Opportunity in green there and come back the same way.
I'd definitly go there since you could shoot both the C3L and C3C groups once each.
You shoot at C3L first and then the C3C. If you do it right neither one will be able to respond before you break line of sight to them.
Retreat the same way you came.
Now you got a choice. By the time you have done all this the battlefield is likely to have changed a lot depending on how much time you used on those opportunity attacks.
You could go back following the black line.You might want to look towards the C3C group to check if you can get a shot from the E3 hill.
Then onwards towards the E4 area and maybe go to D4 to take a shot. Then you figure out the rest from there.
If the enemy was no more in the area between A3 and B3 you could go flanking there for example.
-Or-
-You could go to D2 with a random potshot along the way if you want. Head to C2 shooting position. Shoot.
Relocate towards the B2 area. Do your stuff there and retreat back the way you came.
Unless the enemy is no longer in the A3/B3 area or just plain dead.
I wouldn't take any timeconsuming random potshots during this retreat if you went back C2 to D2.
This last part is to keep out of the clutches of the enemy since you might have gotten a lot of their attention at this point.
By now you can probably somewhat see how far you must relocate each time you get in position.


