Jump to content

Foust's Mechpit Rev. 3


35 replies to this topic

#1 Foust

    Member

  • PipPipPipPipPipPip
  • Legendary Founder
  • Legendary Founder
  • 394 posts
  • LocationKentucky

Posted 09 September 2013 - 06:29 PM

I wanted to wait until I had more things finalized. Then they made a whole sub forum.....

So here we go.

For the history on my previous two iterations, the log can be found HERE.

Now I want to say that without LocNar's work, I would probably have given up on the mechpit. I have him to thank for the design of the pit, and the encouragement to keep working out the bugs I had in the control scheme for the stick. Thank You LocNar, could not have made this happen without you.

First I will talk about how you take a perfectly good Thrustmaster T16000M, cut it up in to many many pieces and turn it into a full HOTAS + pedals.

You start out with a factory default T16000M.

Then you take the bottom off to get to all those naughty wires:
Posted Image

See all that stuff? The main control board is the one on the left. On the right is simply the board with the other 6 buttons on it. I should mention now that everything on the base is common ground. It was like they wanted me to hack this thing up. Begged me even. Oh you silly joystick, hack you we shall....

Quite literately, I got the hack saw. I'm not kidding, look:
Posted Image
Posted Image

Yes, I am a monster. I promise though, it is all for a good cause. Hacking the center out of the stick allowed me to keep the factory mounting for the gimbal and sensor, so I could switch back to spring centering in the future if I so choose. It also allows it to fit in my side rail.

Which I guess means this is a good time to mention that I modified the gimbal to be a friction joint instead of spring centered. I originally was going to try to fit a set screw of sorts with a fabric brush to press against the top of the bell on the gimbal to provide the friction, but there is not much space to do such a thing and I had come up with another solution to try out.
Posted Image

That white ring was cut out of a plastic template material sold at fabric stores. It rides on the top of the bell and gets sandwiched between the bell and the top of the case. Little bit of Dow33 and we have a winner.

Mostly. It will fail, it is just a question of when. (Probably soon) You can see why here:
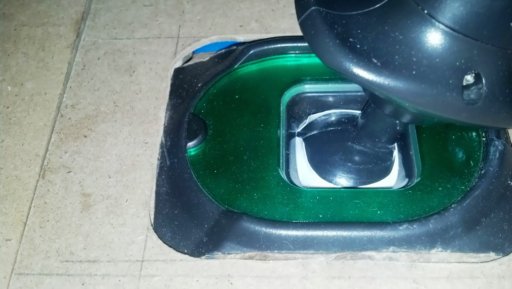
Posted Image

That split will eventually make its way through to the outside of the ring and when that happens it is time to engineer a new solution.

While I had the stick apart to do all that I also removed the spring on the rotation axis of the stick, as well as the pot. I then used tactical popsicle sticks to block the rotation on the stick. Shame on me, no pictures of that.

I mentioned that the wiring was all common ground, here you can see how I tapped into all the switches on the control board side. All of those along with the switches on the right side get sent along the old DB15 cable from the TQS.
Posted Image
This is a shot of what ended up being the mounting of the control board to the bottom of the stick. It is all laid out kind of weird because I was reusing the wire that was in the thing to begin with, and because I needed to be able to fit it into the side rail. I built it such that I could remove the stick and put something else in its place, like a gated shifter. That is a separate project for a later date.
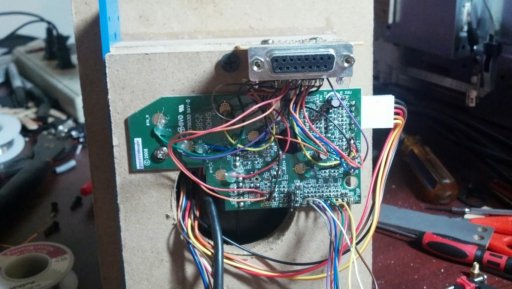
Posted Image
I scavenged that female DB15 from the TQS board as well. Heat guns do wonderful and terrible things to solder. The next image is of the interconnect board I built for the inside of the throttle. I scavenged the pin headers to. I had the shorted pins to show for it to....
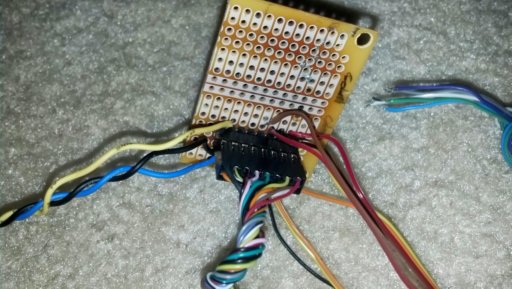
Posted Image

To speak a bit more to the wiring. Outside of taking out the rotational pot from the joystick handle, I left all that alone. I also left the magnet and hall sensor in the gimbal alone. I had planned to use one of my hall sensors from the other stick project to run the throttle.
Posted Image
I was real happy about that arrangement by the way, but it didn't work. My hall sensors work at +5 and the T16000M only runs +3.3 to its pots so that was right out. Remember that pot I just took out of the stick? Yup some hot glue and tactical popsicle stick later and we have a working throttle axis. Thankfully side walls hide the "sins" and tactical popsicle sticks.
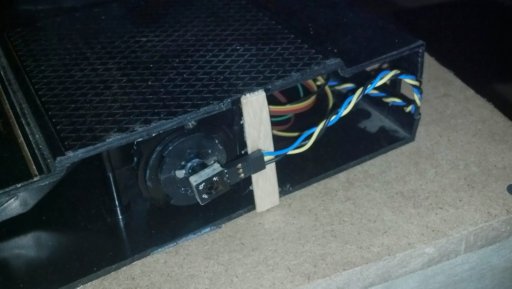
Posted Image

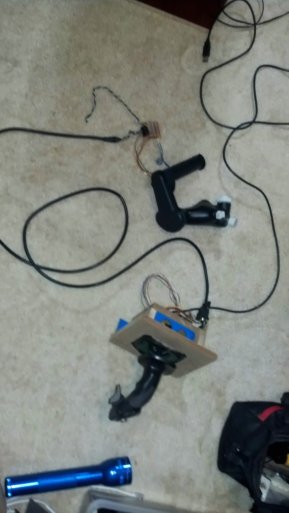
Wired into the main boards throttle axis. Yes it is ugly, yes it works. Don't judge me. The rest of the buttons went to the hat on the throttle, the two two-way toggles and the push button. I have three more buttons available if I come up with a use for them later on.

Here is a example of one of my "testing environments" I think this was when I was playing "find the short" and "why wont this axis work.
Posted Image

There is not much to say about the rudder pedals. I used the pot that was in them, and wired it to the rotational axis on the main board. Easy.

Im getting nervous about the length of this post, so Ill break here and write up the mechpit itself next.

Edited by Foust, 09 September 2013 - 06:29 PM.


#2 Foust

    Member

  • PipPipPipPipPipPip
  • Legendary Founder
  • Legendary Founder
  • 394 posts
  • LocationKentucky

Posted 09 September 2013 - 07:01 PM

Alright, so that was the HOTAS build out, now to the mechpit.

Posted Image

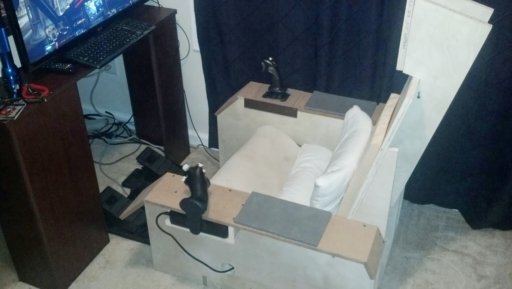
If you have been following the MWO mechpit "scene" you will recognize this design. It is 100% LocNar's brain child, I just took his measurements and generated a model in sketchup and cut out the parts. The seat all came out of a single sheet of 3/4" ply with some left overs. The side rails are made of 1/2" mdf and the box for the throttle to sit in is some scrap from the ply.

The grey things in this shot are some foam flooring material, left overs from my halo armor build. The seat "cushions" are a memory foam pillow I hated sleeping on, a old pillow and some scrap foam. Its on the list.

Posted Image
Here is a top down. You can see that I have no mounting for the pedals, and no adjustment for the distance. On the list.

Posted Image
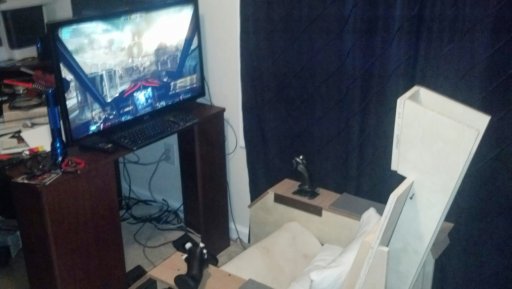
This is the arrangement as it sits now. That is a 32" LG 1080P display. It runs 4:4:4 for anyone who knows what that means. Good for PC monitor is the translation. You can see that I am off the side of my desk with the pit. On the list is a pivioting TV mount attached to the wall in such a position to allow me to swing the screen to the desk for more traditional computing/gaming and to swing out to the mechpit for mechpitting.... Anyway, this setup will allow me to move the seat further away from the desk to easy entry.

Posted Image
View from behind. You can see the headrest here is temp screwed into the 2x4 mount. I will do something much nicer here. More for the list.

Posted Image
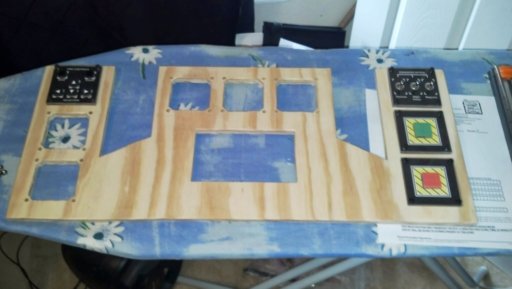
This is what I was going to do for my front console. I have since scrapped this idea. What I am going to do now is keep the sides with the three panels in them and separate them from the center. Those sides I will then mount above the side rails ahead of the joystick and throttle. New on the list then is a removable center console, deviating in design from the center of this picture.

Posted Image
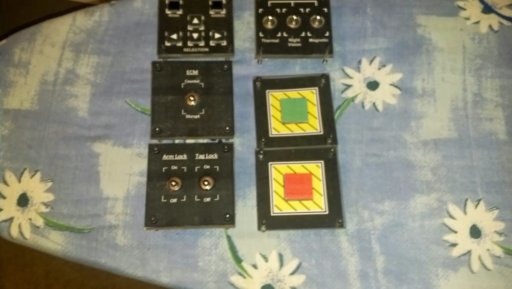
Two of these things are not like the others, and since I just realized how poor the quality on this picture is Ill tell you what is different. The two switches on the lower left do not have plexiglass as the top layer. They are just the print out glued to the top. I ran out of plexi and got impatient ok? Its on the list.

So that is Rev 3 in its current state. The biggest thing that this pit has over the other revisions is that I have actually PLAYED MWO, on full HOTAS+Pedals in it. Much to my shock, it only took a few games to get accustomed to it. In fact, I spent most of last night trying to finish off my last master slot on my last jenner.

#3 Loc Nar

    Member

  • PipPipPipPipPipPipPipPip
  • 1,132 posts

Posted 10 September 2013 - 01:16 PM

:)

Magnificent!! So very glad to hear/see this. It's... it's beautiful... sniff...

About the friction disc in your T16000M. Let me know the dimensions and I will cut some out of this very robust mylar I have here, using a proper hole punch in a machine shop to knock out the center, ensuring it's burr and micro-split free, which is the only way it won't subsequently develop a split.

Nice work man. I suggest your next priority issue should be making the backrest contour insert pieces. Your back will thank you profusely! I have my pit tore down for big work ATM, so can take some pics of the pieces and/or some measurements you like.

I'm in crunch mode right now, and have been making progress.

#4 Gevurah

    Member

  • PipPipPipPipPipPipPip
  • The Flame
  • The Flame
  • 500 posts

Posted 12 September 2013 - 09:10 AM

Looks great. What's the thickness on the plexiglass you're using?

Also - what type of button are you using for those power switches?

#5 Foust

    Member

  • PipPipPipPipPipPip
  • Legendary Founder
  • Legendary Founder
  • 394 posts
  • LocationKentucky

Posted 12 September 2013 - 09:18 AM

View PostGevurah, on 12 September 2013 - 09:10 AM, said:

Looks great. What's the thickness on the plexiglass you're using?

Also - what type of button are you using for those power switches?


It is 3/8" on the other panels. It will be whatever I can find locally on the rest. Really doesn't need to be a specific thickness since you could adjust the height of the switch on the back plate.

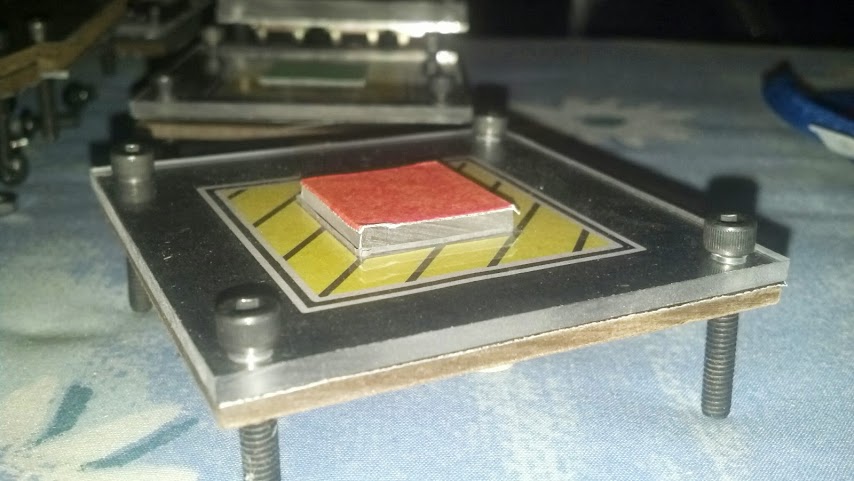
The big push buttons are a single tactile switch and cap with a bigger square of plexi glued to the top. If I remember when I get home Ill take some pictures of them and put them up.

#6 Gevurah

    Member

  • PipPipPipPipPipPipPip
  • The Flame
  • The Flame
  • 500 posts

Posted 12 September 2013 - 09:28 AM

Ah ok. I figured you made a custom cover for a tactile switch but seems pretty simple. I like it :rolleyes:

For me, that's what sells a simpit - buttons and switches. ;)

#7 Foust

    Member

  • PipPipPipPipPipPip
  • Legendary Founder
  • Legendary Founder
  • 394 posts
  • LocationKentucky

Posted 16 September 2013 - 06:32 AM

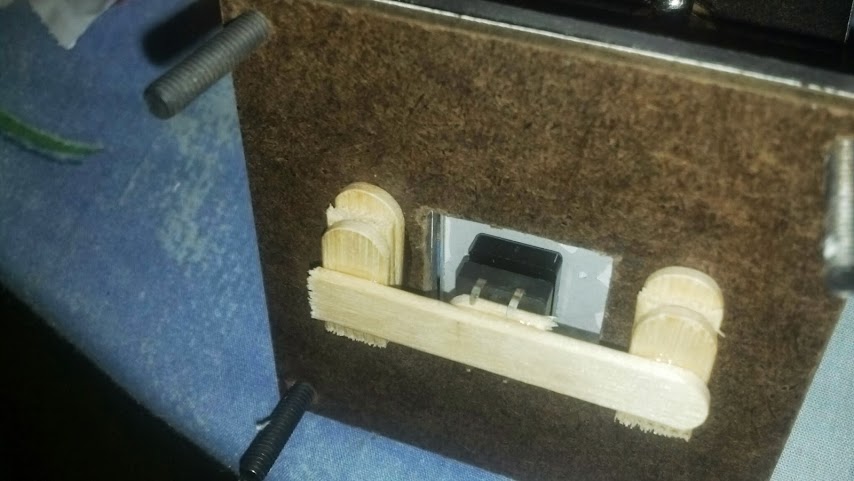
Here are a few shots of how the big push buttons are built.
Posted Image
Posted Image

You can see, I have become a fan of the tactical popsicle sticks.

#8 Foust

    Member

  • PipPipPipPipPipPip
  • Legendary Founder
  • Legendary Founder
  • 394 posts
  • LocationKentucky

Posted 16 September 2013 - 02:45 PM

The build continues. Mounts for the first of the switch panels.

Posted Image

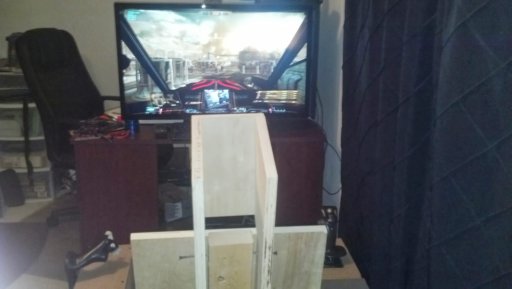
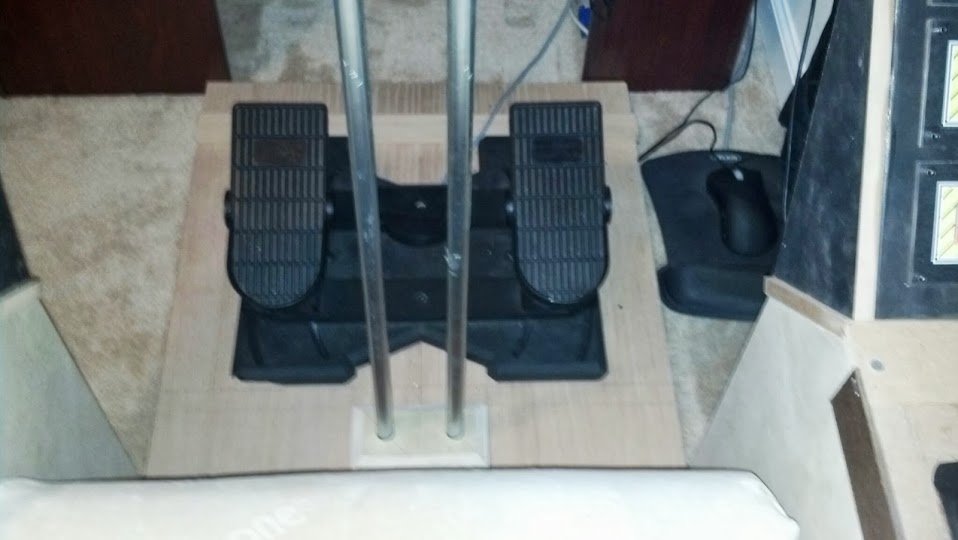
You also can see proof of concept block on the center pillar. To aid in getting into and out of the pit, I have the center pillar removable. The two posts align to holes in base that the rudder pedals sit on. I should note here that the base sets me further away from the desk the monitor is sitting on. I mentioned that I was going to get a mount to allow me to swing the monitor between the pit and the desk. I am not so certain that remains an option. Still thinking about that....

Posted Image

Next up is getting a center console built, some more panels to occupy it and get the wiring done for them all.

#9 Xeno Phalcon

    Member

  • PipPipPipPipPipPipPipPipPip
  • Bad Company
  • 2,461 posts
  • LocationEvening Ladies

Posted 16 September 2013 - 03:22 PM

As awesome as this is, I vote for the more compact approach: Making a Occulus Rift look like a Nuerohelmet.

#10 pigeon253

    Rookie

  • 1 posts

Posted 25 September 2013 - 07:42 PM

This is really awesome! are you actually going to wire up the toggle switches to function in game? I know this is a silly question but I am just curious.

#11 Foust

    Member

  • PipPipPipPipPipPip
  • Legendary Founder
  • Legendary Founder
  • 394 posts
  • LocationKentucky

Posted 26 September 2013 - 04:41 AM

View Postpigeon253, on 25 September 2013 - 07:42 PM, said:

This is really awesome! are you actually going to wire up the toggle switches to function in game? I know this is a silly question but I am just curious.


Yes all of the switches will function. I have a few more panels to build and then Ill get to the wiring.

#12 Captain Stiffy

    Member

  • PipPipPipPipPipPipPipPipPip
  • Liquid Metal
  • Liquid Metal
  • 2,234 posts

Posted 06 October 2013 - 03:12 PM

Serious question: Why does everyone build these using joysticks? I tried using a joystick and it was bad, bad. Nearly impossible to aim compared to a mouse. It sure does look neato but it also sure does suck.

Any thoughts on that? It is NOT a matter of preference, either, I just don't feel like typing 5 pages on why mouse control is more accurate.

#13 Foust

    Member

  • PipPipPipPipPipPip
  • Legendary Founder
  • Legendary Founder
  • 394 posts
  • LocationKentucky

Posted 07 October 2013 - 05:15 AM

View PostCaptain Stiffy, on 06 October 2013 - 03:12 PM, said:

Serious question: Why does everyone build these using joysticks? I tried using a joystick and it was bad, bad. Nearly impossible to aim compared to a mouse. It sure does look neato but it also sure does suck.

Any thoughts on that? It is NOT a matter of preference, either, I just don't feel like typing 5 pages on why mouse control is more accurate.


There is no reference material on Mechwarrior cockpits that include a mouse as the primary control device.

You are correct that using a ordinary joystick is bad, and terribly difficult to aim with. Now my stick is not typical, such that it uses a static position modification as well as acting as a mouse as far as the game is concerned.

For some light reading on the subject of control devices and their interaction with MWO I present LocNar's Controls Demystified thread.

While I'm here I might as well note what I have been up to in regard to the pit. I decided that I did not like how center console rev 0 was looking so I went back to the drawing board. Decided on making it a bit bigger, sit higher up on the mount and to mount 4 panels + tablet. While cutting the panel mounting holes out, my multipurpose bit snapped and met with the inside of my left thumb. Wear gloves folks.

I got some foam for the seat base and I am pretty happy with the results. Need to get the back foam contoured and then get it all covered.

#14 SpiralFace

    Member

  • PipPipPipPipPipPipPipPip
  • The Devoted
  • The Devoted
  • 1,151 posts
  • LocationAlshain

Posted 27 November 2013 - 06:02 AM

a fully functioning joystick set up correctly I feel is superior to mouse controls for me at least.

But then again, I've been playing the sim pods and mechwarrior since the beginning, so I guess I've just had over 25 years to adapt to it.

Although I admit I haven't had one since my MW4 days. So I'm looking to grab one for myself soon to play this game.

#15 Loc Nar

    Member

  • PipPipPipPipPipPipPipPip
  • 1,132 posts

Posted 27 November 2013 - 11:56 AM

Quote

Although I admit I haven't had one since my MW4 days. So I'm looking to grab one for myself soon to play this game.


Have a read of the writeup I did a while back called Controls Demystified(?) before putting much hope into this. In short, MWO reticule aim allows the unfettered use of direct inputs called zero-order positioning (aka mouse aim), which precludes the viability of input devices engineered for vector inputs like a regular joystick.

The joystick in Foust's cockpit is a mutant zero-order positioning device. As such it has no return springs and instead uses friction damping, and is returning absolute inputs, adding up to a very different experience than what you are comparing this with. This type of stick can potentially compete with mice and other devices designed for positional tasks.

Previous mech titles worked excellent with regular joys because reticule aim is coded for vector commands, which in turn makes the mouse and other positioning devices a little goofy although they still work as there is much more room to use mice for joy tasks than the other way around.

Foust, you've been too quiet lately! ...any news, updates, or thoughts in general? I made a small breakthrough recently which you've likely seen in my controls post, ...but I discovered the proper name for my stick. Both our sticks are zero-order positioning devices, but mine is a breed common to the field of robotics called Master/Slave/Replica.

The master (my stick), is controlling the slave (mech) using direct inputs, and since it kinematically describes the same motions as the slave (mech) it's a replica controller. Armed with new and better search terms naturally steps up the research game and there is so much stuff out there, and it was very vindicating to see I've reinvented a wheel here.

This video of a zero-order 6DoF Stewart Platform slave/master I started using to demonstrate what positioning looks like in practice, and may prove useful for your own explanations to others.


edit: clarification of 'replica'

Edited by Loc Nar, 02 December 2013 - 06:34 PM.


#16 Foust

    Member

  • PipPipPipPipPipPip
  • Legendary Founder
  • Legendary Founder
  • 394 posts
  • LocationKentucky

Posted 27 November 2013 - 12:33 PM

I have updates.

I need to get some pictures taken, but I am going to make you all wait till later this weekend. I have a few more things I want to get done first.

:)

#17 Foust

    Member

  • PipPipPipPipPipPip
  • Legendary Founder
  • Legendary Founder
  • 394 posts
  • LocationKentucky

Posted 02 December 2013 - 07:02 AM

Alright, as is tradition, I got no where near the work done I was hoping to over the long weekend. None the less updates.

I built a base to elevate the seat. This helps adjust my position to the foot pedals making the seating position more comfortable.

Posted Image

I also built a stand for the monitor and PC. Now the entire pit arrangement is self standing.

Posted Image

The seat is sitting on those hard plastic furniture sliders. Let's me easily move the seat forward and back.

Posted Image

Here is the pit in the closed position. I have also added the center console. It is mounted to 1/2 conduit, and then that is slide into conduit hangers mounted under the top of the monitor stand. It can slide out if you would want it closer to you. Clearly it is not populated yet, part of what I was unable to complete. I also put guides on the sides of the base to help keep the seat on the base while moving back and forth, as well as a back stop to keep me from falling of the back end.

I still have a list of things to complete. I am hindered by the fact that I can play in the pit and time to build means time not playing.... I understand that may be a common problem.

#18 Loc Nar

    Member

  • PipPipPipPipPipPipPipPip
  • 1,132 posts

Posted 02 December 2013 - 06:38 PM

Always great to see an update to the project. Seeing this arrangement however brings up questions.

1. how does your pit slide back/forth into driving position? (rollers? wheels, drawer slides, spagetti o's?...)

2. why not mount switch panels to *fwd cockpit section where they will not interfere with ingress/egress when cockpit is slid back?

3. hows your *nongeometric analogic master/slave controller working out for you?

*name of master/slave controller that kinematically describes related but not identical motions

#19 Foust

    Member

  • PipPipPipPipPipPip
  • Legendary Founder
  • Legendary Founder
  • 394 posts
  • LocationKentucky

Posted 02 December 2013 - 07:21 PM

1. Furniture sliders kind of like the teflon blocks you have at the front of your pit.

2. That is something I'm considering now that it is sitting here. When I had just the seat mounting them to the sides was the thing to do. It is under serious consideration.

3. It is working wonderfully. You know for a nongeometric analog master/slave controller. :-)

I need to take a night and get the rest of the wiring done.

#20 Zharkov

    Rookie

  • Bad Company
  • 3 posts
  • LocationGreenville, Texas

Posted 09 December 2013 - 02:13 PM

Just wanted to cheer Foust on. I often drop with him and several other guys. Wish I had the room for this kind of set up, but just a mouse and keyboard at a desk for me. I bask in your glory, sir.


14 user(s) are reading this topic

0 members, 14 guests, 0 anonymous users