You did an amazing job and brought this whole idea together easily. Thanks again for all the professionalism on this Valcrow!

1:60 Posable 3D Printed Sarah's Jenner
Started by Valcrow, Oct 02 2013 02:46 PM
43 replies to this topic
#22
-
-

- 63 posts
Member
Posted 04 October 2013 - 12:06 AM
Quote
Printed parts often have layering pattern to them. roughly 8 layers in one millimeter.
I saw this in places and thought it looked quite good. Could be a way to denote ferro-fibrous armour on a model if some sections were all printed in a similar orientation

#23
-
-
- The 1 Percent
- 119 posts
Member
- LocationCairns, Australia

Posted 04 October 2013 - 01:33 AM
Outstanding result!


#25
-
-

- 228 posts
Member
- LocationCanada
Posted 05 October 2013 - 11:56 AM
Thanks for the comments guys!
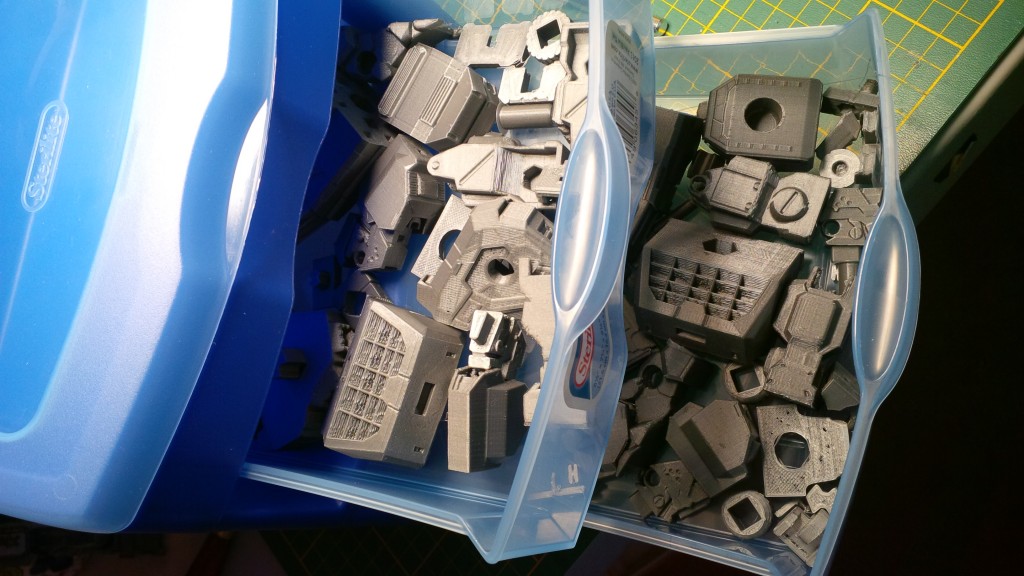
Here's a glimpse of some WIP pics for those wondering about the process.
Naked Jenner

This is how it comes out of the printer. Gotta keep organized!
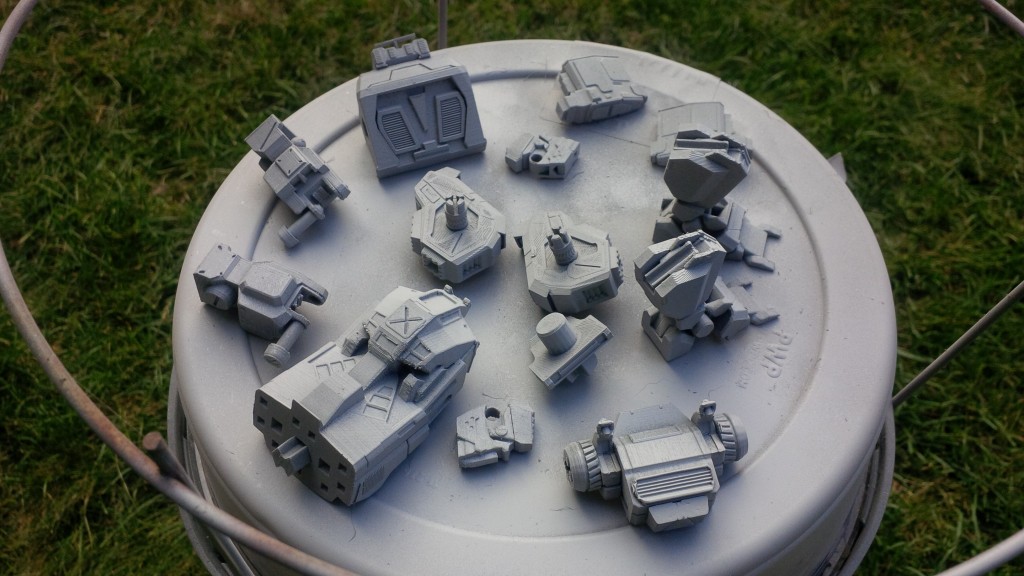
Puttied, filed, Major parts assembled. (eg. pelvis) Tolerances on pins a little looser to account for a layer of paint.
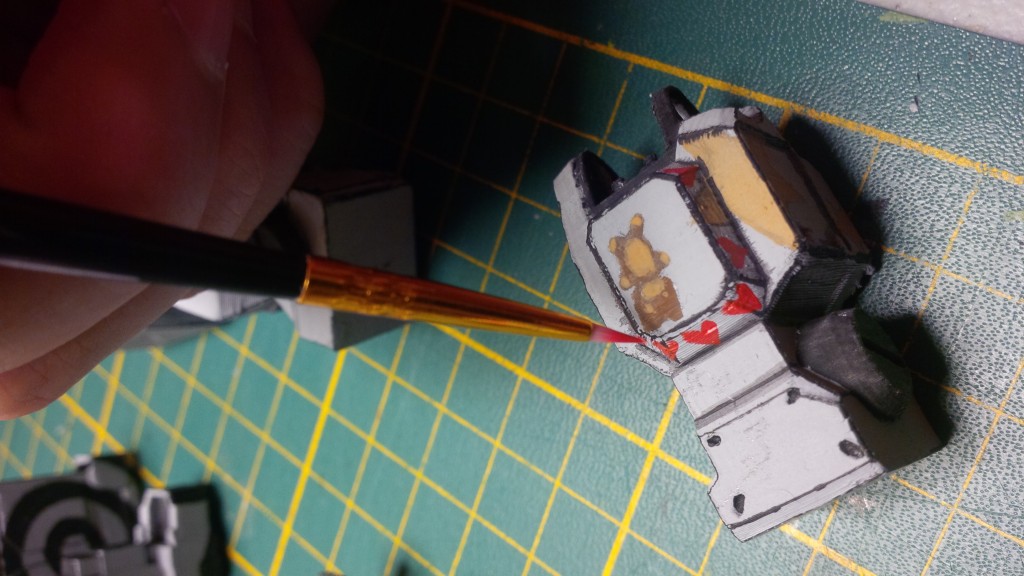
Painting hearts. (that is a tiny brush)
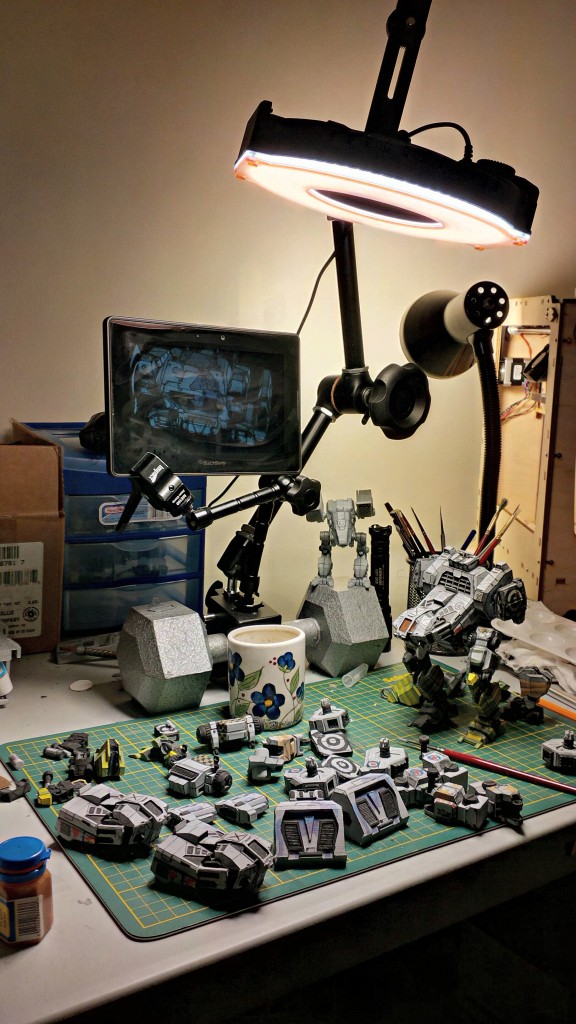
Base colours before shading. And my jerry rigged work area.
More pics later!
Here's a glimpse of some WIP pics for those wondering about the process.
Naked Jenner
This is how it comes out of the printer. Gotta keep organized!
Puttied, filed, Major parts assembled. (eg. pelvis) Tolerances on pins a little looser to account for a layer of paint.
Painting hearts. (that is a tiny brush)
Base colours before shading. And my jerry rigged work area.
More pics later!
#26

Posted 05 October 2013 - 08:07 PM
What is in the background? Its torso doesn't look like a catapult, but maybe it is the lighting. Almost like a raven, even! O_o
Edited by Pariah Devalis, 05 October 2013 - 08:07 PM.
#27
-

-
- Knight Errant

- 233 posts
Member
- LocationRotterdam
Posted 07 October 2013 - 11:12 AM
Oh man! This is one amazing generous project! Im a model painter myself and theres a ton of effort that went in to the paintjob!
Incredible
Incredible
#28
-
-
- The Devoted

- 1,375 posts
Member
- LocationBetween the Flannagan's Nebulea and the Pleiades Cluster
Posted 07 October 2013 - 01:01 PM
Impressive, the paint sheme looks really realistic with shadows and dirt. Nice work!
#29
-
-
- Bad Company
- 2,611 posts
Member
- LocationBay Area, California

Posted 07 October 2013 - 04:54 PM
I keep coming back to your work Valcrow... and I keep telling myself how freaking bad *** this is! Then I keep saying I need to buy a 3D printer... seriously, though... you deserve some serious respect for this little endeavor... you may have lost some sleep but Sarah would be happy as a kid in a candy shop, piloting a Jenner!
#30
-
-
- The Hammer

- 47,187 posts
ForumWarrior
- Locationclimbing Mt Tryhard, one smoldering Meta-Mech corpse at a time
Posted 07 October 2013 - 05:43 PM
 Valcrow, on 05 October 2013 - 11:56 AM, said:
Thanks for the comments guys!
Here's a glimpse of some WIP pics for those wondering about the process.
Naked Jenner
This is how it comes out of the printer. Gotta keep organized!
Puttied, filed, Major parts assembled. (eg. pelvis) Tolerances on pins a little looser to account for a layer of paint.
Painting hearts. (that is a tiny brush)
Base colours before shading. And my jerry rigged work area.
More pics later!
Dude. You NEVER fail to amaze. Love the talent, but admire the heart more. Folks like you make this community.
#31
-
-
- 228 posts
Member
- LocationCanada
Posted 08 October 2013 - 11:29 AM
Pariah Devalis, on 05 October 2013 - 08:07 PM, said:
What is in the background? Its torso doesn't look like a catapult, but maybe it is the lighting. Almost like a raven, even! O_o
That is my early catapult. It's got the fat cockpit which is why it looks a bit weird, and it's also kinda looking down.
http://mwomercs.com/...inted-catapult/
Lots of progress has been made between the catapult and this model.

Grendel408, on 07 October 2013 - 04:54 PM, said:
I keep coming back to your work Valcrow... and I keep telling myself how freaking bad *** this is! Then I keep saying I need to buy a 3D printer... seriously, though... you deserve some serious respect for this little endeavor... you may have lost some sleep but Sarah would be happy as a kid in a candy shop, piloting a Jenner!
You should buy one! they are affordable-ish now. Just think, you can literally make ANYTHING. (that's plastic). I make repair parts, gifts, film equipment... mechs.
It's local, organic, environmentally friendly (no shipping costs). And improves your skills.
Bishop Steiner, on 07 October 2013 - 05:43 PM, said:
Dude. You NEVER fail to amaze. Love the talent, but admire the heart more. Folks like you make this community.
aww thanks.. I just put up my making of pictures.. I had to make a new thread because there's a ton of pics. I've removed the WIP pics from this thread to keep them clean.
http://mwomercs.com/...-sarah-jenners/
#32
-
-
- 8,260 posts
Member
Posted 09 October 2013 - 12:53 PM
Very impressive work.
What are you using as your printer? A customized version of a model that can be bought, or did you build one from scratch? I'd be interested in knowing more about your hardware and what you've put into it so far.
Did you originally print some sort of support structures on the arms?
What would be really awesome would be a video of the thing printing. Do you think you could make one?
EDIT:
Ah... never mind about that question of the support structures. I see from your later pictures that you actually printed separate pieces and then assembled them. Cool. I had thought you printed the entire model as a single unit.
Edited by Roland, 09 October 2013 - 12:54 PM.
#33
-
-
- 228 posts
Member
- LocationCanada
Posted 10 October 2013 - 09:23 AM
Roland, on 09 October 2013 - 12:53 PM, said:
Very impressive work.
What are you using as your printer? A customized version of a model that can be bought, or did you build one from scratch? I'd be interested in knowing more about your hardware and what you've put into it so far.
Did you originally print some sort of support structures on the arms?
What would be really awesome would be a video of the thing printing. Do you think you could make one?
EDIT:
Ah... never mind about that question of the support structures. I see from your later pictures that you actually printed separate pieces and then assembled them. Cool. I had thought you printed the entire model as a single unit.
What are you using as your printer? A customized version of a model that can be bought, or did you build one from scratch? I'd be interested in knowing more about your hardware and what you've put into it so far.
Did you originally print some sort of support structures on the arms?
What would be really awesome would be a video of the thing printing. Do you think you could make one?
EDIT:
Ah... never mind about that question of the support structures. I see from your later pictures that you actually printed separate pieces and then assembled them. Cool. I had thought you printed the entire model as a single unit.
I am using a stock ultimaker 1. I built as a kit. They send you the parts and you assemble it, you save a few bucks and learn how everything works together. Important if something doesn't go right or you need to tweak it.
I haven't put anything into it with the exception of some vibration dampeners I downloaded (wow, that's a weird phrase), and a fanshroud I designed for it. That's the fun thing about printers is you can design and print parts to upgrade and customize your printer.
Nope, no supports, I broke it into many pieces for that reason.
I have a video breifly explaining the process start to finish from concept -> 3d -> slicing to printing.. I'll put it up when i get the chance to finish it.
#34
-
-
- 8,260 posts
Member
Posted 10 October 2013 - 12:39 PM
That's cool. I've been getting into 3D printing myself, although I haven't yet sprung for buying my own printer yet. I'm kind of scared to make the plunge, just because there seem to be very quickly developing advancements in terms of the printers themselves at this point... I'm seeing a lot of new, potentially cool printers coming about (or due to be released this year).
Anyway, have you played with Autodesk's "MeshMixer"?
I think it may be free... it's a pretty awesome tool for 3D fabricators though. For instance, you can take a model and have it automatically generate support structures needed for printing, which you can then just snap off after the printing process is complete. It'd let you make full models as single prints (although they would not be posable then).
It has all kinds of other cool manipulation effects as well, for making crazy 3D models. It's a pretty sweet general purpose 3D morphing tool.
Edited by Roland, 10 October 2013 - 12:41 PM.

#36
-
-
- 228 posts
Member
- LocationCanada
Posted 12 October 2013 - 10:47 AM
Roland, on 10 October 2013 - 12:39 PM, said:
That's cool. I've been getting into 3D printing myself, although I haven't yet sprung for buying my own printer yet. I'm kind of scared to make the plunge, just because there seem to be very quickly developing advancements in terms of the printers themselves at this point... I'm seeing a lot of new, potentially cool printers coming about (or due to be released this year).
Anyway, have you played with Autodesk's "MeshMixer"?
I think it may be free... it's a pretty awesome tool for 3D fabricators though. For instance, you can take a model and have it automatically generate support structures needed for printing, which you can then just snap off after the printing process is complete. It'd let you make full models as single prints (although they would not be posable then).
It has all kinds of other cool manipulation effects as well, for making crazy 3D models. It's a pretty sweet general purpose 3D morphing tool.
Anyway, have you played with Autodesk's "MeshMixer"?
I think it may be free... it's a pretty awesome tool for 3D fabricators though. For instance, you can take a model and have it automatically generate support structures needed for printing, which you can then just snap off after the printing process is complete. It'd let you make full models as single prints (although they would not be posable then).
It has all kinds of other cool manipulation effects as well, for making crazy 3D models. It's a pretty sweet general purpose 3D morphing tool.
Yeah, I think the SLS patents expire around this time so all those printers are free to develop. (the laser, photo resin ones) Still, I'm not sure those are gonna be as popular as the FDM printers even though they're awesomer in so many ways. Primarily because photoresin is significantly pricier than spools of ABS and PLA, and functionally more complex. But hey, more competition = better prices!
I haven't used Mesh Mixer, but it looks pretty cool! Most if not all printers have slicers that automatically generate support structures you can snap off without the use of 3rd party software. I can technically just print the whole thing in one go with supports, but you wouldn't get nearly as nice of a finish on the parts because of orientation. And also where the supports touch will have marred surfaces.
#37
-
-
- Moderate Giver
- 3,584 posts
Member
- LocationBrisbane, Queensland
Posted 21 October 2013 - 09:49 PM
Awesome work i have to say mate. Bloody well done.
I have to ask, what paints are you using? I saw in one of the pic's an old school pot of a GW wash.
I've got the full set of GW paints as well as Vallejo (unfortunately i've just exhausted the final pot of the old school GW paint ). The Vallejo's are really good for airbrushing and good filler as a basecoat for printed models such as your one.
#38
-
-
- 228 posts
Member
- LocationCanada
Posted 22 October 2013 - 12:40 PM
KharnZor, on 21 October 2013 - 09:49 PM, said:
Awesome work i have to say mate. Bloody well done.
I have to ask, what paints are you using? I saw in one of the pic's an old school pot of a GW wash.
I've got the full set of GW paints as well as Vallejo (unfortunately i've just exhausted the final pot of the old school GW paint ). The Vallejo's are really good for airbrushing and good filler as a basecoat for printed models such as your one.
I have to ask, what paints are you using? I saw in one of the pic's an old school pot of a GW wash.
I've got the full set of GW paints as well as Vallejo (unfortunately i've just exhausted the final pot of the old school GW paint ). The Vallejo's are really good for airbrushing and good filler as a basecoat for printed models such as your one.
Thanks! Yup you are correct, those are the old school GW paints, I think the standard starter set. I've had them for a very long time, haven't used them for like 10+ years only the white pot dried out. I also used a pack of german uniform/tank colours from Vallejo. And a big bottle of artist acrylic white, black and clear varnish. For the most part, everything mixed and thinned well, but artist acrylics are no match for model colours, the pigment density seems off. I mixed to get all the colours I didn't have.
I used all standard brushes, didn't have an airbrush. I primed it with tamaya ultrafine light grey primer (which I think is actually for enamel paints.)
I don't actually know what I'm doing for the most part of the painting... Just kinda tried stuff until something worked.

#40
-

-
- Survivor

- 308 posts
Member
Posted 09 December 2014 - 11:18 PM
I apologise for bringing up an old thread, but I just came across the 3D printed Sarah's Jenner while researching which 3D printer to buy (from here: http://www.redicubri...-the-making-of/)
First off: Amazing work
Second: I am envious of your 3D modelling skills (both the design side and the implementing it for 3D printing side)
Thirdly: I hope you kept this up!
First off: Amazing work
Second: I am envious of your 3D modelling skills (both the design side and the implementing it for 3D printing side)
Thirdly: I hope you kept this up!


1 user(s) are reading this topic
0 members, 1 guests, 0 anonymous users


