
So, here's my pointers to people who may like surviving against LRMs in PUGalandia. This is from both perspective: on the receiving end, and the delivery end. Like any opinion, it's up to you to take it or not, and how effective these are will depends on your playstyle and mech build.
1. Put away your ECM, AMS and Radar Deprivation module.
If you have to rely on them to avoid LRMs, you won't survive if they either are not around (you change Mechs), or if PGI change their functionalities. Adapting to change is one thing, knowing how to survive without these will ensure when you do have them, you'll be just that much more effective.
Knowing the basics will help you better than relying on equipment.
2. Respect the f**king LRM boats.
I don't care if you think LRMs are easy mode, loser weapons, whatever. It's irrelevant to LRM Specialist. If you don't respect the LRM boats, they will core you a new one from afar. This means you learn their strengths and deficiencies, and learn to exploit those. If you are arrogant enough to think you are immune to LRMs and walk out there into the open, you deserve what's coming to you.
Don't think the LRM Boaters are newbies or lazy players looking to make a quick buck. The good ones know their chassis, their tolerances, have packed their chassis with ALRMs, TAG, BAP, Target Decay, Radar Deprivation, and know how to make the most out of the equipment, and know how to work as a team. You can always laugh at the proven newbies and lazy players later... after you kill them. Laughing at an unknown target before you kill them is just asking for a full deck launch into the face. Assume the guy knows what he's doing and how to achieve it, and fight him and his team smartly.
3. Learn how the targeting system work.
Blue triangles are friendlies and there don't appear to be a range limit to blue triangles. There is LOS restriction though. You cannot target friendlies (i.e., you cannot see their paper doll).
Without equipment or modules, the targeting system only work on enemies within LOS and within 800m. Anything not in LOS is not targeted, and anything outside 800m is not targeted. Empty triangles are in-range targets you can see but has not transmitted to the team. Red filled triangles are targets somebody in your team -- including yourself) have targeted and transmitted to the whole team.
You can target only one target, which will become a red filled triangle, and will be transmitted to your team. You will also get a damage display of the targeted mech, and the HUD will put a bracket around the mech. The rest of the team will see this red full triangle. Thus, the maximum number of red filled triangles that are mechs will be 12 (Possibly more due to turrets and UAVs).
Critically, only mechs with sufficient amounts of its structure showing will registered on the targeting system. Mechs that are partially hidden may or may not register, depending on their visibility to you. You can fire weapons at unregistered targets but you don't get the damage display nor transmit the location of the enemy to the team.
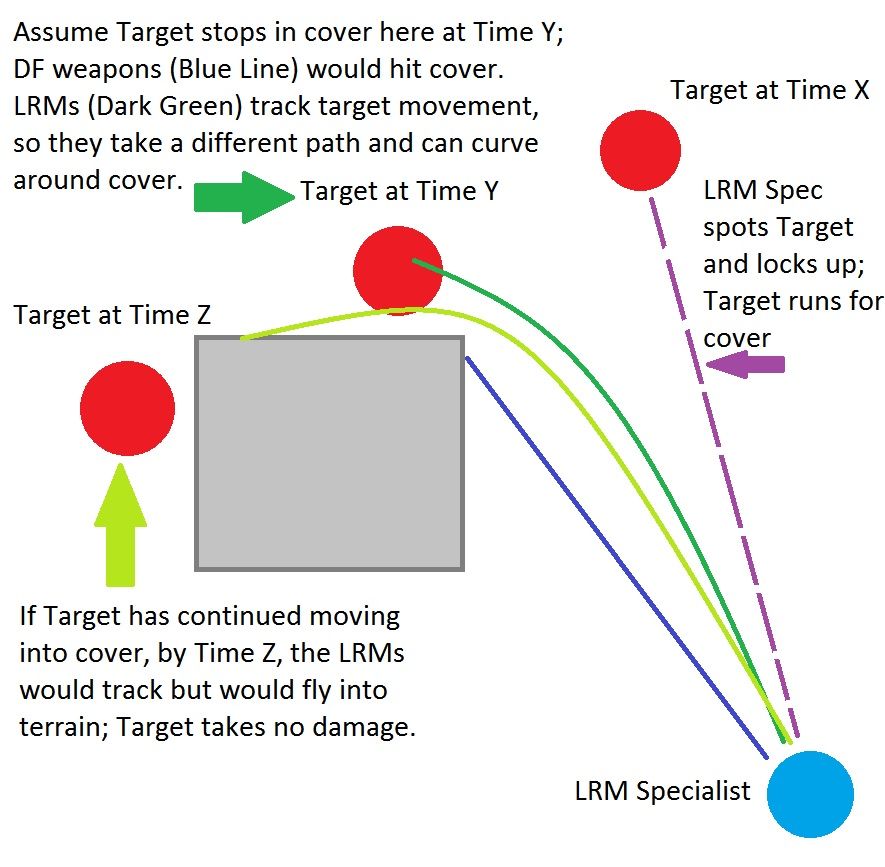
All this is important because you need to know how to avoid getting targeted by the enemy, which prevents you from getting LRMed. If you keep to partial or full concealment/ cover, the enemy cannot target you and have to fire blind. There are many places on maps that gives you this option, and if your mech has a particularly tall cockpit, you can peek over ridges, target the enemy while not being targetable. This gives you an information advantage and keeps you safe from locked weapons -- and mostly unlocked weapons too, if you do it right.
Don't forget -- a LRM mech that has locked you up directly is also transmitting your location to his teammates. It's a big "FREE FRAG" sign around your neck, particularly if he is able to keep his fire on you. They'd come looking, and if you stay there to soak LRMs, you'll be either pinned and unable to fight effectively, or stripped and easy kill, or stunlocked and easy kill. The best way to fight LRM boats is simply not to be detected. PREVENTION is better than anything else available to you.
4. Learn your maps.
You need to know your maps. Learn where are the likely LRM boat points, the target zones, and how to get across or around them. There are places where cover is abundant and even LRM's top-down trajectory can't reach you. Know them, love them, creep around them. There's a reason why veteran 'Warriors always go by a certain route: Because they are safer from detection, and there's cover if they are detected, that's why.
Don't skyline yourself, peek quickly and get back into cover. Always assume the enemy team has eyes and ears and can see you, and minimize your exposure. Always plan routes so that you can blind reverse or forward into cover without too much delay. If you need to cross open ground, do it quickly and stick to cover as closely as possible.
PREVENTION is key to surviving LRMs, and PLANNING for that is good.
5. Keep your situational awareness.
If you aren't directly fighting the enemy, always keep twitching and moving. Standing still is an invitation to both direct and indirect fire, even when you are in cover (because cover typically works one way; you get flanked, you have no cover). Keep an eye on the minimap, to see where your team and enemy contacts are, and develop an understanding of the situation. Also, keep an eye on the sky, particularly when AMS and Betty start making noise. You want to (1) see if the missiles are headed to you, and (2) where they are coming from.
It is important for you to backplot the LRMs so that you can see which terrain features you need to keep between you and the LRM Boat, both to prevent detection and to protect yourself from missiles. Important also to keep an eye to see if the LRM Boat moves -- if he doesn't, light hunter-killers can go in to harass. If he's moving, assume he knows what he's doing and try to keep terrain between the two of you while you close. Being able to PREDICT his position means you can prevent and plan better.
If you get caught out -- and we all do -- the first thing on your RECOVERY is to get into cover, as per your PLAN. Don't bother to shoot back too much. If he can fire on you, he's either got friends or he soon will have. Get into cover quickly, and assess damage and situation. Don't try to be Rambo and stand out there to get shot. You will get shot. Repeatedly. With Prejudice. Deservedly.
Keep an eye out for enemy mechs who are trying to get LOS on you. Even just firing weapons to suppress and drive them back will disrupt locks; if you can get a spotter to break LOS, in-flight LRMs often lose locks and fly off. The smart spotter stays quiet, and keep the LRM Boats firing as long as they can, because typically a LRM boat packs way more firepower than a spotter. The noisy spotter lets you chase him off with rounds.
Lastly. Don't get separated from the team. Enemy teams love lone rangers. No support, no hope, FREE FRAG. Once an enemy mech latch onto you, LRM boats will fire if possible so as to take your mech out of the equation. Gaining numerical superiority is an advantage all teams want, so don't give it blindly away.
6. Know the weapon.
LRMs sound scary. That's about it. Their knock effect is their second greatest effect.. but that knock effect comes with 1 point of damage per missile. The mech isn't being shaken that much, the crosshairs stay where they are, it's your pilot model that's shaking all over the place. The flames and smoke are more of a problem because they obscure LOS... but that's why you PLAN your movement and can RECOVER by blindly getting into cover. If you didn't PLAN, you get what you get. The damage accumulates if you stay there too long and if you get hit by a salvo, there will typically be another two or three on the way, so get the hell out -- now. PREDICT the flight path by observation and use cover that would intersect with the flight path, so that you get hit less.
The LRM's first effect is their arc of fire. It negates cover to some degree. Know which covers will be negated by enemy LRMs and be prepared to run away once you identified (PREDICTED) an enemy LRM Boat advancing into position on those. Share information if you can -- one of your harassers may be in position to attack the LRM Boat now. Typical fortications that fall into this category is the firing ridge on Tourmaline -- the overhead cover does not protect from LRMs, and D/F mechs are going to have to stand up high to fire over the crystals (and are thus targetable), so LRM Boats are happy to see a ridgeline firefight.
Also, the Citadel on River City. Many mechs hide in the gap between the buildings on the Citadel. Word of Warning. You can be targeted from the open water side, and LRM arcs flip over the lip and into your torso very nicely. A LRM boat exposing himself to fire on Mechs entrenched within the Citadel is almost fully protected by the Citadel's lip, but can easily flip LRMs into you... until you come out to engage, at which point the rest of the team open fire on you.
(Happened to me. Hit a Cataphract hiding in there. He eventually came out, focused on me, and I torso twisted to absorb fire... and lured him out so that a friendly Dire Whale could happily core him from the back. Teamwork.)
7. Do your maths.
LRMs typically have a 30% hit rate. That means a LRM15 rack does 5 points of damage. This might sound paltry, but let's just say you spotted a LRM boat in the open, on the hill in Alpine, at 800m, in direct line of sight, in your Laser Thunderbolt, with your friend in his Quad AC5 Jagermech.
Your Medium lasers are totally out of range. At this range, assuming linear dropoff in damage, you are going to do 2 points of damage to the LRM boat. Spread all over thanks to the laser. Your Quad AC5 friend will do about 3.5 points per AC5, so his total is about 14. Again, splattered all around.
In return, that LRM boat has 3 LRM15s. Which means he locks, he shoots, he delivers 15 points or so, more if he has Artemis and you have no cover. He's doing pretty much equivalent damage that your two Mechs are dishing out at him, and slight movements and torso twists will cause D/F misses and spreads. It's a no-win situation for the two Mechs, they just can't outdamage the LRM Boat, which is happily sitting there and twitching and torso twisting away the hits, while delivering the LRMs (yes, you can do that, within limits). They can only hope that the LRM boat overheats... on Alpine... or run out of ammo.
So do the maths. Know where you are strong and where you are weak, your engagement envelope and the typical engagement envelope of common builds. You do NOT want to get into a Long Range fight against Long Range Missile Boats. Run away, regroup, PLAN a new approach that would PREVENT you from getting too shot up.
(It really did happen. My Orion was on Alpine. ALRM45. on the side of the hill. Three mechs, not two, was downhill and spotted me. They duck in and out of cover, lowering their DPS even further, while my missiles went over the cover. It didn't end well.. for them).

16 replies to this topic
#2
-

-

- Bad Company

- 1,214 posts
Member
Posted 02 March 2015 - 10:18 PM
i milk those guys for cbills you know not making it any easier  . good primer tho.
. good primer tho.
#3
-
-

- 1,710 posts
Member
Posted 03 March 2015 - 07:50 AM
Wait. Half a day goes by and no sass, no backtalk, no "LURMS"... ok who are you guys and what have you done with the MWO GD forum? 
#4
-
-
- Philanthropist
- 5,851 posts
Member
Posted 03 March 2015 - 09:25 AM
Can you elaborate as to why this is the case based on your study?
Then I read this.
After reading that, I can only wonder why if those things are good for the Goose, why are they listed as not so much for the poor Gander?
P.S. Good advice btw.
Quote
Put away your ECM, AMS and Radar Deprivation module. Knowing how to survive without these will ensure when you do have them, you'll be just that much more effective.
Then I read this.
Quote
Don't think the LRM Boaters are newbies or lazy players looking to make a quick buck. The good ones know their chassis, their tolerances, have packed their chassis with ALRMs, TAG, BAP, Target Decay, Radar Deprivation, and know how to make the most out of the equipment.
After reading that, I can only wonder why if those things are good for the Goose, why are they listed as not so much for the poor Gander?
P.S. Good advice btw.
#5
-
-
- 1,710 posts
Member
Posted 03 March 2015 - 11:56 AM
 Almond Brown, on 03 March 2015 - 09:25 AM, said:
After reading that, I can only wonder why if those things are good for the Goose, why are they listed as not so much for the poor Gander?
Ok, let's take the following scenario: Frozen Night Skirmish, you start from the Dropship side, say Bravo, and move in to the lower city with your lance. You pass through the cliff pass, and is about to enter the buildings, when an enemy LRM boat pops up to your left (on the ridge) and locks you up from about 500m or so. Betty starts screaming -- what do you do?
Well you got a few options:
- Stand and return fire.
- Slam into reverse and head back to the cliffs.
- Quickly get into cover in the low buildings, and prepare to engage.
- Get further into the buildings, aiming to stop around the tall building in the center of lower city.
- Your loadout may actually outgun the enemy at this range, so it's likely a quick burst would send him back behind the ridge for cover -- this is after all early in the engagement. However, he has already locked you up and one salvo is out (since Betty is already screaming), so you'd eat at least one salvo, and if he's quick or quirked, two.
- If he backs into cover, his lock would break one sec after loss of LOS, but at that range anything in the air will still be guided and will hit you, either still guided or in terminal flight (i.e. they'd plow into the ground, but you were in the way).
- If he has Target Deprivation, it actually hurts him, because his locks would break earlier, meaning less would hit you... but in return, your lock (if you managed to lock him fast enough) would break and your LRM support will also likely miss.
- If he has Target Decay, he has 2 more sec (3 secs) total to fire on you from behind cover, which means at least one more salvo, which means you eat one more as you're in the open. So potentially 3 salvos.. On a heavy-ish LRM-boat, about 45 points, likely spread around the torsos. And his buddies will start to home on you.
Slam into reverse means you are exposed longer, slower so a bigger target, moving so your fire is less accurate, and he's more likely to continue plummeting you. You also experience a loss of forward team momentum, which can be fairly fatal. Probably the worst choice, but it also depends on what else has showed up in lower city.
Get into low cover is interesting, because this is where differences start to show up:
- You probably won't break lock that fast so he'll get at least 2 full salvos off at you. On the plus side, you are moving so less missiles would hit you, and spread more.
- Assuming you managed to break lock, if he has Target Deprivation, again it hurts him as the missiles go terminal; it'd likely miss. If he doesn't, it'll track for one second, which given the trajectory, may still arc over the low buildings or better yet, fly along the road and hit you (thus denying you any cover).
- If he has Target Decay, he gets 2 secs at least, which means the missiles (and any already in the air) still homes, and again may negate your cover totally, depending on the 3D trajectory it takes.
So the low cover option is decent, as it prevents some damage, but may not always work, depending on the setup of the launching LRM boat.
Get into High Cover offers better odds, because regardless of what modules he has, you as the target is effectively dragging the missiles on a leash, and if you can drag that leash across intersecting terrain (in this case the tall building), then you're fairly safe. There are two problems with this option though.
First, is quite straightforward -- if your team hasn't scouted the area, you can't tell if the area you are rushing into for cover has enemies. It doesn't help if you avoid the LRM boat just to run into a King Crab with AC40 looking for food.
Second, is related to that blasted LRM boat. If the guy is fully kitted out with the right gear, this

Side note: If the guy can do this at the ranges we are talking about, he's very good. You're going to have a rough day. I can do this but at significantly longer ranges.
Since you can't actually know what modules an enemy is carrying until you have observed his behaviour for a bit, how do you know which options/ cover is the best for the scenario? The short answer is "you don't". You assume the worst, that he has modules to help him do kinky stuff, and you just get the heck out of dodge until you can fight him on terms that at least you are happy with. So, that's why the goose gets the modules, the gander doesn't... and if the gander can still evade, he doesn't have much to fear from the goose.
#6
-

-
- Ace Of Spades
- 1,136 posts
Member
- LocationCalgary, AB

Posted 10 March 2015 - 07:00 AM
Didn't see the range mentioned: If you're in a fast light, LRM boats are a gift, get within 180M of IS or lets say around 150M of Clan mechs(You will take SOME damage but it's much less than full) and put them in their place
IS LRM boats, shoot the legs, you might get an ammo explosion and end the entire mechs existence, plus it lets you play with your food before you finish it.
IS LRM boats, shoot the legs, you might get an ammo explosion and end the entire mechs existence, plus it lets you play with your food before you finish it.
#7
-
-
- 1,710 posts
Member
Posted 10 March 2015 - 07:08 AM
shad0w4life, on 10 March 2015 - 07:00 AM, said:
Didn't see the range mentioned: If you're in a fast light, LRM boats are a gift, get within 180M of IS or lets say around 150M of Clan mechs(You will take SOME damage but it's much less than full) and put them in their place
This is a good point, even for heavies. Remember that you're in a Mech, not on foot; 100m is not a lot to cover. If you start within 300m of an enemy boat, you can cover the 120m into his minimum range very quickly. You'd probably take one salvo of LRMs but unless you are red-cored CT and facing LRM45+, you're likely to survive that.
EDIT: Remember, if you ambushed him, he still has to change targets and lock you up to maximize his damage; that takes at least a precious second during which you are closing to do harm to him. If he doesn't lock and fire dumb at you, his damage is reduced and you may survive it better.
There are a few caveats...
First, you need to check what his loadout is. If he's a pure boat or a boat with a few secondaries, that's fine to do. But some very good LRM Specialists are very good at working at 400~500m, and expect that they know how to handle themselves fine in close. If they are packing serious in-close heat, you need to figure out what is a good engagement envelope that suits your build and not his.
Second, he might have friends. Always try to have a good Situation Awareness. The good LRM Specialists who fight close in will stick close enough to the Main Line of Resistance (MLR; translation, his buddies) so that he can get help, and he sure as hell know how to use the targeting system to send out your location. So keep an eye out for his friends coming back.
Edited by Lynx7725, 10 March 2015 - 07:10 AM.
#8
-

-
- Legendary Founder

- 1,342 posts
Member
- LocationYork, New
Posted 10 March 2015 - 07:31 AM
Lynx7725, on 10 March 2015 - 07:08 AM, said:
First, you need to check what his loadout is. If he's a pure boat or a boat with a few secondaries, that's fine to do. But some very good LRM Specialists are very good at working at 400~500m, and expect that they know how to handle themselves fine in close. If they are packing serious in-close heat, you need to figure out what is a good engagement envelope that suits your build and not his.
Second, he might have friends. Always try to have a good Situation Awareness. The good LRM Specialists who fight close in will stick close enough to the Main Line of Resistance (MLR; translation, his buddies) so that he can get help, and he sure as hell know how to use the targeting system to send out your location. So keep an eye out for his friends coming back.
Second, he might have friends. Always try to have a good Situation Awareness. The good LRM Specialists who fight close in will stick close enough to the Main Line of Resistance (MLR; translation, his buddies) so that he can get help, and he sure as hell know how to use the targeting system to send out your location. So keep an eye out for his friends coming back.
As one of those LRM 'Specialists' (Should be a cheevo), that 400-500m range is THE sweet spot. And while I do play the venerable CAT-A1 without any back up weapons, I am far more effective in my C1 with 4xML for 'dirty work'.
Dont discount the medium missile platform either. They can be wicked deadly, pack back up weapons and have pretty good mobility to boot.
Good post Lynx
#9
-
-
- 1,710 posts
Member
Posted 10 March 2015 - 09:45 PM
So, let's take a look at the other side of surviving LRMs in PUGalandia -- how a match usually progress, and the roles of mechs within a "typical" game.
Current PUGalandia setup is 3 mechs of each weight class, where possible; do note that if there is a particular queue imbalance, Maggie the Matchmaker would slip in a wrong weight class from time to time. This is normal so quit bellyaching.
The typical engagement in PUGalandia goes something like this:
In the Meeting Game, it's mostly a light and medium game, as they have the speed to range out and find the enemy. LRMs typically would get thrown around ineffectively -- most LRM boats are going to be working at the maximum range of their weapons, and locks are unreliable as the scouts are correctly more interested in self-preservation.
A single exception though: The Orion VA. With its quirks, it can reach out to 1250m with LRMs, 1350 with modules. This guy would be quite happy to reach out and touch you if you are too careless. Solution? Don't be careless.
Typically, the role of the lights and mediums are to find the enemy and harass/ delay, but not to get themselves killed. The role of the heavy and assault is to use that intelligence, and determine the best killing ground to work over, based on the collective intel on enemy loadouts and individual knowledge of friendly builds. This is mostly going to be setting up for subsequent phases. Regardless of weight class, the focus should be on deception and intel-deprivation; to PREVENT the enemy from identifying you and your build, so that your choice of killing ground won't be so bloody obvious. Driving off scouting mechs is usually a good idea.
In the Snipefest Exchange, the teams either chose or have been forced into a meeting engagement. Usually, the intel and setup is sub-par and both teams are still reacting to known enemy movements. This is where the majority of locks would be important -- you're primarily sharing intel with your team, with the side-dish benefit of calling fire down if your team's LRM Specialists are on the ball. This is where they usually ply their trade, using their superior weapon capacities in this situation to reduce the enemy by two ways: direct damage, and disruption to movement.
In this phase, it is important for heavies and assaults to form up the Main Line of Resistance (MLR) where most of the head-bashing would take place, and critical for lights and mediums to start flanking around the MLR to both develop a better intel picture on the enemy and to disrupt their MLR. Two MLR bashing head to head is usually inconclusive; it takes either a flank disruption (lights and mediums, usually), or heavy indirect fire (heavy/ assault LRM boats or heavy arty usage) to disrupt a MLR sufficiently for an assault.
LRM Specialists in Heavy and Assault chassis would typically position themselves in the middle of the MLR, slightly behind the D/F mechs, and would watch carefully for flank movement. After all, a flank movement would catch them very quickly, so they have vested interest in keeping an eye out. In addition, flank movements are by definition isolated (your MLR is in one place and you are flanking around, of course you are likely isolated from your team), so LRM Specialists watch out for flankers because they are easier to kill once detected. Again, keyword is DETECTED. If you are undetected on a flank run until you get in, then you won't eat LRMs.
To sum, the crux of this phase is to set up an advantage for your team, and heavies and assaults are looking to deal enough damage to do that, while avoiding receiving the same. Mediums and lights are typically more engaged in hunting down each other, as well as setting up disruptive situations to turn the enemy MLR. At this time, the role of the LRM specialist is to help the relevant classes set up the situation, either by supplementing D/F damage on their target, or to compliment flanking movements, or to deny the same by suppressive fire on enemy attempts. Again, to survive against LRMs here, you need to PREVENT detection and PLAN routes with sufficient cover. A longer route isn't necessarily worse if it improves the prevention and planning.
In the Brawl Convergence, the setup is as complete as it gets, and one team moves to close with the other. Sometimes both teams are so good or so crap they just skip the above two phases and slam into each other gleefully. Here it becomes a Heavy and Assault game; their greater mass, protection and firepower counts for more than a Light's speed and a Medium's versatility. In this segment, it is more important to deliver damage that quickly drops the enemy, rather than neatness. LRM Specialists would be in the second line, acting on better locks (since more people are simultaneously locking up) and providing suppressive and attritional firepower against the enemy MLR.
The trick here is for LRM Specialists to not so much deal damage on the enemies being attacked by other teammates, but to target enemy support mechs and disrupt them sufficiently that the they cannot help the enemy being targeted by the rest of the team. Target selection by the LRM Specialist is important here. Conversely, by disrupting the LRM Specialists at this point, the balance can change quickly -- both by removing the LRM support fire, as well as to distract and redirect enemy charge momentum.
In this phase, it's mostly head-breaking. That's not much need for deception or prevention; it's too late for that. Now it's more about accurate aiming and focus fire to take down mechs quickly, prioritizing to remove badly damaged but still threatening mechs out of the equation quickly and efficiently. In this phase, LRM fire is usually more to do stunlocking and disruption, not really trying to deal damage.. but this is also where Heavy LRM boats can vomit LRM45+ at a go and instantly remove a hiding Red CT enemy to keep the numerical advantage running.
In the Wrap, it's the conclusion. If the LRM Specialist still have ammo, either the team is very good or very bad. The team would mop up. Not much to say about this.
So why did I go to the lengths to type all the above crap up? Well, it's mostly to set up the discussion for the next post. I'll wait a while to let the forums decide not to merge my posts together...
Current PUGalandia setup is 3 mechs of each weight class, where possible; do note that if there is a particular queue imbalance, Maggie the Matchmaker would slip in a wrong weight class from time to time. This is normal so quit bellyaching.
The typical engagement in PUGalandia goes something like this:
- The Meeting Game, where the two teams tentatively touch each other in inappropriate places.
- The Snipefest Exchange, where both teams hump terrain and snipe at each other. Typically, this is where people get careless and get boatloaded by LRMs.
- The Brawl Convergence, where one team gains enough confidence -- real or imagined -- that they have a substantial advantage either numerically or tactically, and closes in to finish the other team off. Sometimes the balls fall off and we revert back to 2, until they sew the balls back on.
- The Wrap, where the winning team chase down the unaware, the loose cannons, and the not-theres (AFK/ DCs).
In the Meeting Game, it's mostly a light and medium game, as they have the speed to range out and find the enemy. LRMs typically would get thrown around ineffectively -- most LRM boats are going to be working at the maximum range of their weapons, and locks are unreliable as the scouts are correctly more interested in self-preservation.
A single exception though: The Orion VA. With its quirks, it can reach out to 1250m with LRMs, 1350 with modules. This guy would be quite happy to reach out and touch you if you are too careless. Solution? Don't be careless.
Typically, the role of the lights and mediums are to find the enemy and harass/ delay, but not to get themselves killed. The role of the heavy and assault is to use that intelligence, and determine the best killing ground to work over, based on the collective intel on enemy loadouts and individual knowledge of friendly builds. This is mostly going to be setting up for subsequent phases. Regardless of weight class, the focus should be on deception and intel-deprivation; to PREVENT the enemy from identifying you and your build, so that your choice of killing ground won't be so bloody obvious. Driving off scouting mechs is usually a good idea.
In the Snipefest Exchange, the teams either chose or have been forced into a meeting engagement. Usually, the intel and setup is sub-par and both teams are still reacting to known enemy movements. This is where the majority of locks would be important -- you're primarily sharing intel with your team, with the side-dish benefit of calling fire down if your team's LRM Specialists are on the ball. This is where they usually ply their trade, using their superior weapon capacities in this situation to reduce the enemy by two ways: direct damage, and disruption to movement.
In this phase, it is important for heavies and assaults to form up the Main Line of Resistance (MLR) where most of the head-bashing would take place, and critical for lights and mediums to start flanking around the MLR to both develop a better intel picture on the enemy and to disrupt their MLR. Two MLR bashing head to head is usually inconclusive; it takes either a flank disruption (lights and mediums, usually), or heavy indirect fire (heavy/ assault LRM boats or heavy arty usage) to disrupt a MLR sufficiently for an assault.
LRM Specialists in Heavy and Assault chassis would typically position themselves in the middle of the MLR, slightly behind the D/F mechs, and would watch carefully for flank movement. After all, a flank movement would catch them very quickly, so they have vested interest in keeping an eye out. In addition, flank movements are by definition isolated (your MLR is in one place and you are flanking around, of course you are likely isolated from your team), so LRM Specialists watch out for flankers because they are easier to kill once detected. Again, keyword is DETECTED. If you are undetected on a flank run until you get in, then you won't eat LRMs.
To sum, the crux of this phase is to set up an advantage for your team, and heavies and assaults are looking to deal enough damage to do that, while avoiding receiving the same. Mediums and lights are typically more engaged in hunting down each other, as well as setting up disruptive situations to turn the enemy MLR. At this time, the role of the LRM specialist is to help the relevant classes set up the situation, either by supplementing D/F damage on their target, or to compliment flanking movements, or to deny the same by suppressive fire on enemy attempts. Again, to survive against LRMs here, you need to PREVENT detection and PLAN routes with sufficient cover. A longer route isn't necessarily worse if it improves the prevention and planning.
In the Brawl Convergence, the setup is as complete as it gets, and one team moves to close with the other. Sometimes both teams are so good or so crap they just skip the above two phases and slam into each other gleefully. Here it becomes a Heavy and Assault game; their greater mass, protection and firepower counts for more than a Light's speed and a Medium's versatility. In this segment, it is more important to deliver damage that quickly drops the enemy, rather than neatness. LRM Specialists would be in the second line, acting on better locks (since more people are simultaneously locking up) and providing suppressive and attritional firepower against the enemy MLR.
The trick here is for LRM Specialists to not so much deal damage on the enemies being attacked by other teammates, but to target enemy support mechs and disrupt them sufficiently that the they cannot help the enemy being targeted by the rest of the team. Target selection by the LRM Specialist is important here. Conversely, by disrupting the LRM Specialists at this point, the balance can change quickly -- both by removing the LRM support fire, as well as to distract and redirect enemy charge momentum.
In this phase, it's mostly head-breaking. That's not much need for deception or prevention; it's too late for that. Now it's more about accurate aiming and focus fire to take down mechs quickly, prioritizing to remove badly damaged but still threatening mechs out of the equation quickly and efficiently. In this phase, LRM fire is usually more to do stunlocking and disruption, not really trying to deal damage.. but this is also where Heavy LRM boats can vomit LRM45+ at a go and instantly remove a hiding Red CT enemy to keep the numerical advantage running.
In the Wrap, it's the conclusion. If the LRM Specialist still have ammo, either the team is very good or very bad. The team would mop up. Not much to say about this.
So why did I go to the lengths to type all the above crap up? Well, it's mostly to set up the discussion for the next post. I'll wait a while to let the forums decide not to merge my posts together...
#10
-
-
- 1,710 posts
Member
Posted 10 March 2015 - 10:06 PM
Ok, here's hoping the forums don't merge the two posts. Otherwise it's going to be too long to read.
Well, let's revisit the first part. PUG games are nominally 3/3/3/3. So:
Being able to revert to a Meeting Game has a pre-requisite; that you practice PREVENTION and has PLANNED for a reversion route. If you get pinned in place and cannot revert, your planning sucked and just suck it up and charge the buggers as a team.
In either case, taking out their lights and mediums would reduced the effectiveness of their LRM fire. This forces them to move closer, which makes them more vulnerable for a setup into Brawl Convergence. Chasing the squirrel is not a good policy, but if the opportunity arise to take out their lights without other targets of higher priority, it's usually a good idea.
Looking at this from the other perspective, you can see that by taking a heavy or assault LRM boat, you are effectively reducing the team's ability in the two segments most reliant on these chassis, and now have a responsibility to be good enough to carry the reduction. Some do it by long range fire (during Snipefest Exchange), others do it via support during Brawl Convergence, but in any case, you aren't a direct combatant on the MLR, so you must work much harder to support the entire team. So don't gloat too much at high damage numbers -- you're supposed to do better than that.
So what's the role of the Medium? Surprisingly, it's extremely flexible because nobody is expecting them to do anything. So they can help in everywhere, everywhen. If you see a medium LRM boat and it's doing remarkably well, you might want to keep an eye on him -- the guy may be a LRM Specialist looking to set up positional and tactical advantages for his team.
Well, let's revisit the first part. PUG games are nominally 3/3/3/3. So:
- In the Meeting Game, the 3 lights and 3 mediums are more critical.
- In the Snipefest Exchange, the game shift more towards the 3 mediums and Heavies/ Assaults.
- In the Brawl Convergence, the focus is on the Heavies and Assaults.
Being able to revert to a Meeting Game has a pre-requisite; that you practice PREVENTION and has PLANNED for a reversion route. If you get pinned in place and cannot revert, your planning sucked and just suck it up and charge the buggers as a team.
In either case, taking out their lights and mediums would reduced the effectiveness of their LRM fire. This forces them to move closer, which makes them more vulnerable for a setup into Brawl Convergence. Chasing the squirrel is not a good policy, but if the opportunity arise to take out their lights without other targets of higher priority, it's usually a good idea.
Looking at this from the other perspective, you can see that by taking a heavy or assault LRM boat, you are effectively reducing the team's ability in the two segments most reliant on these chassis, and now have a responsibility to be good enough to carry the reduction. Some do it by long range fire (during Snipefest Exchange), others do it via support during Brawl Convergence, but in any case, you aren't a direct combatant on the MLR, so you must work much harder to support the entire team. So don't gloat too much at high damage numbers -- you're supposed to do better than that.
So what's the role of the Medium? Surprisingly, it's extremely flexible because nobody is expecting them to do anything. So they can help in everywhere, everywhen. If you see a medium LRM boat and it's doing remarkably well, you might want to keep an eye on him -- the guy may be a LRM Specialist looking to set up positional and tactical advantages for his team.
Edited by Lynx7725, 10 March 2015 - 10:07 PM.
#11
-

-
- Big Daddy

- 5,565 posts
Member
- LocationSCIENCE.

Posted 10 March 2015 - 10:54 PM
Lynx7725, on 10 March 2015 - 10:06 PM, said:
So what's the role of the Medium? Surprisingly, it's extremely flexible because nobody is expecting them to do anything. So they can help in everywhere, everywhen. If you see a medium LRM boat and it's doing remarkably well, you might want to keep an eye on him -- the guy may be a LRM Specialist looking to set up positional and tactical advantages for his team.
I fear medium LRM boats more than any other LRM boat. Normally, I don't notice LRM's at all, because i'm a firm proponent of the preparedness points you mentioned earlier. If I ever die to LURMS, it's usually something I can chalk up to as my own stupidity.
Hunchbacks though... are fast, agile, and can lay on the hurt so quickly that you spend the rest of the match mewling in a corner hoping the bad mech doesn't see you again. They can skirmish from just about anywhere, and unlike dedicated boats, they actually carry enough MLAS to deter close encounters of the hump kind.
BRB, going to jump in my HunchBoat.
#12
-
-
- 7,239 posts
Member

Posted 13 March 2015 - 06:39 PM
LRMs are not terribly effective.
Ive been kinda running my Mad Dog in CW, ive used it in 2 Pugland battles and like 3 CW battles, and in both, those missiles do alot of nothing. I wait, I see, I lock, I wait, I fire and nothing probably 40% of the time. Just now in a pug land game I ended with like 420 some damage, most being my LRMs, but alot of them slammed into nothing. And sadly, the LRMs, which are supposed to be long range indirect weapons are actually not effective until its short range, loS weapon...
Ive been kinda running my Mad Dog in CW, ive used it in 2 Pugland battles and like 3 CW battles, and in both, those missiles do alot of nothing. I wait, I see, I lock, I wait, I fire and nothing probably 40% of the time. Just now in a pug land game I ended with like 420 some damage, most being my LRMs, but alot of them slammed into nothing. And sadly, the LRMs, which are supposed to be long range indirect weapons are actually not effective until its short range, loS weapon...
#13
-
-
- 1,710 posts
Member
Posted 07 December 2015 - 09:01 PM
Ok, this slumbered for some time because I grew tired of the Solo PUG stupidity. Now that the big patch that changes things around happened, let's do a quick update.
1. ECM reduction: This is the big one. Combined with the release (and thus insanity) of the Marauder, there has never been more targets out there in the field for a LRM specialist. Yes, ECM carrying mechs are still around and will still cause problems, but their area of effect is a lot smaller, and it's harder for them to hide entire formation under. Basically the change made LRM contributions more meaningful in PUG games.
On the flip side: people who are too used to working under an extensive ECM umbrella have bad habits that are hard to break. Bad coordination, not targeting, etc. The errors are now more telling and aggravating, but these seem to be smoothing out in time.
The PSR setup means that most players are going to be Tier 3 and below, and while there are always going to be a bunch of people with an ax to grind against LRMs, generally people are appreciative of help with an enemy mech. So as time go by, the general trend should be more people using the targeting system to help the whole team... and the LRM Specialist to return the favour by sanding flat as many targets as he can.
Also, Radar Derp module basically rears its ugly head now, so locks are still problematic, but at least you know that silly git is somewhere there now...
2. LRM adjustments: Generally speaking it's more to tighten the spread but trade off in Cooldown. It's not that noticable, really.
3. Quirks readjustments: This one is fairly fatal to a number of chassis, at least as a LRM support platform. Both the Hunchback 4J -- a premium LRM10 death machine -- and the Orion V has been adjusted southwards, making them less attractive as a specialist platform. They aren't bad, especially the Hunchback for the Medium class, it's just that other changes make them less attractive.
OTOH, the Orion VA trades the somewhat dubious range increase quirk for missile cooldown, heat reduction and velocity increases. Combined with certain modules, this makes the Orion VA a top missile platform, and you need to be careful when you see one around. Orions are not good brawling platforms due to the side torso vulnerability, so someone who brings one into a game usually is either trying it out, or knows what to do with it.
3. Changes to Match setup: the removal of the 3/3/3/3 setup is the big thing. Previously, I stopped using a heavy LRM boat because with only 6 armour-heavy mechs, taking a heavy LRM boat means the Main Line of Resistance (MLR) is short one tanker.. which is not a good idea. The Hunchback 4J was a good and viable alternative and works to what I need it to do, so everything was fine.
The removal of the 3/3/3/3 setup means there is no longer a reason not to bring the big boat out and lay the hurt on the enemy. The matchmaker may respect the tonnage/ class matching, but at the end of the day, a heavy LRM boat is probablistically just more effective than a medium LRM boat, and is more able to affect the course of a game. The same rational applies to Assault LRM boats, but the increased armour of Assaults make them much better at tanking and doing face-to-face damage, so I prefer Heavy LRM boats more.
The changes to the choice of game map and mode isn't so big, since there is still some randomness, and honestly speaking, a LRM Specialist has to adjust to changing circumstances. So that has some interesting applications -- you can bias your LRM mechs to use more open maps, some of the time -- but it shouldn't be a big impact.
Other than that, the most unusual thing I've noticed during my absence was that people are talking a lot less smack about LRMs on the forums. Was a bit strange, that.
Edited by Lynx7725, 07 December 2015 - 09:02 PM.
#14
-
-
- The 1 Percent

- 201 posts
Member

Posted 07 December 2015 - 09:43 PM
You may have written more in this post than I have in all my papers combined this semester.
#15
-
-
- 1,710 posts
Member
Posted 07 December 2015 - 09:45 PM
I was doing CW drops for Tukkayid 2 and after meeting a tier, decided to just destress in solo PUG. And then our good friend Sean Lang dropped with me..
So this is his twitch stream, our match started at around 32:40 for him.
http://www.twitch.tv/ngngtv/v/28780145
Now, I'm always keen to see the recieving end of my efforts, so the minute he announced himself, I started recording too:
Turns out he likes nightvision and I don't give really a crap.
So what are the interesting points for this LRM thread? Well a few things. I'll use the countdown timer of the game to coordinate the view on both video, easier to do referencing.
The first thing is about recon. My team's scouts didn't spread out enough to catch the sneak attack Sean Lang's team did, which was bad. Recon is life, for the team, and more so for LRM Specialists. Remember, if they can't see you, they can't hit you.. mostly.
So, once the enemy has been considerate enough to announce their presence, I immediately (with teammates) engage with LRMs, around the 12:56 mark. Critically, this is the effect on the enemy team:
"Lots of missiles".
And that's what I want them to think. A rough count of friendly missile tubes is 50 on my Orion, 20 on an Atlas, and probably a 15 on a Whale. So total, not even 100 tubes. The reason why they thought it was a lot is because you can't really differentiate between 10 missiles in flight and 30 missiles in flight.. it just looked a lot. I was chain-firing 10s and 15s, so it looked like heavy salvos, but in reality is just the rate of fire.
But what's the net effect? The point is that the enemy team took note of the supposedly high LRM count and would likely do two things:
1. Take a more cautious approach, which buy us time to redeploy.
2. They may take it as a sign that we are a missile boat heavy team and decide to close in to brawl, but because I was mimicking a larger salvo density, that may not be true.
Of the two, the enemy team definitely bit for 1, and that spread them out a bit. Whether enough to matter, hard to say. Point 2 didn't quite work out because this was an Assault mission and the base was in between anyway.
This points out the importance of both salvo density (total number of tubes) and number of launchers, which determines the rate of fire of the LRMs. LRMs are highly visible weapons, which is both a drawback, and if you can make it work, an advantage. There's nothing wrong with speculative missile fire if it serves to affect the enemy in their psychology or strategy. That's why I carry more ammo.
Around the 12:24 mark, and actually throughout the clip, I showed that I've violated one of my own rules -- I didn't know this part of the map well enough. As a result, plenty of munition went into buildings for no good reason... 10:28 was especially glaring because I can't see whether the targets were behind buildings and didn't know from memory, so wasted some munitions.
At around 11:36, I actually engaged Sean Lang, as he came down from the star port, and this is another key effect of LRMs: his immediate reaction is "break locks, break locks". That is *exactly* what I want him to do. Actually what I want him to do is to stay there and eat missile, but I can settle for what he ended up doing.
Because what he did to break lock is important -- he sidestepped, his forward momentum was stalled. He was close enough to the objective that it didn't matter that much, but it's common for standard Mechwarrior evasion drill to duck and cover when LRMs comes in. So using this instinct and training against the enemy can pay off when you need to break up a charge -- especially true at Therma gates. At around 10:21 you see that an enemy Marauder backed into Sean Lang trying to dodge what appears to be missile fire; that wasn't me, but the effect is what's important -- confusion, disruption, cut off of situation awareness. That locked two Mechs in a single location with no mobility.
At 10:01 I sent Sean Lang a final present of LRM50. That hit pretty much dead on and weakened his left torso, for the killing shot later. About the most direct damage effect I had in the game really. The rest were all about shaping the battlefield. Interestingly, Combat Loss Grouping (CLG) caught up with the enemy team all about the same time, and I was under the impression during the match that the artillery strike at 9:48 took out huge globs of enemy.
After Sean Lang's mech died, he swapped between a few of his teammates, which showed interesting effects:
At 9:31, he swapped to a Vulture. The poor thing, I was chain firing on him and rocking his world. I had observed good initial hits and knew as he was travelling down a road towards me, my hits will continue to be good, and I continued. The effect can be seen from Sean Lang's persepctive: the rock is impressive, and the net effect is that the pilot cease firing and concentrated on moving. To no avail, because there was no good cover between me and him.
At 9:14, you see an impressively large crowd of LRMs coming for the Stalker -- that's a full LRM50 cloud, compare and contrast against the chain fire cloud. Unless you are safely to one side and aware of the differences, one cloud looks very similar to another. That one smacked into an already weakened CT and set it up for a kill.
And that wraps the game in 6 minutes flat. It wasn't a particularly great game for me, with only 454 points of damage and 6 enemeies engaged -- a LRM Specialist usually engage 8 to 10 targets in a game, if not all. Damage should usually be higher too, usually 500 to 600 as a base, but this one I had a lot of buildings blocking.
Still, the key isn't about dealing damage out to the enemy, that comes with sending missile downrange. The whole key is to use the LRMs to:
1. Shape the battlefield, directing the enemy to (mostly) not go where you don't want them to go, and
2. To buy time for your teammates, either by redirection or suppression of enemy.
There are other effects, one of them about boosting the morale and confidence of the team sufficiently to tackle the enemy, but those are harder to see in such PoV videos.
#16
-

-
- Ace Of Spades
- 3,504 posts
Member
Posted 08 December 2015 - 03:52 AM
Guide is too long. You could have just wrote "Find a rock. Reverse behind it when you see the incoming missile warning."
#17
-
-
- Big Daddy
- 26,736 posts
Member
- LocationStill doing ungodly amount of damage, but with more accuracy.
Posted 08 December 2015 - 04:04 AM
When you are lurmed, the best advice I can give is to "Keep calm and twist the damage around". LRMs are not pin point, and players cannot single out a section to hit with them. It is very easy to spread the damage around. I can get lurmed, lose 40% HP, and still have no breach in my torso armor.
Edited by El Bandito, 08 December 2015 - 05:28 AM.


3 user(s) are reading this topic
0 members, 3 guests, 0 anonymous users


