
Some great ideas here.

Contest: Design A Fedcom Civil War Era Map
Started by CK16, Jun 09 2017 04:02 PM
62 replies to this topic
#22
-

-

- Hell Fork

- 1,384 posts
Member
Posted 11 June 2017 - 01:15 PM
Your going to make me read FedCom Civil war history aren't you. This contest is really hard. 

#25
-
-
- The Undertaker

- 416 posts
Member
Posted 13 June 2017 - 04:34 AM
One Question: Why the heck lore conform- pgi kicks lore since it started working on mwo...
#26
-

-
- FP Veteran - Beta 2

- 4,259 posts
Member
Posted 13 June 2017 - 02:10 PM
What if... the Clans won the Battle at Tukayyid?
For many MechWarriors it's unthinkable that almost two decades ago the Inner Sphere could've lost Terra herself to the invading Clan armies, but with another war on the horizon, this time from within the periphery like the Star League Wars of old, let us look now and see how these events might of unfolded...
"Insert hazy flashback technique and 1980's CRT TV effects here." Bwwwweeeeooooppp!
We begin our story at the negotiation table. Before our battle can even commence we must first learn who the major players are in this grand board of chess soon to be before you. Seven clan armies bid untold galaxies of units to fight against the 144th Comstar Regiments.
First would come the Smoke Jaguars, followed by Nova Cat, followed by Ghost (drop) Bears, then Steel Vipers and the most fearsome of all yet to come or since, the Diamond Sharks! Also the Jade Falcons and some Wolves, but they're not important to this story. Instead, we shall begin in the middle with...
Urcunat Take my City!
OR
Kozice Prime. Home of Spice.
Comstar Intelligence was foolish to have underestimated the Diamond Sharks. While their primary interest was trade amongst their clan brethren would make them appear weak and unfit for battle, they had access to not only the best pilots but the best equipment that money could buy!
A man brilliant not only inside the cockpit of a mech, but with a reputation among his fellow statesmen for his unmatched cunning, strategy, and economic planning. In the years that would follow he would be known as among the legendary Grand Khans, but today he is shall prove that future worth in glorious battle against the relatively green and inexperienced freeborn Second and Eighth armies.
Through this cunning he managed to bid from some of the best galaxy units. While his units may be among the last few to drop he knew that they would be the Clans last, best hope if the others failed - and he was right.
Each target city was approximately 20 KM from the other. He would split the 19th Heavy Cluster and 39th Striker Cluster up to strike Kozice Prime along with the Omega Cluster. Though his hatred of the Freeborns was great, he knew that he could spare no reserves in sieging this heavily fortified city while the 222nd Assault Cluster and 359 Strike Cluster went to attack the lesser defended, secondary target of Urcanut.
The 19th, 39th and Omega Cluster reached Kozice Prime and easily cut through the unprepared 31st division and wiped out the 85th Green division, who fled upon the sight of their veteran commanders being cut down so easily, so efficiently and so ruthlessly by the Clan Warriors.
The 182nd division fought bravely, but they were no match for the lemony-fresh Clan Warriors and they too were wiped out completely, but not without the 19th and Omega Cluster suffering moderate losses.
After only 5 days of fighting for the two cities Clan Diamond Shark emerged victorious and was prepared to aid their Clan Brothers in securing what remained of Tukayyid. The IS expected to win with superior tactics and numbers, but lost against the long term superior strategy of the Clans. It took only 2 years after for the IS factions to surrender as the Clans moved in from beyond the periphery and would soon elect a new Star Lord from among them in Kerensky's honor.
Or would they? For what you have just read is but an alternate version, one of infinite realities for which the Clans won at the battle of Tukayyid.
*It's technically not a proper Fedcom battle, but I wanted to have some backstory for an alternate history leading up to a totally different future - one that MW:O has set into motion.
Edited by cazidin, 13 June 2017 - 02:11 PM.
#27
-

-
- Bad Company

- 2,361 posts
Member
- LocationЯрославль. RDL.

Posted 14 June 2017 - 08:27 AM
Reserved
I want to touch aspect the CLANS vs INNER SPHERE.
This is probably suitable for FW mode.
Civil_War
3055
Katherine Steiner-Davion renames herself Katrina after her popular grandmother Katrina Steiner to appease the Lyrans.
Melissa Steiner-Davion is assassinated.
3057
Katherine Steiner-Davion segregates the former Lyran Commonwealth from the Federated Commonwealth and renames it to Lyran Alliance. Victor Steiner-Davion takes no action in order to prevent a military conflict.
3060
Victor leads Operation Bulldog to Huntress. He leaves Yvonne Steiner-Davion as regent of the Federated Commonwealth.
Operation Bulldog started with two waves, which were impressively successful in reaching their objectives. This momentum was briefly hindered by a Smoke Jaguar counterattack, which was largely unsuccessful. The SLDF forces regrouped and pushed twice more in waves three and four, which succeeded in securing yet more planets for the Inner Sphere
Smoke Jaguar counterattack...
Pesht...
Pesht was invaded in the Clan Smoke Jaguar counterattack. The Delta Galaxy Command Trinary and the Third Assault Cluster assaulted the Seventh Sword of Light, Ryuken-san, First Kell Hounds, and the Second Wolf Legion; under the combined strength of these defending forces, the Clan invaders were wiped out.
Pesht / City: HopeFort.
A medium size map. Standart temperature. Dynamic Time of Day.
City and some Parks, alleys of trees. All small assets: trees, street lightings, fences and etc - are destructable.
The Сlans сontrol the City and the Base. And SLDF forces, after destroying the defense towers in the spaceport area, are planted to take the city into their own hands.
The Jaguar's chances of victory were slim from the start, however, and Jaguar aerospace assets abandoned the Clan's ground forces soon after their combat drop.
some pics (based cryengine2):
more in album: http://imgur.com/a/VkIrm
.
Video: Destructable
I want to touch aspect the CLANS vs INNER SPHERE.
This is probably suitable for FW mode.
Civil_War
3055
Katherine Steiner-Davion renames herself Katrina after her popular grandmother Katrina Steiner to appease the Lyrans.
Melissa Steiner-Davion is assassinated.
3057
Katherine Steiner-Davion segregates the former Lyran Commonwealth from the Federated Commonwealth and renames it to Lyran Alliance. Victor Steiner-Davion takes no action in order to prevent a military conflict.
3060
Victor leads Operation Bulldog to Huntress. He leaves Yvonne Steiner-Davion as regent of the Federated Commonwealth.
Operation Bulldog started with two waves, which were impressively successful in reaching their objectives. This momentum was briefly hindered by a Smoke Jaguar counterattack, which was largely unsuccessful. The SLDF forces regrouped and pushed twice more in waves three and four, which succeeded in securing yet more planets for the Inner Sphere
Smoke Jaguar counterattack...
Pesht...
Pesht was invaded in the Clan Smoke Jaguar counterattack. The Delta Galaxy Command Trinary and the Third Assault Cluster assaulted the Seventh Sword of Light, Ryuken-san, First Kell Hounds, and the Second Wolf Legion; under the combined strength of these defending forces, the Clan invaders were wiped out.
Pesht / City: HopeFort.
A medium size map. Standart temperature. Dynamic Time of Day.
City and some Parks, alleys of trees. All small assets: trees, street lightings, fences and etc - are destructable.
The Сlans сontrol the City and the Base. And SLDF forces, after destroying the defense towers in the spaceport area, are planted to take the city into their own hands.
The Jaguar's chances of victory were slim from the start, however, and Jaguar aerospace assets abandoned the Clan's ground forces soon after their combat drop.
some pics (based cryengine2):
Spoiler


more in album: http://imgur.com/a/VkIrm
.
Video: Destructable
Edited by Volkodav, 28 June 2017 - 12:28 PM.
#28
-

-
- Wrath

- 20,369 posts
Member
- LocationBlack Dot in a Sea of Blue
Posted 15 June 2017 - 04:58 AM
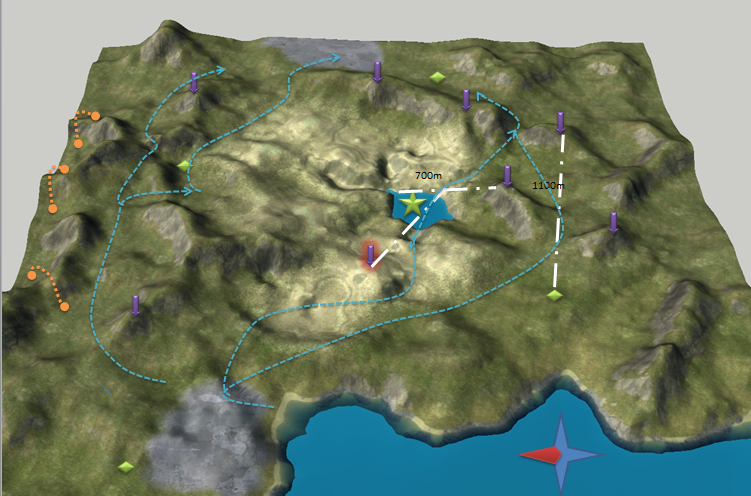
Ok - this map is about the final climax of the senseless war on Dalkeith.
The story so far:
This is Dalkeith - to be exact the eastern Rockmeier continent. A radioactive barren - remains of the 1st Succession Wars.
The map might be a shrinked version of this continent. Fighting there took part in the later stage Civil War although the first shots were fired during 3064.
The battlefield did see the end of the 4th Deneb Light Cavalry - the major part of the 3rd Royal Guards. The already savaged 13th Donegal Guards had only few survivors remaining.
As you already might suspect Dalketih was a meat grinder, like New Syrtis; Kathil or New Avalon.
4 Loyalist RCT and 2 Allied RCTs saw fighting and were mauled (up to the destruction as fighting force) in the progress of more than 2 years.
The final push at the ruined city - the former capital - was crushed for the first time by well placed killing grounds of the defender (allied) and massive artillery. However the second push and the retreat was a feint. When the 4th DLC followed the remnants of the loyalist forces - the 26th Lyran Guards dropped right on top of them. The 4th DLC fought to the last and the casualties of the fresh Guards were serious.
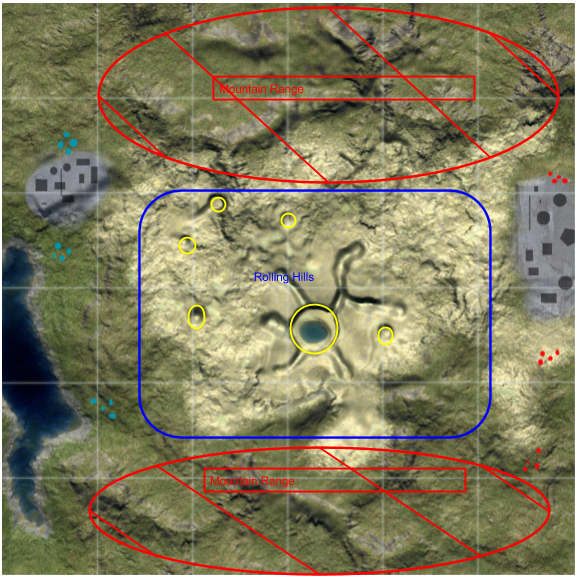
A medium / small sized 3x3 km map.
The north and south are covered with steep mountains and cliffs that provide lots of hard cover and are suitable for short range fighters.
The middle ground are rolling hills with not so much hard cover - but a Mech can go almost everywhere.
The feature is the central “atom bomb crater” that caused several rifts in the terrain, perfect for hard cover - so even short range fighters can move through the middle ground without fear of getting wasted by LRMs or Long range fighters. There are also some other craters along the route to went for cover.
Red are "safe" routes for short range fighters. There they will find usually enough cover to get into short range combat. although time is critical - with the passes there is no way they can react fast for a push of the enemy through the open middle terrain.
The black lines show "sniper" nests and cliffs. The needle in the south as well as the ridge in the west provide medium range line of sights to the bottom of the crater. It should not be possible to shoot from the rim of the crater to the bottom (to steep angle, to many rocks)
There are also sniper nests open only from one direction to allow a Mech to defend a pass against short range combatants.
However the sniper positions are open and doesn't provide ample hard cover - when the sniper got spotted he better moves instead of staying and playing peekaboo.
Mech Roles:
Scout - needed to "watch" the three routes
Sniper - obviously to protect those routes
Missile Boats - to flush snipers out or to "mine" the barrens
Striker - move through the mountain to get into "sniper" positions or harass the enemy base
Brawler - medium range pls go mountain
Juggernaut - brutal CQC? The crater is all yours
I would not play Escort on this map - there are to many positions were a attacker can lay in ambush
Assault - harbor and ruined city.
Dominion - obviously the bomb crater with the trenches.
Conquest - 2 for the bases and each 1 in the crossroad junctions plus Theta in the crater.
With the correct start positions the way is for both teams the same.
Incursion would place the "spots" at the same position as the conquest points (base; junctions crater)
The base in the east is below the average terrain of the rolling hills - were the base in the east is protected by the ridge - so shooting into the base is ugly short range business.
Minor updates for my entry and a bump
a different angle -
You see the mountains in the north have more cliffs (I'm really an absolute beginner) so jump jet equiped mediums or lights (heavys and assault hovers would not help much) can use solid cover and a fast lane between the bases.
In the south the mountain range is less steep . better for all type pf mechs. I would put the assault charlie lances there
The middle barrens as said have rolling hils - you have LOS cover as long as you follow the ridges.
The crater is here wide open (more cliffs and rocks needed) but provide cover from the many sniper positions. (As you see the west base have more sniper positions available. were the east have better ones.
Those sniping positions are open - maybe with rocks in hip height for hill humping - but very dangerous terrain when somebody send the rain in form of LRMs.
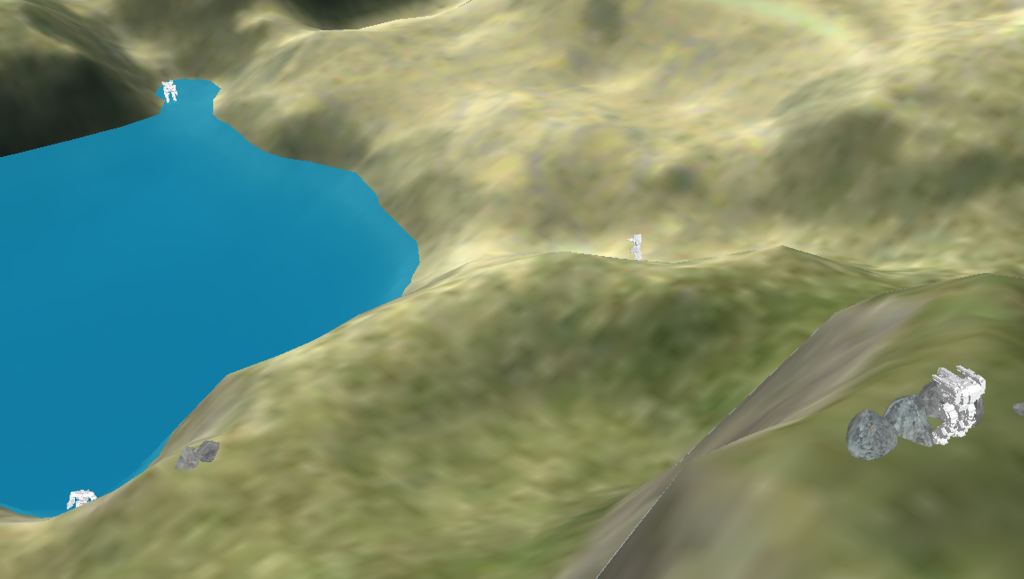
A Stalker 8S fires at a enemy Marauder in ~700m distance that moves into the caldera- only his upper torsos is exposed. The cliff however hide the two centurions that move at the edge of the cladera.
luck for the 8S - a loyalist Banshee 6S charges from the second premium sniper position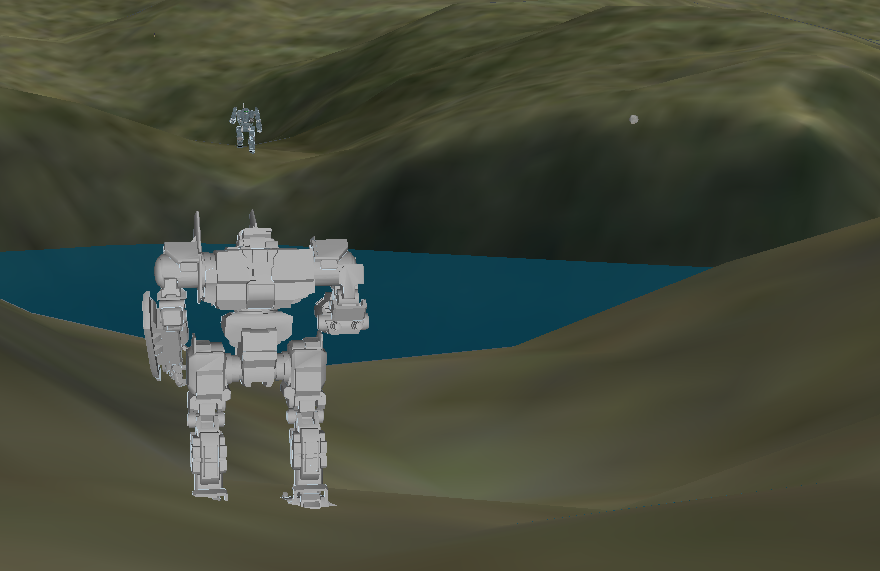
The second centurion hardly has time to warn his wing man before he get shot.
Loyalist start at the harbor.
Story - already written although only in German - if there are enough people who want to read - i can try to translate. https://drive.google...iew?usp=sharing
The story so far:
This is Dalkeith - to be exact the eastern Rockmeier continent. A radioactive barren - remains of the 1st Succession Wars.
The map might be a shrinked version of this continent. Fighting there took part in the later stage Civil War although the first shots were fired during 3064.
The battlefield did see the end of the 4th Deneb Light Cavalry - the major part of the 3rd Royal Guards. The already savaged 13th Donegal Guards had only few survivors remaining.
As you already might suspect Dalketih was a meat grinder, like New Syrtis; Kathil or New Avalon.
4 Loyalist RCT and 2 Allied RCTs saw fighting and were mauled (up to the destruction as fighting force) in the progress of more than 2 years.
The final push at the ruined city - the former capital - was crushed for the first time by well placed killing grounds of the defender (allied) and massive artillery. However the second push and the retreat was a feint. When the 4th DLC followed the remnants of the loyalist forces - the 26th Lyran Guards dropped right on top of them. The 4th DLC fought to the last and the casualties of the fresh Guards were serious.
A medium / small sized 3x3 km map.
The north and south are covered with steep mountains and cliffs that provide lots of hard cover and are suitable for short range fighters.
The middle ground are rolling hills with not so much hard cover - but a Mech can go almost everywhere.
The feature is the central “atom bomb crater” that caused several rifts in the terrain, perfect for hard cover - so even short range fighters can move through the middle ground without fear of getting wasted by LRMs or Long range fighters. There are also some other craters along the route to went for cover.
Red are "safe" routes for short range fighters. There they will find usually enough cover to get into short range combat. although time is critical - with the passes there is no way they can react fast for a push of the enemy through the open middle terrain.
The black lines show "sniper" nests and cliffs. The needle in the south as well as the ridge in the west provide medium range line of sights to the bottom of the crater. It should not be possible to shoot from the rim of the crater to the bottom (to steep angle, to many rocks)
There are also sniper nests open only from one direction to allow a Mech to defend a pass against short range combatants.
However the sniper positions are open and doesn't provide ample hard cover - when the sniper got spotted he better moves instead of staying and playing peekaboo.
Mech Roles:
Scout - needed to "watch" the three routes
Sniper - obviously to protect those routes
Missile Boats - to flush snipers out or to "mine" the barrens
Striker - move through the mountain to get into "sniper" positions or harass the enemy base
Brawler - medium range pls go mountain
Juggernaut - brutal CQC? The crater is all yours
I would not play Escort on this map - there are to many positions were a attacker can lay in ambush
Assault - harbor and ruined city.
Dominion - obviously the bomb crater with the trenches.
Conquest - 2 for the bases and each 1 in the crossroad junctions plus Theta in the crater.
With the correct start positions the way is for both teams the same.
Incursion would place the "spots" at the same position as the conquest points (base; junctions crater)
The base in the east is below the average terrain of the rolling hills - were the base in the east is protected by the ridge - so shooting into the base is ugly short range business.
Minor updates for my entry and a bump
a different angle -
You see the mountains in the north have more cliffs (I'm really an absolute beginner) so jump jet equiped mediums or lights (heavys and assault hovers would not help much) can use solid cover and a fast lane between the bases.
In the south the mountain range is less steep . better for all type pf mechs. I would put the assault charlie lances there
The middle barrens as said have rolling hils - you have LOS cover as long as you follow the ridges.
The crater is here wide open (more cliffs and rocks needed) but provide cover from the many sniper positions. (As you see the west base have more sniper positions available. were the east have better ones.
Those sniping positions are open - maybe with rocks in hip height for hill humping - but very dangerous terrain when somebody send the rain in form of LRMs.
A Stalker 8S fires at a enemy Marauder in ~700m distance that moves into the caldera- only his upper torsos is exposed. The cliff however hide the two centurions that move at the edge of the cladera.
luck for the 8S - a loyalist Banshee 6S charges from the second premium sniper position
The second centurion hardly has time to warn his wing man before he get shot.
Loyalist start at the harbor.
Story - already written although only in German - if there are enough people who want to read - i can try to translate. https://drive.google...iew?usp=sharing
Edited by Karl Streiger, 28 June 2017 - 12:53 AM.
#29
-
-
- The Cub

- 3,031 posts
Member
- LocationAlshain V
Posted 15 June 2017 - 08:07 AM

This is off to a good start!
#30
-
-
- Heavy Lifter

- 1,744 posts
Member
Posted 15 June 2017 - 10:57 AM
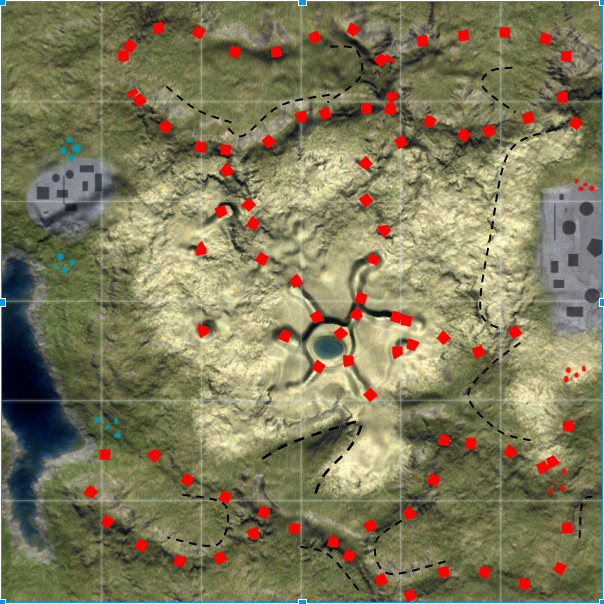
Tharkad Palace:
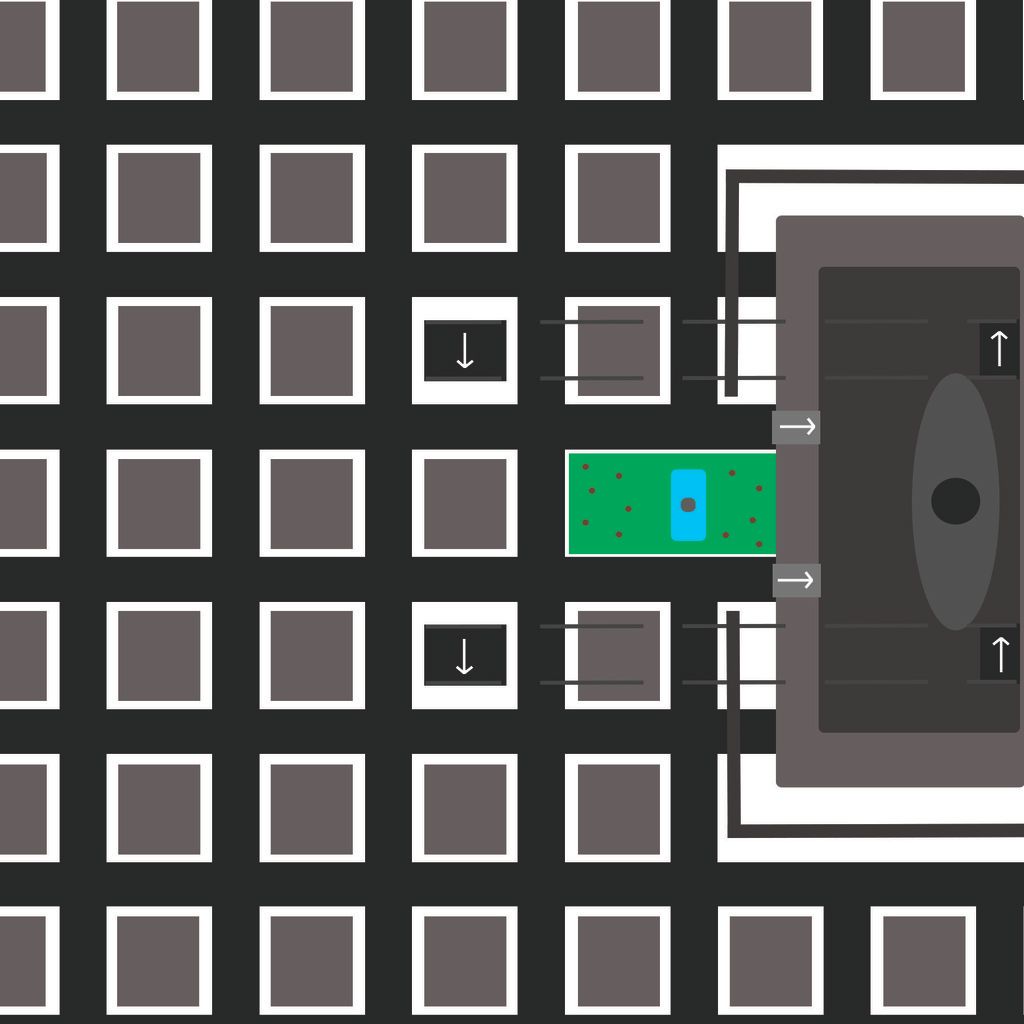
The majority of the map is flat. No hills. No cliffs. No high ground. No low ground. A level city-scape with tall buildings to act as cover. The spawn points are on the north and south sides of the map. The map is mirrored from north and south to ensure spawn points never play a determining factor in match victories. The majority of the map is urban with the exception of the palace itself, which is still surrounded by high walls. Only from the very top level of the palace can mechs see over the palace walls. Tunnels leading into the palace from the outside keep campers honest.
Buildings are noted as grey squares on the map. All buildings are 15 stories or higher, more than tall enough to shield from LRMs. They can be in various states of damage due to fighting.
The palace sits on the east end of the map. It has 3 different levels with a crown piece on top. The first level is slightly elevated above street level. The wall surrounding the balance is at least 4-5 stories high, just tall enough to cover the tallest mech standing directly next to it. The two black squares with down arrows represent tunnels that go into a subway system. Both tunnels exit on the back side of the palace inside the walls on the second level. The main gate also has a courtyard with a small park and a fountain in the center. Two ramps take the entrance roads from street level to the first palace level. The palace is the only high ground on the map and is equally accessible from both north and south spawn points.
Edited by Kiran Yagami, 16 June 2017 - 06:22 AM.
#31
-
-
- Heavy Lifter
- 1,744 posts
Member
Posted 16 June 2017 - 06:16 AM
Editted to make the map larger. There is now more city than palace, so the open spaces are limited. Also hid the tunnel openings from the palace, so that people can use them to enter the palace undetected by snipers.
#34
-
-
- The Cub
- 3,031 posts
Member
- LocationAlshain V
Posted 19 June 2017 - 09:52 AM
Yea less then 2 weeks now, only like 4/5 submissions lol so far....
#35
-
-
- The God

- 5,751 posts
Member
- LocationOn Reddit and Twitter
Posted 19 June 2017 - 09:56 AM
Recent balance changes have killed my motivation.
#36
-
-
- Hell Fork
- 1,384 posts
Member
Posted 19 June 2017 - 06:10 PM
 CK16, on 19 June 2017 - 09:52 AM, said:
Yea less then 2 weeks now, only like 4/5 submissions lol so far....
Yeah I'm putting some time into it. Spent a weekend so far and wont be done for a week at least if I follow my plan.
#37
-
-
- Knight Errant
- 9,942 posts
Member
- LocationDueling on Solaris
Posted 19 June 2017 - 06:31 PM
Good topic I will try not to miss how this turns out.
#38
-
-
- Ace Of Spades

- 6,040 posts
Member
- LocationCalifornia
Posted 19 June 2017 - 06:56 PM
I love these ideas. #PlzPGI
#39
-
-
- Wrath
- 20,369 posts
Member
- LocationBlack Dot in a Sea of Blue
Posted 21 June 2017 - 01:23 AM
Minor updates for my entry and a bump
a different angle -
You see the mountains in the north have more cliffs (I'm really an absolute beginner) so jump jet equiped mediums or lights (heavys and assault hovers would not help much) can use solid cover and a fast lane between the bases.
In the south the mountain range is less steep . better for all type pf mechs. I would put the assault charlie lances there
The middle barrens as said have rolling hils - you have LOS cover as long as you follow the ridges.
The crater is here wide open (more cliffs and rocks needed) but provide cover from the many sniper positions. (As you see the west base have more sniper positions available. were the east have better ones.
Those sniping positions are open - maybe with rocks in hip height for hill humping - but very dangerous terrain when somebody send the rain in form of LRMs.
A Stalker 8S fires at a enemy Marauder in ~700m distance that moves into the caldera- only his upper torsos is exposed. The cliff however hide the two centurions that move at the edge of the cladera.
luck for the 8S - a loyalist Banshee 6S charges from the second premium sniper position
The second centurion hardly has time to warn his wing man before he get shot.
Loyalist start at the harbor.
Edited by Karl Streiger, 28 June 2017 - 12:52 AM.
#40
-
-
- Bad Company
- 81 posts
Member
Posted 22 June 2017 - 04:10 PM
Reserving for an entry 
Sadly, I must submit my entry partially complete because of a family emergency and busy season at work conspiring to devour my free time. Now, let us begin.
EDIT: Had to clean up formatting because copy-paste went full ham.
EDIT2: Whoops, forgot to include the original concept sketch I did.
===================================================================================
Greetings, fellow MechWarriors!
I present to you a map concept inspired by the Fifteenth Battle of Hesperus of the Third Skye Rebellion during the FedCom Civil War (now say it five times fast.)
The most critical engagement of the Fifteenth Battle of Hesperus occurred on the planet of Hesperus II in and around the Defiance Industries factories. Defiance Industries was one of the largest arms and equipment suppliers to the Federated Commonwealth before the Civil War, and during it they allied themselves with the Lyran Commonwealth Armed Forces fighting on behalf of Archon Katrina Steiner-Davion. It supplied the LCAF with many notable BattleMechs such as the Locust, Assassin, Uziel, Zeus, Stalker, Banshee, Atlas, and Fafnir. The installations responsible for this massive production of war materiel are insanely high-value targets, and their capture or destruction will change the course of history.
Having grated against the reign of the Lyrans for decades, the Federation of Skye saw the outbreak of open war as their chance to finally seize independence, and so they struck against the LCAF garrisons and attacked Hesperus II, vying for control of the factories. The only hope to defend and keep their new sovereignty is to seize Defiance and gain the supplies, materiel, and infrastructure necessary to repel the inevitable reprisals.
This is a battle for freedom, for the future of Skye. The fate of millions is in your hands.
Design Philosophy:
My main goal in creating Defiance Industries' Zeta Complex was to make a map that conveyed the monumental scale of facilities and industries in the BattleTech universe with stunning and dramatic lore-inspired vistas. It balances the different play styles by creating numerous landmarks and positions designed as counters to each other. There are so many places and directions from which a player and team can choose to move to and from and different ways to engage that battles should always surprise you. Alas, monumental scale can be just as much of a hindrance as a boon, and since this map has much greater vertical variance given the number of levels available to it, it is not as large as some of the other maps. It will fall just between Canyon Network and Grim Portico in size, in order to not put assault mechs at a distinct disadvantage by not being fast enough to respond to feints, and minimize time spent slowly plodding to target. The goal of this map is Action, Drama, Excitement!


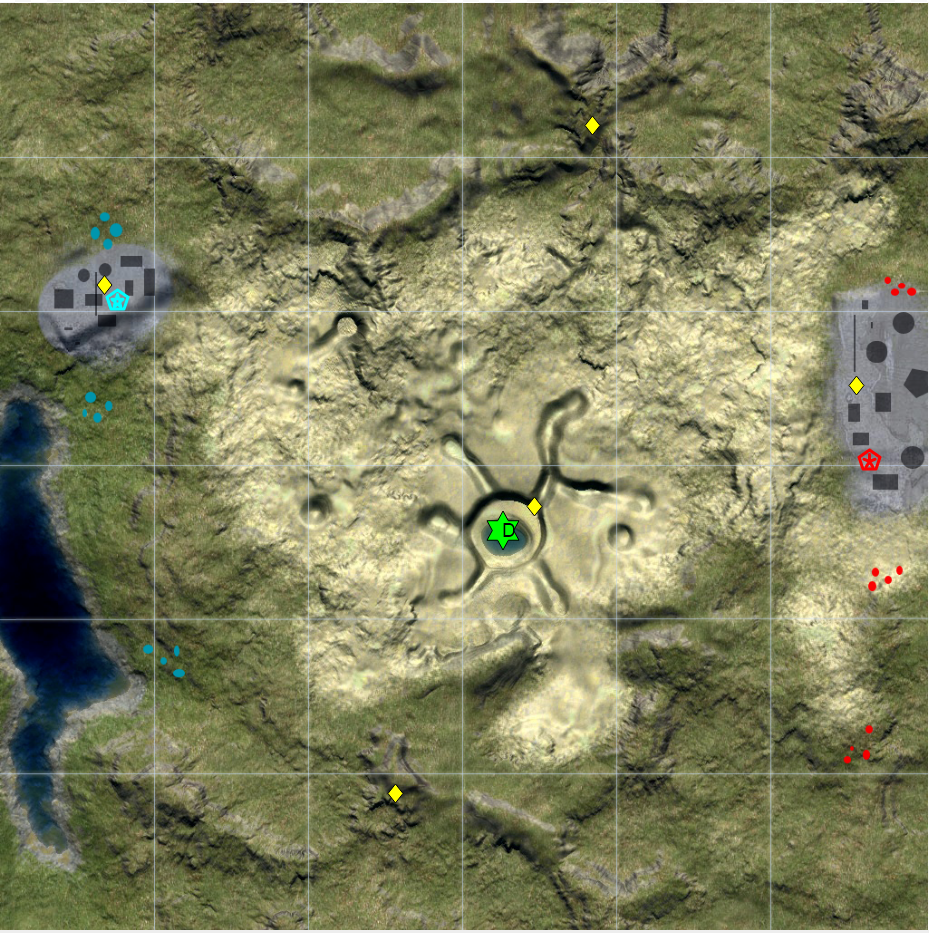
Main Map Landmarks:
⦁The 'Rage Cage' - A 500 meter square live fire testing range in the center of the map with large concrete blocks used for maneuverability, stability, and accuracy tests. Provides an excellent brawling arena, but is vulnerable to sniper fire from the mountains, Experimentals, and Superstructure if pilots aren't careful.
⦁Experimental Weapons Facility (EWF) - West of Rage Cage, this citadel-like structure handles production of new autocannons and lasers, safely away from the superstructure to compartmentalize damage in the case of catastrophic failure. It has a coolant pool beneath it that connects to the STNTS. Is a destroyable facility.
⦁Experimental Munitions Facility (EMF) - East of Rage Cage, this citadel-like structure is used for the production of new shells and missiles in a relatively safe manner. Has a storage magazine beneath it that connects to the STNTS. Is a destroyable facility.
⦁Mech Assembly Hall - To the south of the Rage Cage, in the center of the Factory Superstructure, connected to the internal halls of the Superstructure and the STNTS.
⦁HPG Station - On the far side of the Northern Mountains from the Rage Cage. This dense installation provides uplink to the rest of the Lyran Alliance. Controlling it is critical to intelligence gathering and coordination with off-world units. The Lyrans need it to summon reinforcements, and the Separatists need it to stay in the fight.
⦁Northern Mountains - To the north of the Rage Cage, this mountain range provides a natural barrier between the factory and the HPG Station, and the cliffs and rocks provide cover and high ground for skirmishers and snipers to fire into the Experimental facilities, Rage Cage, and Superstructure.
⦁Service Tunnel & Transit System (STNTS) - A massive underground tunnel system connecting most major landmarks on the map, this system gives light and medium mechs the ability to quickly reposition as needed. It has entrances at the Experimentals, the HPG Station, and the Superstructure.
⦁Factory Superstructure - A massive industrial facility spanning several kilometers that integrates all elements of battlemech production into one heavily fortified structure capable of withstanding orbital bombardment. It lies to the south of the Rage Cage, and stretches across the bottom of the map. It contains several interior spaces, passages, landings, and exterior walkways, with many portals to the exterior allowing mechs to trade fire with the Experimental facilities, the Rage Cage, and if the pilot is skilled enough, the mountains. Brawlers will be at a distinct advantage within the Superstructure, but must take care not to expose themselves to the exterior portals.
Game Mode Setup:
Original Concept:

Sadly, I must submit my entry partially complete because of a family emergency and busy season at work conspiring to devour my free time. Now, let us begin.
EDIT: Had to clean up formatting because copy-paste went full ham.
EDIT2: Whoops, forgot to include the original concept sketch I did.
===================================================================================
Greetings, fellow MechWarriors!
I present to you a map concept inspired by the Fifteenth Battle of Hesperus of the Third Skye Rebellion during the FedCom Civil War (now say it five times fast.)
The most critical engagement of the Fifteenth Battle of Hesperus occurred on the planet of Hesperus II in and around the Defiance Industries factories. Defiance Industries was one of the largest arms and equipment suppliers to the Federated Commonwealth before the Civil War, and during it they allied themselves with the Lyran Commonwealth Armed Forces fighting on behalf of Archon Katrina Steiner-Davion. It supplied the LCAF with many notable BattleMechs such as the Locust, Assassin, Uziel, Zeus, Stalker, Banshee, Atlas, and Fafnir. The installations responsible for this massive production of war materiel are insanely high-value targets, and their capture or destruction will change the course of history.
Having grated against the reign of the Lyrans for decades, the Federation of Skye saw the outbreak of open war as their chance to finally seize independence, and so they struck against the LCAF garrisons and attacked Hesperus II, vying for control of the factories. The only hope to defend and keep their new sovereignty is to seize Defiance and gain the supplies, materiel, and infrastructure necessary to repel the inevitable reprisals.
This is a battle for freedom, for the future of Skye. The fate of millions is in your hands.
Design Philosophy:
My main goal in creating Defiance Industries' Zeta Complex was to make a map that conveyed the monumental scale of facilities and industries in the BattleTech universe with stunning and dramatic lore-inspired vistas. It balances the different play styles by creating numerous landmarks and positions designed as counters to each other. There are so many places and directions from which a player and team can choose to move to and from and different ways to engage that battles should always surprise you. Alas, monumental scale can be just as much of a hindrance as a boon, and since this map has much greater vertical variance given the number of levels available to it, it is not as large as some of the other maps. It will fall just between Canyon Network and Grim Portico in size, in order to not put assault mechs at a distinct disadvantage by not being fast enough to respond to feints, and minimize time spent slowly plodding to target. The goal of this map is Action, Drama, Excitement!
Main Map Landmarks:
⦁The 'Rage Cage' - A 500 meter square live fire testing range in the center of the map with large concrete blocks used for maneuverability, stability, and accuracy tests. Provides an excellent brawling arena, but is vulnerable to sniper fire from the mountains, Experimentals, and Superstructure if pilots aren't careful.
⦁Experimental Weapons Facility (EWF) - West of Rage Cage, this citadel-like structure handles production of new autocannons and lasers, safely away from the superstructure to compartmentalize damage in the case of catastrophic failure. It has a coolant pool beneath it that connects to the STNTS. Is a destroyable facility.
⦁Experimental Munitions Facility (EMF) - East of Rage Cage, this citadel-like structure is used for the production of new shells and missiles in a relatively safe manner. Has a storage magazine beneath it that connects to the STNTS. Is a destroyable facility.
⦁Mech Assembly Hall - To the south of the Rage Cage, in the center of the Factory Superstructure, connected to the internal halls of the Superstructure and the STNTS.
⦁HPG Station - On the far side of the Northern Mountains from the Rage Cage. This dense installation provides uplink to the rest of the Lyran Alliance. Controlling it is critical to intelligence gathering and coordination with off-world units. The Lyrans need it to summon reinforcements, and the Separatists need it to stay in the fight.
⦁Northern Mountains - To the north of the Rage Cage, this mountain range provides a natural barrier between the factory and the HPG Station, and the cliffs and rocks provide cover and high ground for skirmishers and snipers to fire into the Experimental facilities, Rage Cage, and Superstructure.
⦁Service Tunnel & Transit System (STNTS) - A massive underground tunnel system connecting most major landmarks on the map, this system gives light and medium mechs the ability to quickly reposition as needed. It has entrances at the Experimentals, the HPG Station, and the Superstructure.
⦁Factory Superstructure - A massive industrial facility spanning several kilometers that integrates all elements of battlemech production into one heavily fortified structure capable of withstanding orbital bombardment. It lies to the south of the Rage Cage, and stretches across the bottom of the map. It contains several interior spaces, passages, landings, and exterior walkways, with many portals to the exterior allowing mechs to trade fire with the Experimental facilities, the Rage Cage, and if the pilot is skilled enough, the mountains. Brawlers will be at a distinct advantage within the Superstructure, but must take care not to expose themselves to the exterior portals.
Game Mode Setup:
Skirmish: Each team starts on opposite sides of the Experimental Facilities, giving both teams equal access to the map.
Assault: Same as above, with the team's MFBs located in the Experimental Facilities. The Experimentals are not destructable in this mode.
Incursion: Similar to Assault, except the bases form fortified areas on the far side of the Experimentals.
Conquest: The five capture points are located in the Mech Assembly Hall, the HPG Station, the Experimental Facilities and the Rage Cage. In order to prevent murderballing, the teams start in opposite corners of the map, with BlueFor in the upper left corner mountain passes, and RedFor on the surface of the Factory Superstructure in the lower right. This forces the teams to choose between murderballing and gaining cap advantage by making the middle cap point the furthest away and the two nearest points equidistant, providing no optimal path that allows both murderball and cap advantage.
Domination: EVERYONE IN THE RAGE CAGE, BRAAAAAWWWWWLLLL!!!! Generators in the EMF and EWF and on the surface of the Factory Superstructure.
Escort: Just... whyyyyyyy.
Siege: This won't be your traditional siege map. Instead of fighting for an SDS, you will be seeking to sabotage the emergency systems put in place on the HPG Station after its support facilities were destroyed and the main transmitter damaged in an orbital bombardment from the Skye rebels. BlueFor starts at the HPG Station, while RedFor starts on top of the Factory Superstructure. The central tunnel's blast door has closed, and the gates through the mountain passes have been shut. Generators are situated behind the gates, with the STNTS gate generator being vulnerable through small service corridors. The Omega Generator is to the North of the HPG, with O-Gens 1-3 situated in the ruins around it.
Original Concept:
Edited by Esarai, 01 July 2017 - 05:31 AM.


1 user(s) are reading this topic
0 members, 1 guests, 0 anonymous users


