Jump to content

How To: Create Your Own Art Using Pgi's Mechs

Art Misc

2255 replies to this topic

#441 Leafia Barrett

    Member

  • PipPipPipPipPipPip
  • 356 posts

Posted 02 August 2013 - 09:15 AM

View PostDirePhoenix, on 02 August 2013 - 08:42 AM, said:

I'm fairly certain the Commando cockpit interior also cannot be matched up with the exterior. And the Atlas as well (most telling because the POV from the cockpit is actually from the center of the 'mech instead of canted off to the side).

Well, ****. I was planning to have a posed image with a pilot sitting in the cockpit, but if I can't even fit the cockpit in properly, then I guess I may as well not bother. I'll still figure something out, I suppose.

Edited by Leafia Barrett, 02 August 2013 - 09:18 AM.


#442 Leafia Barrett

    Member

  • PipPipPipPipPipPip
  • 356 posts

Posted 02 August 2013 - 01:32 PM

Okay, for the Jenner (and I presume the others of the original 4), you can throw out about 75% of that assembly tutorial I put together, as it doesn't exactly work from what I'm seeing. The first 4 seem a lot more disorganized as far as files go, which I guess makes sense, since PGI was just getting started.

Edited by Leafia Barrett, 02 August 2013 - 03:26 PM.


#443 Overkill C7

    Member

  • PipPipPip
  • Legendary Founder
  • Legendary Founder
  • 85 posts

Posted 02 August 2013 - 04:32 PM

Anyone have the mech files in the table top scale (1/285) that they wouldn't mind sharing with us so we can get some printed for the table top game?

#444 Leafia Barrett

    Member

  • PipPipPipPipPipPip
  • 356 posts

Posted 02 August 2013 - 05:35 PM

All right, so I took the initiative and got the camo colors using screenshots (MWO saves in jpg, so there was a little artifacting- these aren't perfectly accurate, but they're close). And boy, there's a lot of them.

Posted Image

For all 0 of you who are wondering, this is the palette for Sarah's Jenner:
Posted Image

#445 Leafia Barrett

    Member

  • PipPipPipPipPipPip
  • 356 posts

Posted 03 August 2013 - 09:32 AM

View PostSparks Murphey, on 17 February 2013 - 05:51 PM, said:

Making a mask in Gimp:
Right click the layer, click "Add Layer Mask" then select "Grayscale copy of layer". Done.

Okay, okay, you'll need to move it to a different layer for painting as well (Photoshop actually does this bit better, but the rest of it so much worse). Easiest way to do this is to right click the layer, select "Mask to selection", right click your painting layer, click "Add Layer Mask" again, and this time select "Selection". Now we're done.

How do you force each color of the original RGB to its own layer, instead of having to remake the camo from scratch (assuming it's possible - if it isn't, then **** this whole project)? I tried using the color channels as masks, but it just made it look outrageously ugly and a bit glitchy when applied.

#446 Leafia Barrett

    Member

  • PipPipPipPipPipPip
  • 356 posts

Posted 04 August 2013 - 05:05 PM

So, I'm on a crusade to assemble (from pieces, regardless of the existence of the _scale models- those are all in one clump, making rigging harder) and rig every mech in the game (for simplicity's sake, just gonna tack on as many of the hardpoints from the variants as will fit, with a few exceptions), and make them to scale (using a Gardevoir model, 1.58m, for scale). I'm also going to try to fit the cockpits in when possible. Working on the Jenner-D(S) currently, which does actually have a cockpit that more or less fits into the head. In related news, does anyone know where I can find a decent 3D child model base for free?

#447 Sparks Murphey

    Member

  • PipPipPipPipPipPipPipPipPip
  • Bridesmaid
  • Bridesmaid
  • 2,953 posts
  • LocationAdelaide, Australia

Posted 07 August 2013 - 08:49 PM

View PostLeafia Barrett, on 03 August 2013 - 09:32 AM, said:

How do you force each color of the original RGB to its own layer, instead of having to remake the camo from scratch (assuming it's possible - if it isn't, then **** this whole project)? I tried using the color channels as masks, but it just made it look outrageously ugly and a bit glitchy when applied.

Use the colour channels as masks, as you said. The trick seems to be that you need to put them in the correct order as well. From the top of my head, I think it is:

B layer
G layer
R layer
Base diffuse

in order of top to bottom. I haven't got it open in front of me, though, so you may need to fiddle with the order until it works better.

Not sure if this is quite what you're looking for in a 3D child model, but it's the best I could find: http://www.turbosqui...l-x-free/583223

#448 Leafia Barrett

    Member

  • PipPipPipPipPipPip
  • 356 posts

Posted 08 August 2013 - 07:46 AM

View PostSparks Murphey, on 07 August 2013 - 08:49 PM, said:

Use the colour channels as masks, as you said. The trick seems to be that you need to put them in the correct order as well. From the top of my head, I think it is:

B layer
G layer
R layer
Base diffuse

in order of top to bottom. I haven't got it open in front of me, though, so you may need to fiddle with the order until it works better.
In fact, doing anything involving more layers than the base one apparently glitches the texture out, even merging a perfectly clear, unedited layer with absolutely nothing in it, so it doesn't matter if that works, because it'll still glitch out.

Posted Image
I did this. I added a brand-new untouched layer and saved (it automatically merges, but the same thing happens with manual merging).

Posted Image
See? Completely unchanged layer. I added it and saved, and that is literally it.

Posted Image
It does this. Any and every part of the texture image that was transparent now becomes completely black on the model. And before you say that maybe the texture itself was affected somehow...

Posted Image
Nope. This is the exact same image, reopened after saving it. And if you're wondering, yes, it does still do this if you actually change the new layer at all, and it does it with multiple layers instead of just one, and it does it if you ever so much as touch the "add layer" option or anything related to it, including copy/pasting stuff from another image.
And using the compound map option for the diffuse texture in 3dsmax not only cuts the texture quality to about 1/4, the other images used as masks have glitched out transparency, including just flat-out random transparent pixels. And no, I'm not going to learn a completely new 3D editor to do this, especially since Blender is horrendously unintuitive to me to even change the viewpoint, let alone actually model or texture anything.

Edited by Leafia Barrett, 08 August 2013 - 07:52 AM.


#449 Devil Fox

    Member

  • PipPipPipPipPipPipPipPip
  • The Infernal
  • The Infernal
  • 1,393 posts
  • LocationThe Fox Den

Posted 08 August 2013 - 03:26 PM

View PostLeafia Barrett, on 08 August 2013 - 07:46 AM, said:

And no, I'm not going to learn a completely new 3D editor to do this, especially since Blender is horrendously unintuitive to me to even change the viewpoint, let alone actually model or texture anything.


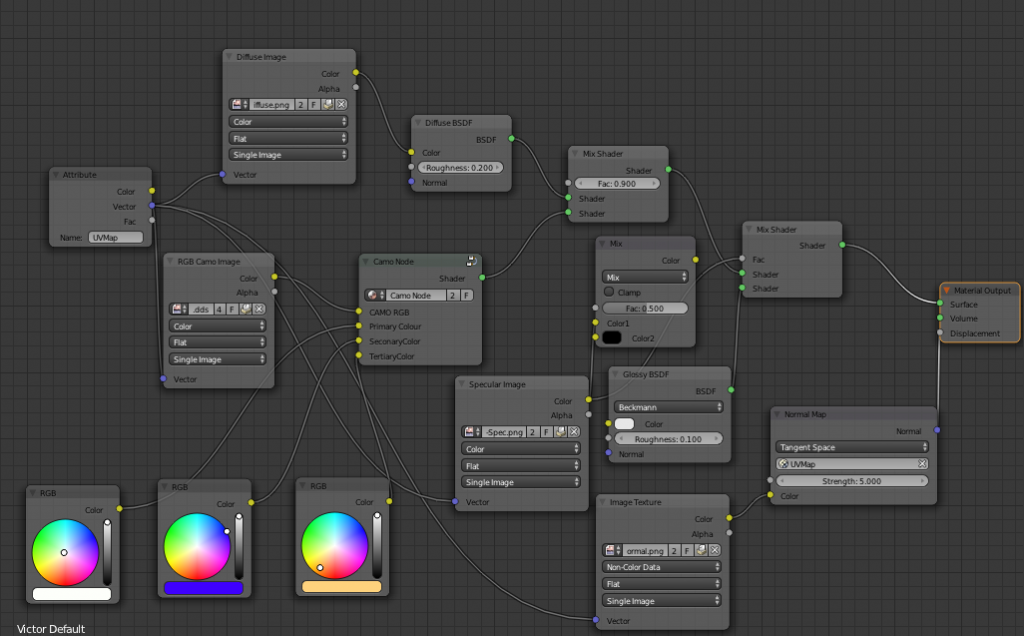
I agree Blender was a pain, it took me 4 hour's of work just to position a camera and set up the lighting for any sort of rendering. I've included **** of my blender object set-up, my friend set it up, it applies the camo you want (had to pull out the tiger camo) and it's set-up for the multiple colour input of the ingame camo. Just no way to input hex or colour codes, had to eyeball the colouring myself to get it as my mech appears in MWO.

Posted Image

I'm just now looking at decomposing the .dds of the Victor Tiger camo into it's RGB layers in Gimp 2.8 and should have SS up shortly I hope.

EDIT: I can decompose the diffuse.dds into the RGB layers, however the alpha layer (from the original) isn't created which causes all that was transparent to become black. I can decompose the original .dds however into the only the alpha layer, it's just trying at the moment to introduce that alpha back into the decomposed RGB layers.

Edited by Apostal, 08 August 2013 - 03:44 PM.


#450 Devil Fox

    Member

  • PipPipPipPipPipPipPipPip
  • The Infernal
  • The Infernal
  • 1,393 posts
  • LocationThe Fox Den

Posted 08 August 2013 - 04:16 PM

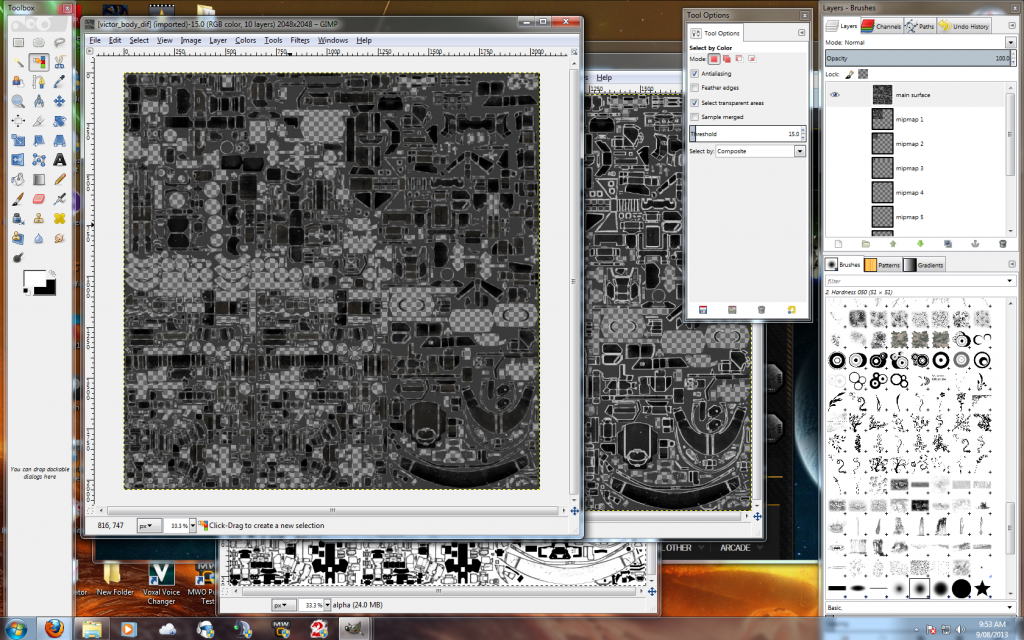
Ok I think I might've done it but not sure how your program or even blender might handle the end result exactly because in essence all I'm trying to do is break down the original diffuse.dds into a reasonable copy separated into it's RGB layers. Note I did this all in Gimp 2.8, Photoshop should have similar functions to decompose an image.

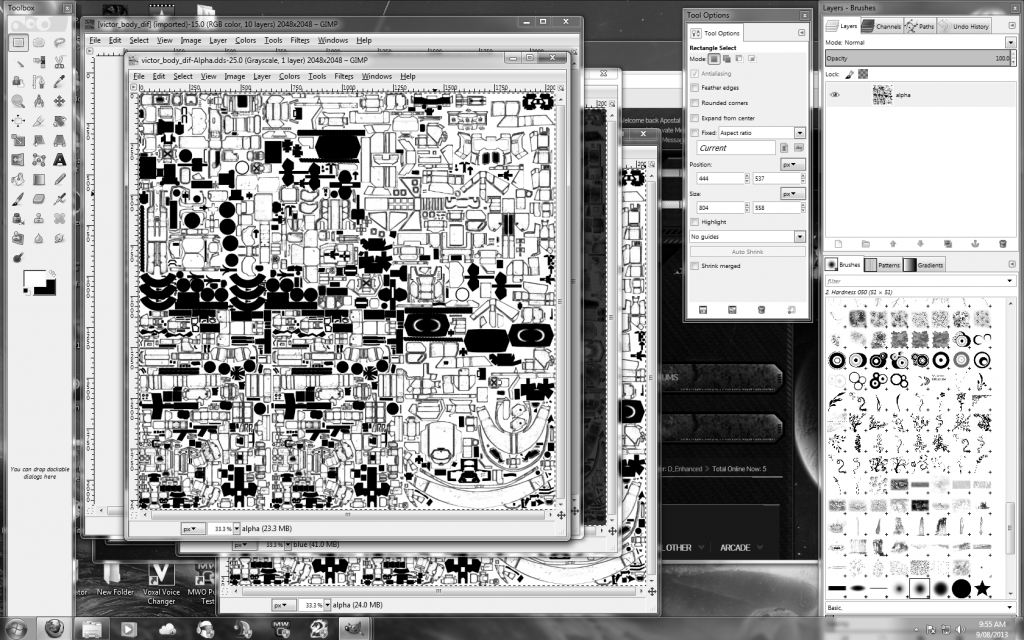
1. The original diffuse.dds

Posted Image

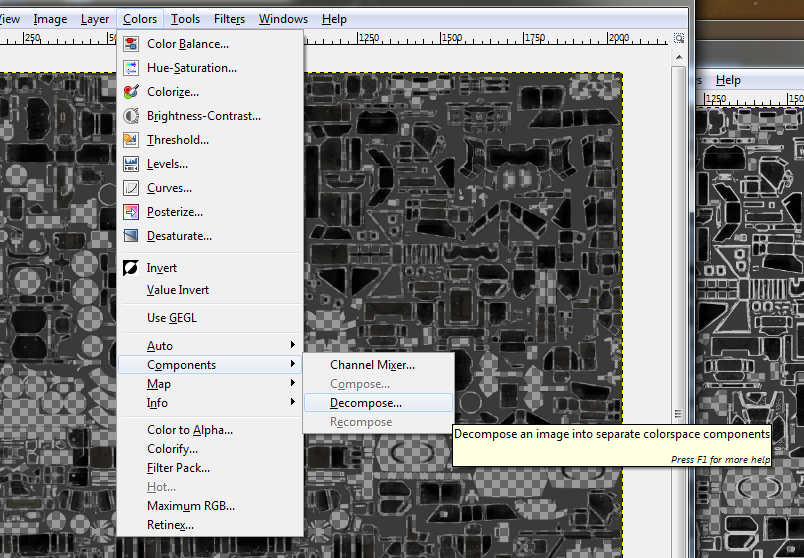
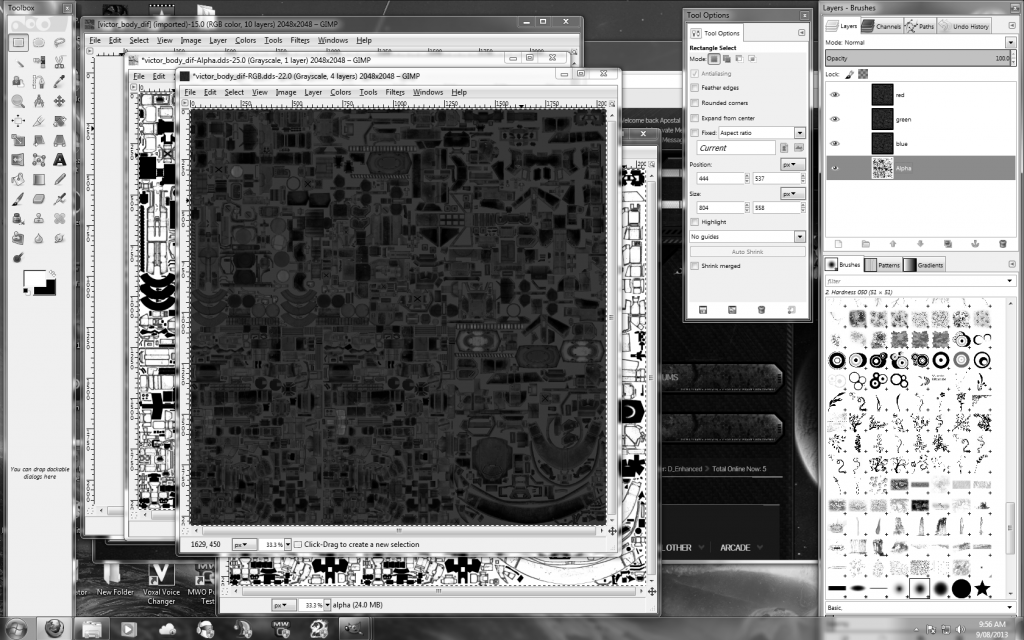
2. Colors - Components - Decompose - Select 'RGB' format

Posted Image

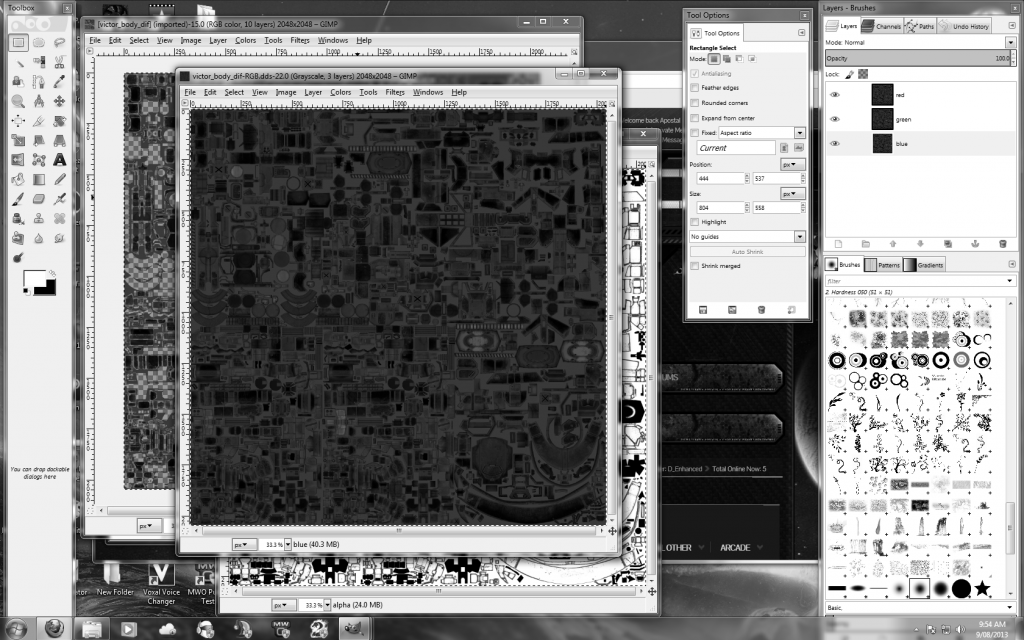
3. Result - No alpha layer is transferred with it

Posted Image

4. Return to original .dds, and once again decompose it but this time use 'Alpha' instead of 'RGB'

Posted Image

5. Copy and paste the new alpha layer back into your 'RGB' decomposed image layers.

Posted Image

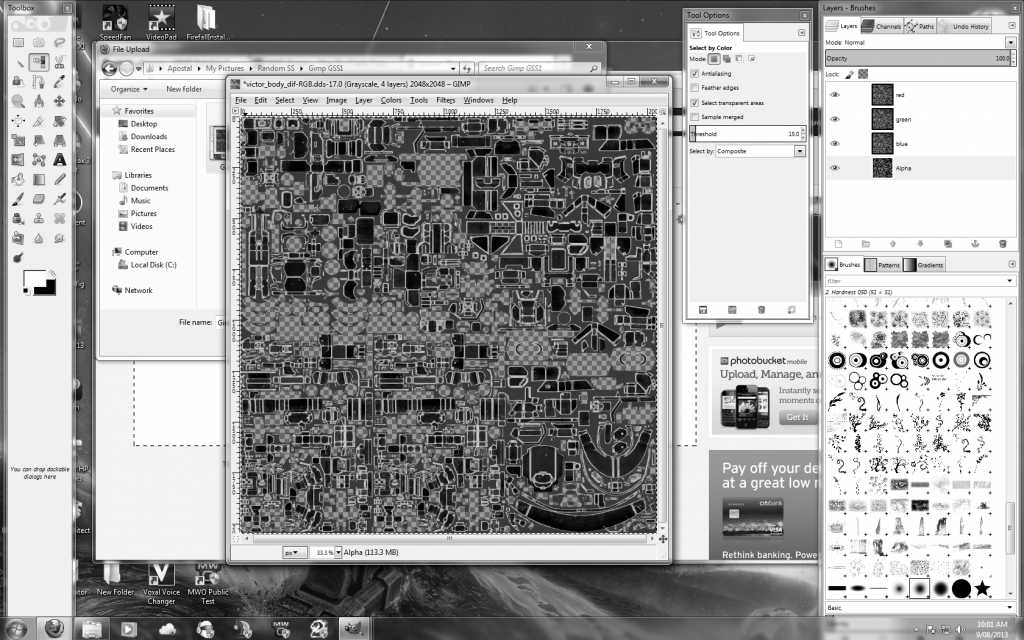
At this point I turn the layers off so only Alpha is left. I 'select by colour' the black, then systematically delete that selection from all 4 layers. Now on the Alpha layer, I invert the colour, and 'select by colour' the black, once done I then invert the selection. This should pick up all white out-lining of the various components, so I systematically delete once again from each of the layers.

6. Results are:

Posted Image

Not sure if that's what you wanted Leafia, and just noticed because I just did SS and exported their all in greyscale. If i'm understanding correctly, does your program pull in the RGB channels as layers straight up? Well hope this helped :(

#451 Sparks Murphey

    Member

  • PipPipPipPipPipPipPipPipPip
  • Bridesmaid
  • Bridesmaid
  • 2,953 posts
  • LocationAdelaide, Australia

Posted 08 August 2013 - 08:31 PM

View PostLeafia Barrett, on 08 August 2013 - 07:46 AM, said:

In fact, doing anything involving more layers than the base one apparently glitches the texture out, even merging a perfectly clear, unedited layer with absolutely nothing in it, so it doesn't matter if that works, because it'll still glitch out.

Posted Image
I did this. I added a brand-new untouched layer and saved (it automatically merges, but the same thing happens with manual merging).

Posted Image
See? Completely unchanged layer. I added it and saved, and that is literally it.

Posted Image
It does this. Any and every part of the texture image that was transparent now becomes completely black on the model. And before you say that maybe the texture itself was affected somehow...

Posted Image
Nope. This is the exact same image, reopened after saving it. And if you're wondering, yes, it does still do this if you actually change the new layer at all, and it does it with multiple layers instead of just one, and it does it if you ever so much as touch the "add layer" option or anything related to it, including copy/pasting stuff from another image.
And using the compound map option for the diffuse texture in 3dsmax not only cuts the texture quality to about 1/4, the other images used as masks have glitched out transparency, including just flat-out random transparent pixels. And no, I'm not going to learn a completely new 3D editor to do this, especially since Blender is horrendously unintuitive to me to even change the viewpoint, let alone actually model or texture anything.

What format are you saving the file in? It looks to me at least like that saving conversion is what's stripping the alpha channel out. dds files don't automatically have alpha channels, so if that's what you're using, you may need to check the save options to see if it's on. I prefer to use targa or PNG myself, as both default to having alpha channels saved in Photoshop if there's an alpha channel to save, but again, double check your options.

#452 Leafia Barrett

    Member

  • PipPipPipPipPipPip
  • 356 posts

Posted 09 August 2013 - 04:30 AM

View PostSparks Murphey, on 08 August 2013 - 08:31 PM, said:

What format are you saving the file in? It looks to me at least like that saving conversion is what's stripping the alpha channel out. dds files don't automatically have alpha channels, so if that's what you're using, you may need to check the save options to see if it's on. I prefer to use targa or PNG myself, as both default to having alpha channels saved in Photoshop if there's an alpha channel to save, but again, double check your options.
PNG. Always PNG.

In other news:

View PostLeafia Barrett, on 01 August 2013 - 04:36 PM, said:

...!!!
In objects/mechs/<mechname>/, open <mechname>.cdf (in Notepad++) to get this. This tells you all the translations and rotations of all the mech pieces. Oh my god, this makes things so much easier.

EDIT: Note - for the X and Y translations, multiply them by -1
Unless someone can figure out why the Rotation section rotates the model piece in 4 dimensions and what the rotation numbers mean (they are not degrees, that is for f***ing certain), then this is literally useless (and a fair chunk of my tutorial rendered pointless as well) as soon as you get to the arms and legs (so basically, the only things that the tutorial and the cdf file would help with at all).

View PostApostal, on 08 August 2013 - 04:16 PM, said:

Ok I think I might've done it but not sure how your program or even blender might handle the end result exactly because in essence all I'm trying to do is break down the original diffuse.dds into a reasonable copy separated into it's RGB layers. Note I did this all in Gimp 2.8, Photoshop should have similar functions to decompose an image.

I understand 0% of what you said, mainly because I haven't needed to touch GIMP 2.8 (Noesis can export dds files to whatever other format you want, I don't know why nobody has noticed this as it's very painfully obvious), and GIMP 2.8 is a gigantic pile of rubbish compared to 2.6 anyways.

Edited by Leafia Barrett, 09 August 2013 - 04:43 AM.


#453 MCXL

    Member

  • PipPipPipPipPipPip
  • Bridesmaid
  • Bridesmaid
  • 465 posts
  • LocationMinneapolis, MN

Posted 13 August 2013 - 03:28 AM

View PostLeafia Barrett, on 16 July 2013 - 05:46 PM, said:

Posted Image


This should be a ******* hero mech.

#454 MCXL

    Member

  • PipPipPipPipPipPip
  • Bridesmaid
  • Bridesmaid
  • 465 posts
  • LocationMinneapolis, MN

Posted 13 August 2013 - 03:33 AM

View PostLeafia Barrett, on 20 July 2013 - 05:43 PM, said:

Without further ado...

Posted Image

The Abomination ABM-F7.


#455 Radical Roy

    Rookie

  • 7 posts
  • LocationSweden

Posted 14 August 2013 - 03:54 PM

I just want to say hi, and thank the OP and all other contributors to this thread.

Earlier today i gave this tutorial a try, and it was very helpful. I never tried to export or do anything with a game model before, but i really enjoyed it.

Here is a render of my first test. And again, thanks for all the help!

Posted Image

#456 Iqfish

    Member

  • PipPipPipPipPipPipPipPipPip
  • 3,488 posts
  • Google+: Link
  • LocationGermany, CGN

Posted 14 August 2013 - 05:00 PM

View PostRadical Roy, on 14 August 2013 - 03:54 PM, said:

I just want to say hi, and thank the OP and all other contributors to this thread.

Earlier today i gave this tutorial a try, and it was very helpful. I never tried to export or do anything with a game model before, but i really enjoyed it.

Here is a render of my first test. And again, thanks for all the help!

Spoiler


Looks nice! Now make a Wallpaper out of it :(

#457 Leafia Barrett

    Member

  • PipPipPipPipPipPip
  • 356 posts

Posted 16 August 2013 - 04:48 AM

So apparently there's not a single word anywhere in existence that explains how to make this not happen with any number, type, placement, size, or distance of light(s).
Posted Image
I have looked ****ing EVERYWHERE, and there's absolutely nothing.

#458 Radical Roy

    Rookie

  • 7 posts
  • LocationSweden

Posted 16 August 2013 - 05:47 AM

Do you mean that distance in between the hotspot and falloff?
If so, yeah that's annoying.

Go to: The customize tab/Preferences/Rendering/. There change the Hotspot/Falloff to 0,0.


View PostLeafia Barrett, on 16 August 2013 - 04:48 AM, said:

So apparently there's not a single word anywhere in existence that explains how to make this not happen with any number, type, placement, size, or distance of light(s).
Posted Image
I have looked ****ing EVERYWHERE, and there's absolutely nothing.

Edited by Radical Roy, 16 August 2013 - 05:48 AM.


#459 Leafia Barrett

    Member

  • PipPipPipPipPipPip
  • 356 posts

Posted 16 August 2013 - 01:28 PM

View PostRadical Roy, on 16 August 2013 - 05:47 AM, said:

Do you mean that distance in between the hotspot and falloff?
If so, yeah that's annoying.

Go to: The customize tab/Preferences/Rendering/. There change the Hotspot/Falloff to 0,0.

No, it does what you see in the picture if I ever add any kind of light. It doesn't even matter where it's pointing. Like, I can point the light directly at the mech, and I can point it in the complete opposite direction, and both results are no light whatsoever.
I tried what you suggested. It had exactly no effect on anything.

#460 Radical Roy

    Rookie

  • 7 posts
  • LocationSweden

Posted 17 August 2013 - 04:29 AM

I kinda guessed wrong there...

So, you don't want the mech to turn black?
I played around trying to recreate whats happening in your screenshot. And the only thing i could come up with was, if i set the lights multiplier to a negative value. (e.g. -1,0)

Other things i was thinking about was if you had managed to flip the normals on the model, of if you simply needed to press ctrl+L in the viewport.
Hard to do this over a forum, I hope you fix it tho.


View PostLeafia Barrett, on 16 August 2013 - 01:28 PM, said:

No, it does what you see in the picture if I ever add any kind of light. It doesn't even matter where it's pointing. Like, I can point the light directly at the mech, and I can point it in the complete opposite direction, and both results are no light whatsoever.
I tried what you suggested. It had exactly no effect on anything.


6 user(s) are reading this topic

0 members, 6 guests, 0 anonymous users