Jump to content

How To: Create Your Own Art Using Pgi's Mechs

Art Misc

2255 replies to this topic

#501 Zatnik

    Member

  • Pip
  • 18 posts

Posted 20 September 2013 - 07:21 AM

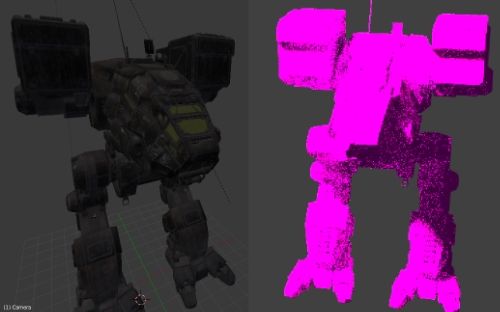
Somewhat Fail.

I spent ages getting this to work, and had it rendering pretty pictures... There was just a few things to tweak... Finally, I managed to get the textures mapping in line (they were all off by just a tiiiny bit on the cockpit), so I hit render.

Posted Image

Um... Perfect!?

Kinda annoying, because I spent hours on this... but also freaking hilarious.

Even restarting from scratch I can't get anything to render non-pink.

:)

Congratulations to those of you who managed to make this work.

#502 Ghogiel

    Member

  • PipPipPipPipPipPipPipPipPipPip
  • CS 2021 Gold Champ
  • CS 2021 Gold Champ
  • 6,852 posts

Posted 20 September 2013 - 07:38 AM

View PostZatnik, on 20 September 2013 - 07:21 AM, said:


Finally, I managed to get the textures mapping in line (they were all off by just a tiiiny bit on the cockpit), so I hit render.


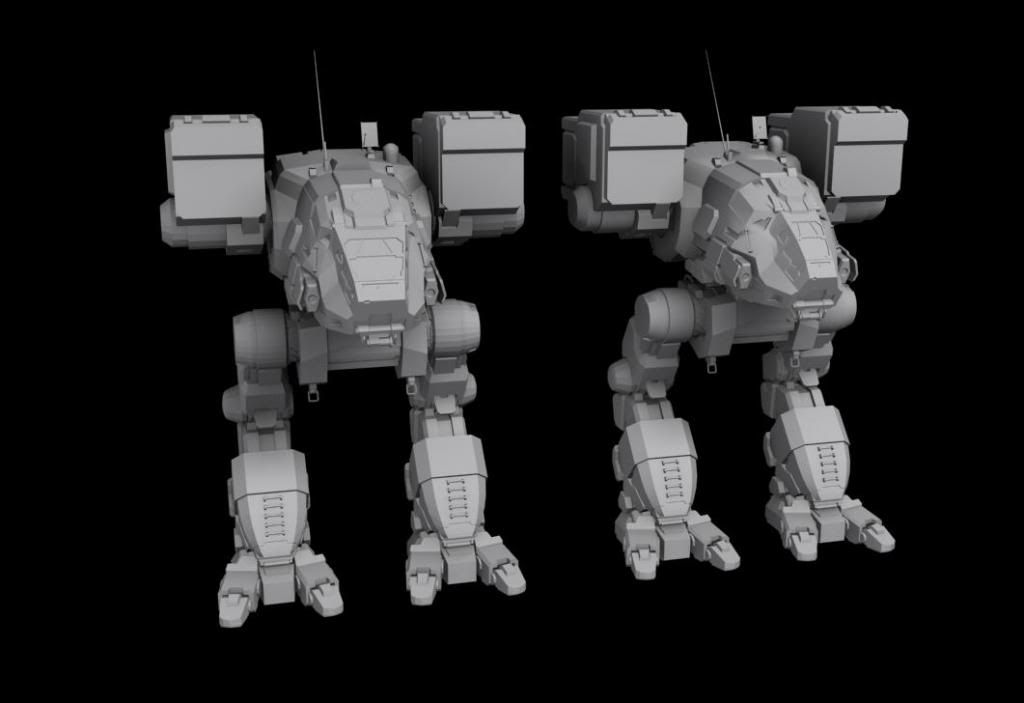
This is because the static model for the CPLT isn't the one we see used in game, that'll be why the texture used for the in game model doesn't match up with it, if you notice the cockpit is really fat on that CPLT. The in game one is much thinner.

You could have just assembled the torso from the CGA files, all the pivots are correct if converted right, so just import it and all the pieces will be in the correct place, no fiddling around or assembly required.

Edited by Ghogiel, 20 September 2013 - 07:38 AM.


#503 Heffay

    Rum Runner

  • PipPipPipPipPipPipPipPipPipPip
  • The Referee
  • The Referee
  • 6,458 posts
  • LocationPHX

Posted 20 September 2013 - 07:51 AM

View PostZatnik, on 20 September 2013 - 07:21 AM, said:

Somewhat Fail.

I spent ages getting this to work, and had it rendering pretty pictures... There was just a few things to tweak... Finally, I managed to get the textures mapping in line (they were all off by just a tiiiny bit on the cockpit), so I hit render.

Posted Image


I see absolutely nothing wrong with the render. If I had that camo option for my Cat, I'd definitely be using something like that.

The pink means that the renderer was unable to find the texture you had assigned to the model. Double check the nodes where you assign the textures to make sure they are all properly set up. You might want to unassign the texture files and reassign them to make sure that it's looking at the right place.

View PostGhogiel, on 20 September 2013 - 07:38 AM, said:

This is because the static model for the CPLT isn't the one we see used in game, that'll be why the texture used for the in game model doesn't match up with it, if you notice the cockpit is really fat on that CPLT. The in game one is much thinner.


I think it looks all fat because he's in perspective mode, not ortho.

#504 Ghogiel

    Member

  • PipPipPipPipPipPipPipPipPipPip
  • CS 2021 Gold Champ
  • CS 2021 Gold Champ
  • 6,852 posts

Posted 20 September 2013 - 08:14 AM

View PostHeffay, on 20 September 2013 - 07:51 AM, said:


I think it looks all fat because he's in perspective mode, not ortho.

Or he used the CGF static model which is different than the CGA files>

compare here>

Posted Image

#505 Heffay

    Rum Runner

  • PipPipPipPipPipPipPipPipPipPip
  • The Referee
  • The Referee
  • 6,458 posts
  • LocationPHX

Posted 20 September 2013 - 10:00 AM

View PostGhogiel, on 20 September 2013 - 08:14 AM, said:

Or he used the CGF static model which is different than the CGA files>

compare here>


I stand corrected.

#506 Zatnik

    Member

  • Pip
  • 18 posts

Posted 20 September 2013 - 10:24 AM

View PostGhogiel, on 20 September 2013 - 07:38 AM, said:

This is because the static model for the CPLT isn't the one we see used in game, that'll be why the texture used for the in game model doesn't match up with it, if you notice the cockpit is really fat on that CPLT. The in game one is much thinner.

You could have just assembled the torso from the CGA files, all the pivots are correct if converted right, so just import it and all the pieces will be in the correct place, no fiddling around or assembly required.


I see, I see! Now I know why the cockpit didn't fit. Maybe it's a two-seater >_>

View PostHeffay, on 20 September 2013 - 07:51 AM, said:


I see absolutely nothing wrong with the render. If I had that camo option for my Cat, I'd definitely be using something like that.

The pink means that the renderer was unable to find the texture you had assigned to the model. Double check the nodes where you assign the textures to make sure they are all properly set up. You might want to unassign the texture files and reassign them to make sure that it's looking at the right place.

I think it looks all fat because he's in perspective mode, not ortho.

I use Ortho for editing, and perspective for prettiness.

View PostGhogiel, on 20 September 2013 - 08:14 AM, said:

Or he used the CGF static model which is different than the CGA files>

compare here><image>


Heffay, thanks, that information means I can stop searching for some secret turn-everything-pink option. I tried everything with the textures, and eventually gave up. I went back a few hours later and it's ... working fine. No idea why.

Thanks for the help!

-Zatnik is-a-girl =)
#507 Heffay

    Rum Runner

  • PipPipPipPipPipPipPipPipPipPip
  • The Referee
  • The Referee
  • 6,458 posts
  • LocationPHX

Posted 07 October 2013 - 09:14 PM

Why am I putting this here?


IT'S A SURPRISE!!! Stay tuned....

#508 Valcrow

    Member

  • PipPipPipPipPipPip
  • 228 posts
  • LocationCanada

Posted 08 October 2013 - 11:36 AM

View PostHeffay, on 07 October 2013 - 09:14 PM, said:

Why am I putting this here?
IT'S A SURPRISE!!! Stay tuned....


Lol that's awesome. You need to track the shot though!

#509 Heffay

    Rum Runner

  • PipPipPipPipPipPipPipPipPipPip
  • The Referee
  • The Referee
  • 6,458 posts
  • LocationPHX

Posted 08 October 2013 - 12:01 PM

View PostValcrow, on 08 October 2013 - 11:36 AM, said:


Lol that's awesome. You need to track the shot though!


I know, that's phase 2. So much more to do!

I should have done it first though, but there aren't a lot of good tracking points.

#510 Valcrow

    Member

  • PipPipPipPipPipPip
  • 228 posts
  • LocationCanada

Posted 08 October 2013 - 12:05 PM

View PostHeffay, on 08 October 2013 - 12:01 PM, said:

I know, that's phase 2. So much more to do!

I should have done it first though, but there aren't a lot of good tracking points.


Looks like a 2D track, so you just need a few.. but ya, it's always tempting to do the fun stuff first.

#511 Heffay

    Rum Runner

  • PipPipPipPipPipPipPipPipPipPip
  • The Referee
  • The Referee
  • 6,458 posts
  • LocationPHX

Posted 08 October 2013 - 05:40 PM

View PostValcrow, on 08 October 2013 - 12:05 PM, said:


Looks like a 2D track, so you just need a few.. but ya, it's always tempting to do the fun stuff first.


Yah. Heck, they don't even need to be that accurate. Just enough to shake the camera around.

I need to get the workflow for that set though, because I'm going to have to do it a dozen more times anyway. Workflows are good. Here's my workflow for rigging a mech; I updated it when I did the Centurion, because I had a few bugs in the earlier on. I used to rewatch the whole freaking rigging video at cgcookie.com every time I wanted to redo it, and just skipped to the parts where I was having problems. This is so much easier!

Rigging a Mech workflow:
Spoiler


#512 Tekadept

    Member

  • PipPipPipPipPipPipPipPip
  • Knight Errant
  • 1,290 posts
  • LocationPerth, Australia

Posted 08 October 2013 - 11:51 PM

You know you can export the armature out of the chr file right? and just tweak that a little bit to make it easier?

#513 Heffay

    Rum Runner

  • PipPipPipPipPipPipPipPipPipPip
  • The Referee
  • The Referee
  • 6,458 posts
  • LocationPHX

Posted 09 October 2013 - 05:06 AM

View PostTekadept, on 08 October 2013 - 11:51 PM, said:

You know you can export the armature out of the chr file right? and just tweak that a little bit to make it easier?


Hmm... I did not know that, although I do remember seeing the armatures before (mechanic and catapult, if memory serves). I'm trying to import the spider .chr file by exporting it in Noesis to .obj file, but all it brings in is a triangle shape and no rig.

How were you able to do this? And I see in a chrparams file that there are a bunch of animations associated with it. Any luck importing those into Blender?

#514 Level1Firebolt

    Member

  • PipPipPip
  • Overlord
  • Overlord
  • 53 posts

Posted 10 October 2013 - 08:11 AM

My first model. The cataphract is one of the easier ones, since the model is already assembled; it just required clean up work to allow it to be a physical, real world model. It took me a great deal of time learning how to use all the programs, but once I got the hang of it the process went smoothly. I used shapeways.com to print the actual model that stands about 5 cm tall.


Posted Image
Thanks to sentinel for the motivation and tips!

#515 Valcrow

    Member

  • PipPipPipPipPipPip
  • 228 posts
  • LocationCanada

Posted 10 October 2013 - 04:00 PM

Looks great! Though I'm sure once it's primed it'll look even better. The translucent seems like it's obscuring some of the details.
You gonna paint it?

#516 Level1Firebolt

    Member

  • PipPipPip
  • Overlord
  • Overlord
  • 53 posts

Posted 10 October 2013 - 04:31 PM

Thanks! Yeah, the camera angle is a bit off and doesn't show off the cockpit detail too well there.

I'm no painter, but after seeing that jenner of yours I think I might have to give it a try.

#517 Tekadept

    Member

  • PipPipPipPipPipPipPipPip
  • Knight Errant
  • 1,290 posts
  • LocationPerth, Australia

Posted 17 October 2013 - 03:25 AM

View PostHeffay, on 09 October 2013 - 05:06 AM, said:


Hmm... I did not know that, although I do remember seeing the armatures before (mechanic and catapult, if memory serves). I'm trying to import the spider .chr file by exporting it in Noesis to .obj file, but all it brings in is a triangle shape and no rig.

How were you able to do this? And I see in a chrparams file that there are a bunch of animations associated with it. Any luck importing those into Blender?


I did a quick vid of part of me importing the shadowhawk files in, at the end I do the skeleton hopefully that helps you.


I havent got the animations in directly, but in cryengine SDK i export the animations to HTR file, then i do a script to do the animation in blender manually. it works pretty decent, I cant find a way to import the HTR file directly into blender though.

#518 Ransack

    Member

  • PipPipPipPipPipPipPipPip
  • 1,175 posts

Posted 18 October 2013 - 04:44 AM

Thank you for posting that video. Great work. I'm a novice at using blender, but I've been able to do ok by following this thread. I was able to keep up with everything that you did up to the data drop in excel. That's where I got horribly lost. I may figure it out at some point, thanks for the visual references.

Thank you everyone who has participated in this thread.

#519 Heffay

    Rum Runner

  • PipPipPipPipPipPipPipPipPipPip
  • The Referee
  • The Referee
  • 6,458 posts
  • LocationPHX

Posted 18 October 2013 - 05:25 AM

Tekadept, that video was incredibly useful! I'm going to write a powershell script that will modify that file directly, so you don't have to cut & paste, find and replace like crazy. Should make the whole process take less than a second. :)

I don't like the bone structure that they have, but I guess if I ever want to use their animations, I better get used to it. <_<

#520 Level1Firebolt

    Member

  • PipPipPip
  • Overlord
  • Overlord
  • 53 posts

Posted 18 October 2013 - 05:50 AM

That video will save so much work for the pre unassembled mechs! I didn't quite follow all the steps, though; is there any way you could describe what's going on in the video, either by text or voice over?


3 user(s) are reading this topic

0 members, 3 guests, 0 anonymous users