


I feel I can provide experience on this as I have Mastered my Locusts (1V, 3M, 3S, 1E) and I can consistently get games over 400-500 damage and typically place in the top couple places in matchscore and sometimes damage.
Locusts are all about high risk and high reward gameplay. If you are afraid of getting destroyed stop right now and move onto another mech. You're going to have those matches where you do terrible and die within the first few minute. Take your scrapes and bruises and move on.
We have the lowest armor maximum of any mech in the game (slightly above stock for a 1V). A few other lights can also match our speed (mostly Spiders and Commandos). We don't have the jump jets of the Spiders, Jenners, or at least one Raven. We also have firepower matched or exceeded by other lights suchs as the Firestarter. So you may wonder why to play a Locust at all, and you wouldn't be the first, however I think the Locust can fulfill many roles useful for MWO all on one mech rather than having to take many different mechs.
General Light Tactics
These tactics apply pretty much universally for all lights, but I’ll include them here as well.
- Never stop running, speed is life*
- Torso twist when taking damage this will spread it out
- Try to keep your movements erratic when not in cover
- Know where cover is at all times!
- If possible run in a pack with other lights, lights in a group are stronger
- Shoot them from behind whenever possible
- Find the enemy by himself and tag team him
- Feast on the injured, cleaning up after a brawl or near the end of a brawl is better than starting one
- When in doubt go for the legs, legged mechs have severally limited mobility
- Come at them where they least expect it
- Know the maps. You need to be aware of cover, likely enemy movement areas, and choke points.
These are some tactics that are (mostly) limited to the Locust.
Ridge humping is your friend, peek over ridges and fire your arms just like stalkers or Jagers. Make sure however when you do this that you the enemy isn’t flanking you. To ‘hump’ a ridge you will typically break the first rule (Never stop moving), so knowing when you can get away with this is important. If you are good enough and on the right map (Alpine mostly), you can actually run along the side of a ridge as you fire over it.
Do not fight other (non-locust) lights. Most other lights can outgun a Locust, only the 3M variant can come close to outgunning other lights. Even more so do not engage in a circle duel with other lights. While a stock Locust out armors a stock Spider, the Spiders armor maxes at twice the Locust and most people max their armor (or come close to it). However we also cannot run away from a lot of enemy lights, so make a point to stick within dashing distance to your team (who hopefully won’t just let you die).
Make use of (deep) water. The Locust (like the commando) can almost totally submerge in the deeper water areas of certain maps like Forest Colony or Crimson Straits. However our arm weapons peak above the water line. Water reduces damage from weapons passing through it. It will stop LB-10X dead and MGs as well. Lasers also get decently reduced. If you can fight in deep water and run a 3M or 3S with solid hitting arm weapons, then do so.
Learn to run at angles, zig zag, and only when you fire run in a straight line (to limit the spread of your shots). Knowing when and where to run in a straight line is a key skill to maximizing damage. Weapons with limited ToT (Time on Target) are the best fit for this.
Stay back and hunt the edges of a battle rather than getting in the thick of things. While you can do ‘drive bys’ like other lights, you are a free kill to most enemy mechs with good alphas. So instead try to go unnoticed.
Limit your use of circle strafing. While circle strafing is stock and trade for many many light pilots getting in front of a heavy or assault mech is often a death sentence. If you want to circle I’d suggest doing ‘figure eights’ with the enemy in one of the ‘eyes’ of the ‘eight’. You can also circle more than one mech and they may even shot each other. This will keep you behind them more than in front of them. If they have a brain they will try to turn (and so you have to alter your figure eight to match regularly) or they will stick their back to something to limit the angles you can come at them from. If you can climb this barrier they have their back to, do it.
Do not stand in front of a Cataphract or King Crab. Their arms are at ‘Locust’ height. It is way to easy for them to team kill you while trying to shoot at the enemy. As you are several times more mobile than them, it unfortunately falls on us to be the more careful of the two.
Be willing to hide in your own forces. Everyone else is tougher than you (unless in another Locust), so running into your forces to shield you is a sound practice. Just make sure to avoid your own teams guns. I aim for right behind the big guys, preferably with cover next to them so I can funnel chasers into the waiting arms of my team.
If you have to fight an enemy light, rather than circling you want to get on their tail and fire away at them from behind. Not only do they usually run weaker armor on their rear, if you can stay they they will have a hard time firing on you. Sadly this is not true for mechs with jump jets, as they can jump turn and turn the tables on you. Though not everyone is smart enough to do that.
Certain mechs with high arm hard points (or that are very tall) can be handled a different way. Get right up next to them within 10m and fire away. Mechs like the AC40 Jager or Dual Gauss Jager (with no lasers as backup) are helpless that close. They will shot over your head missing you. Atlas AC20s can be avoided like that as well, though most of their other weapons can hit you. So still stay out of their front weapons arc, unless they are not paying attention.
Don't always listen to your team. I've had some PUG teams order me to go cap when I'm the only light and the enemy team is fielding a Spider, a Jenner, and a Commando and I'm in a LCT-1V. I'd rather lose on points then die a horrible flaming death because someone wants me to do something I'm likely to fail at. I did however scout ahead of the area and reported back the three enemy mechs spread across that map, so if they would like to help me reach those caps...
Building a Locust
The first thing to look at is the Engine for your Locust, this chart shows all the engines that can run in a Locust (Standard and XL), the extra heat sinks you will need, what the total tonnage is, and the speed you will get (before and after speed tweak).
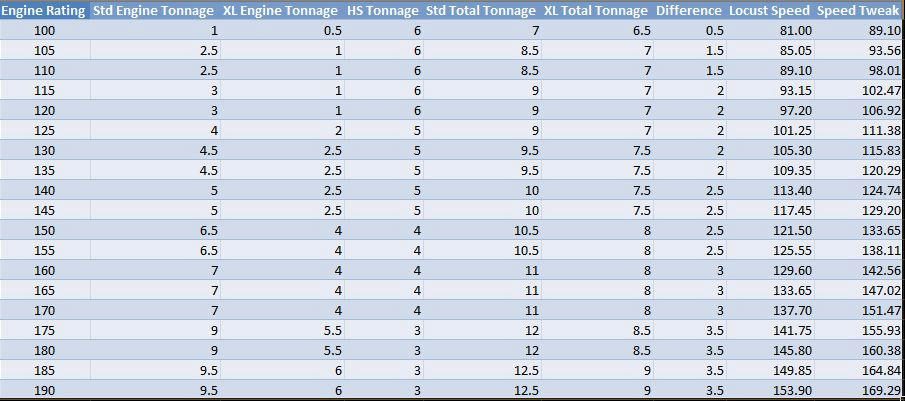
Most Locusts will run XL engines for the extra tonnage (noted by the ‘difference’ column) and since we are easy to kill there is little disadvantage for an XL. The Engine sweet spots are: 100, 125, 145, 170, 180, and 190 in XL. Typically you will want to run 170, 180, or 190 XLs from those.
Next lets talk armor. You usually want to max our rather pathetic armor out. Currently most enemies target the legs or torsos, so those are the things we want to max. Next most likely are the arms, which also hold the majority of our firepower, so we want to keep them high as well. This only leaves one section that is a good choice to lower the armor on: The head. I have several builds that run with 5 armor on the head and I’ve yet to be killed by a headshot.
You will always want to run Endo Steel (ES), The Locust does not have the tonnage to use a ton of critical spaces better. Ferro Fibrous (FF) however is a more mixed bag, not taking FF only requires around a third of a ton to make up the difference. If you have the space though and the money you may as well grab it. Without an engine a Locust with maxed FF armor and ES is 4.9 tons. The Locust with standard armor and ES without an engine is 5.3 tons.
All Locust variants have these quirks:
- Acceleration Rate +25%
- Decceleration Rate +25%
- Armor Strength (Arms) +25%
- Additional Structure (Legs) +25%
These things do not change across the current variants. Weapons, certain quirks, and equipment, however, do. So now we will look at the 3 (4) Variants.
The Locust Variants
The Locust LCT-1V is the original. It's medium laser and dual machine guns are not terribly strong however and I would never recommend taking it stock. It has 1 CT energy hardpoint shared across all variants and 2 Ballistics hardpoints in each arm for a total of 4. It has a single AMS in the Right Torso. Anything larger than MGs however will be limited to a single weapon.
Hardpoints:
- Ballistic - 4
- Energy - 1
- AMS - 1
- Ballistic Range +30%
- Energy Range +15%
- Energy Cooldown +25%
- Laser Duration -25%
- ER Large Laser Cooldown +25%
- ER Large Laser Duration -25%
The Locust LCT-1V (P) is only different from the normal 1V in that it has 'fin' arms rather than normal arms. These will catch more shots from the side than in the normal variant. It also gets bonuses on each match. Otherwise it is identical and when we talk about specific builds below it is going to use the same builds as the 1V. The quirks beg for you to put an ER large laser and machineguns in it.
Hardpoints:
- Ballistic - 4
- Energy - 1
- AMS - 1
- Ballistic Range +30%
- Energy Range +15%
- Energy Cooldown +25%
- Laser Duration -25%
- ER Large Laser Cooldown +25%
- ER Large Laser Duration -25%
Hardpoints:
- Energy - 5
- AMS - 2
- Energy Cooldown +20%
- Energy Heat Generation -10%
Laser Duration -10%
Hardpoints:
- Energy - 1
- Missile - 4
- AMS - 1
- Energy Range +12.5%
- Energy Cooldown +12.5%
Missile Range +15%- Missile Cooldown +30%
- Missile Heat Generation -15%
- Medium Laser Range +12.5%
- Medium Laser Cooldown +12.5%
Hardpoints:
- Energy- 6
- AMS - 1
- Energy Range +25%
- Energy Heat Generation -25%
- Laser Duration -25%
The Locust LCT-1M is an alternate take on the 3S mix of energy and missile hard points. The quirks suggest using medium lasers and missiles of some sort.
Hardpoints:
- Energy - 2
- Missile - 2
- AMS - 1
- Energy Range +25%
- Energy Cooldown +12.5%
- Energy Heat Generation -12.5%
- Laser Duration -12.5%
- Missile Cooldown +15%
- Medium Laser Range +25%
- Medium Laser Cooldown +12.5%
- Medium Laser Heat Generation -12.5%
- Medium Laser Duration +12.5%
The Locust LCT-PB is the hero Locust and arguably the most useful by bringing an ECM. However for weapons it has 4 energy and 2 ballistics with quirks geared to machineguns and small lasers. It is very much like a 1V, though with a better energy loadout and a focus on much closer hit and run rear strikes using the ECM to avoid detection until you are on top of the enemy.
Hardpoints:
- Ballistic - 2
- Energy - 4
- AMS - 1
- ECM -1
- Ballistic Range +10%
- Energy Range +10%
- Energy Cooldown +10%
- Machinegun Range +10%
- Small Laser Range +10%
- Small Laser Cooldown +10%
Locust Builds
LCT-1V Builds
The most common is the 4MG+MPL LCT-1V. As the name implies it carries 4 MGs and a medium pulse laser. The pulse laser would normally be subpar, however here it is not so bad as you need to get in close after other mechs have already opened the enemy up and then you gut him. This is also a common Spider 5K build.
* 190XL, ES, FF, max armor, 10 DHS
* 4xMGs + 1 MPL
Another common build is the 2xMG+LL LCT-1V. It uses a LL (or ER LL) to stay at range and dual MGs to finish off enemies that get close. However it is quite weak against other lights as the LL is hard to focus on them to do good damage. A MG+LL LCT-1V exists as well with a 190XL with even less firepower.
* 180XL (typical), ES, FF, near max armor, 10 DHS
* 2xMG + LL (or ER LL)
The AC2 LCT-1V is the largest ballistic you can realistically fit on a Locust. With 2 tons of ammo your maximum possible damage is 300. You can trade the engine down to a 170 XL for three tons or a backup laser. The best use of this Locust is as a long range ballistic support mech and it’s best used in Conquest where you can ‘run the bases’ while using the AC2 to tag the enemy mechs. However it's slow and has less armor than I'd like.
* 145XL (typical), ES, minimal max armor, 10 DHS
* AC2 (2 tons ammo)
LCT-3M Builds
The easiest build is the 5xML LCT-3M. As you can guess it carries 5 medium lasers. The key to using this mech is to fire them as 4 and 1. The 4 are fired 3-5 times (depending on map) and when you get close to overheating (get the heat warning) switch to only firing the 1 ML until you cool down. 4 ML can hit for as much as a AC20 if you can hold the on target. It works great if you ridge hump with it from above enemy forces. It is also enough to gut or leg a fellow Locust in one good burst or finish them when damaged. It is roughly comparable to the 5 and 6 ML Jenners.
* 190XL, ES, FF, near amx armor, 11 DHS
* 5xML
Another high energy build is the 4xML+MPL LCT-3M. It plays identical to the 5 ML build, but uses a MPL when it goes to single firing. You will run hotter and cool slower, but the MPL is slightly higher damage at a reduced range.
* 190XL, ES, FF, near max armor, 10 DHS
* 4xML + 1 MPL
The Missile Defense LCT-3M is another popular build. The idea is that you have 2xAMS to deal with SRMs and Streaks more than LRMs. It is a direct counter to the StreakCat A1 design and StreakTaro who chainfire streaks. The SPLs and SL are to keep heat down compared to MLs. Though a Missile Defender ML LCT-3M.
* 190XL, ES, FF, near max armor, 10 DHS
* 2xML + 2xSPL + SL
Sniper LCT-3M is another common build. It runs a 170XL engine so it can fit it's single gun: the ER PPC. It should only really be used at range and you need to be a good shot to make it work. It also runs fairly hot (roughly equal to 4 ML).
* 180XL, ES, FF, near max armor, 10 DHS
* ER PPC
The Recon LCT-3M is another option, though it is better suited to premade groups. It is very similar to the Missile Defense 3M, but trades the 1 ton of guns for a tag. It's role is to sneak near an enemy group and mark targets with it's tag. The 2xAMS is a shield against enemy streaks or LRMs to it while it's marking targets and the 2xML+2xSL help fend off anyone who attacks directly.
* 190XL, ES, FF, max armor, 10 DHS
* 2xML, 2xSL, TAG
The Royal LCT-1Vb is a take on a stock build (hence the name). It uses paired medium and small pulse lasers in the arms for in close work and a CT medium laser for longer range hits. You probably want to Elite the 3M before trying it. It also is likely to run a bit hot, though if you use it to dash in and out of combat it shoudl be ok.
* 180XL, ES, FF, near max armor, 10 DHS
* 2xMPL, 2xSPL, ML
The Hit 'n Run LCT-3M runs 5 Small **** lasers which gives it really short range. It mounts an AMS to counter streaks and is best at quick dashes into the fray and out again. It also makes a good chaser. The SPLs have low ToT, though lower damage to the ML or MPL.
* 190XL, ES, FF, near max armor, 10 DHS
* 5xSPL, AMS
LCT-3S Builds
3Streak LCT-3S builds are light hunters, going against the 'don't fight other lights' mantra. However they go through ammo quickly (16.6 shots with all three) and cannot quite chainfire constantly like 4xSRM2 builds. They are still fairly popular though. Also mine trades an extra ton of ammo or a ton worth of armor/engine for a backup ML, however a TAG LCT-3S is another option. It however is not that good against larger mechs. By the way, this build runs Artmeis to reduce lock on times, and takes advantage of the streak bug.
* 190XL, ES, FF, near max armor, 10 DHS, Artemis
* 3xSSRM2 + ML
The 4xSRM2 LCT-3S is designed to avoid needing TAG or BAP and you will switch between chainfired SRM2s to blind and rattle the enemy and full barrages of 8 SRMs against large mechs. The small lasers is pure backup and while minimally useful it does let you do something when you have no ammo. It is very useful for tailing enemy mechs.
* 190XL, ES, FF, near max armor, 10 DHS
* 4xSRM2 + SL
The 2xSRM4 LCT-3S is functionally identical to the 4xSRM2, ignoring the upgrade to the medium laser. It however fires slower and cannot rock targets as much. It runs a ML as opposed to the SL of it's brother giving it a bit more kick even after the missiles go silent, though at a small cost of speed. It's preferred targets are larger mechs.
* 180XL, ES, FF, near max armor, 10 DHS
* 2xSRM4 + ML
The 2xSSRM2 or Near Stock LCT-3S is a improvement on the stock build. The BAP allows you to lock those pesky ECM equipped lights at SRM ranges, it gets better if you add a Sensor range module (360 target retention is also a good choice). You could trade the medium laser for another ton of ammo, though I'd rather have the backup weapon to fill the gaps between SSRM shots. This mech also makes use of the Artemis streak bug for quicker locks.
* 190XL, ES, FF, near max armor, 10 DHS, Artemis
* 2xSSRM2 + ML
Several different 2xLRM builds exist: The Lightning LRM LCT-3S, which can fire 36 times before having to rely on it's backup weapon. The 180 LRM LCT-3S, which tosses the SL for 56 shots of LRMS or the 180 LRM & ML LCT-3S which goes back to 2 tons of ammo for a single ML. The 170 LRM LCT-3S or Tag 170 LRM LCT-3S offer a ton of some sort of energy hard point item and max armor. Or finally the 100 Standard LRM LCT-3S which should never expose itself if it can avoid it. All of these should stick with the rest of the force or provide LRM support for a lance of lights and even then It's not a very good LRM platform.
* 190/180/170/100, ES, FF, near max or max armor, 10 DHS (or 10 SHS)
* 2xLRM5 + varies
The Narc LCT-3S is a build few people would ever run. I have actually taken this for a spin and I added the SRM2 to vaguely help it's firepower. With how hit or miss LRM platforms are in PUGs (and basically non-existent in high end play) I felt I need something more. The Narc is limited with a single ton of ammo, but you can tag every mech on an enemy team once if your careful.
* 180XL, ES, FF, near max armor, 10 DHS
* ML, SRM2 (1 ton ammo), Narc (1 ton ammo)
General Builds
The Large Laser LCT can be built on any Locust variant. It is a lot like the MG+LL 1V build, without the MG. It usually runs a ER LL rather than a normal large laser. This is the 'Sniper' style Locust build that stays out of the fight and only peaks out from time to time.
* 190XL, ES, FF, max armor, 11 DHS
* ER LL
The Pulse LCT can be built from any Locust variant. It is nearly identical to the Large Laser LCT, except it uses the 7 ton LPL. This requires a 170 XL or reduced armor to use and is best for someone who has maxed their elite pilot efficiencies. This build needs to get in close, but it is slower due to requiring a 170XL to have the tonnage to fit this gun. This makes it less optimal, but does have 'ok' ToT, less than the Large Laser and equal to a ML build.
* 170XL, ES, FF, near max armor, 10 DHS
* LPL
Edited by Shadey99, 13 April 2015 - 03:42 PM.


 if you actively know someones trying to kill you, use your speed and agility to zig zag off and huddle behind friendlies till its safe to poke your head out again.


