Jump to content

Mechwarrior / Pilot Outfit

Blog Misc

21 replies to this topic

#1 LasBlast

    Member

  • PipPip
  • Talon
  • Talon
  • 23 posts
  • LocationNottingham, UK

Posted 26 April 2014 - 12:46 PM

For a while now I’ve been tempted by the idea of making a MechWarrior / Pilot outfit. Having recently bought my ticket for the UK Game Expo (30th May – 1st June, Birmingham, https://www.ukgamesexpo.co.uk/) I also now have an excuse… and a deadline!

This will be my first proper attempt at any sort of home-build / DIY costume creation, but having enjoyed several blogs detailing Cosplay build online (check out this guy - http://volpinprops.blogspot.co.uk/) I figured I’d post my work online to see what people think, and share ideas with the MWO community. My skills are fairly basic, but I can do enough basic sewing / DIY and so on that I'm reasonably optimistic.

From the outset, it is probably worth setting the ground rules. I am interested in working within the BattleTech canon – but up to a point. I’d very much like the outfit to be believable, and consistent with the timeline. However, the outfit it ultimately has to be practical and comfortable to wear for 12+ hours (in the temperate UK) in public places and Expo venues. So there may be some ‘balance’ to be struck along the way – I’m not going to apologise for that, this being my project…!

I will also be using a reasonable range of background material, including the canon BattleTech material on Sarna (http://www.sarna.net/wiki/Main_Page), but also looking at the various PC gaming adaptions that have perhaps had wider exposure.

Ultimately, the BattleTech universe is very large, persists over 400 years+, and contains a vast range of units, planets and so forth, so I like to think that there isn’t actually a single ‘right’ way of doing anything, but a range of possible options people could use as the basis for ‘their’ MechWarrior. Anyway, that’s enough flame-retardant – I’m hoping people will enjoy the blog however it turns out.

In addition to creating the outfit itself, I’m expecting to develop something of a backstory and setting for my own MechWarrior character. Thus far, I haven’t given this too much thought, other than transferring my allegiance from Merc to House Davion (http://www.sarna.net/wiki/House_Davion). For those who aren’t in the know, Davion are deemed to descend from primarily UK, US and French influences, thus matching my own nationality, and also the style of items I have easy access to.

Anyway, that’s enough Intro... on with the outfit.

Edited by LasBlast, 26 April 2014 - 01:40 PM.


#2 LasBlast

    Member

  • PipPip
  • Talon
  • Talon
  • 23 posts
  • LocationNottingham, UK

Posted 26 April 2014 - 02:41 PM

Cooling Vest – Part 1

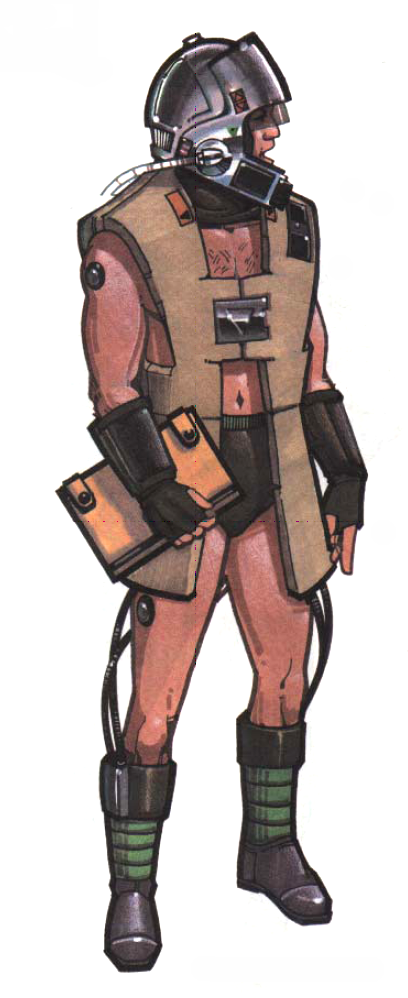
Of all the parts of an outfit which to me define a MechWarrior the two most fundamental are probably the Nuerohelmet (which we’ll do… later), and the Cooling Vest (http://www.sarna.net/wiki/Cooling_vest). So I figured I’d start there, partly on the basis that once I get the fundamentals sorted I’ll be under less time pressure and can add some extra accessories to suit.Sarna has a good (if somewhat unattractive!) picture of a Mechwarrior wearing what appears to be an effective cooling vest (http://www.sarna.net...hWarrior_(pilot)), and similar items can also be seen on various AFFS personnel (http://www.sarna.net...d_Suns_Uniforms).

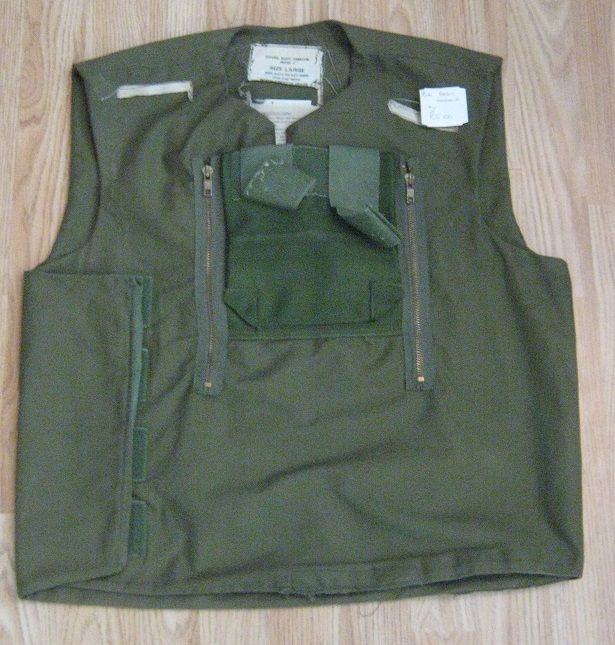
The key element which I think stands out is the visible coolant lines running through the garment, which is also clearly light, and short-sleeved / sleeveless. So, the first was finding a suitable ‘donor’ garment, given that my sewing skills do not extend to complete scratch builds.After some hunting around online and at an awesome local military surplus depot (Anchor Supplies, Nottingham) enter a Mk2 British Army Body Armour Cover (http://www.anchorsup...armour-mk2.html).

For those not familiar with late 20th Century armour, it comes in three parts – a fabric vest / cover (for comfort, hygiene and practicality), a bullet-resistant armour insert (which fills out the vest, and protects against indirect hits, shrapnel etc), and two solid bullet-proof plates (which sit in pockets within the cover, and protect the most vital organs)For my purposes, I only needed the cover, which cost only £5.00 (or 8.40 USD). The armoured insert itself is simply too hot and heavy for a MechWarrior to use, and would interfere with the primary cooling function. MechWarriors might plausibly be issued the plates for wear when outside their machines, but then again many modern soldiers issued with the plates quietly remove them, or replace them with slimmer, lighter (and less effective) versions.

Posted Image

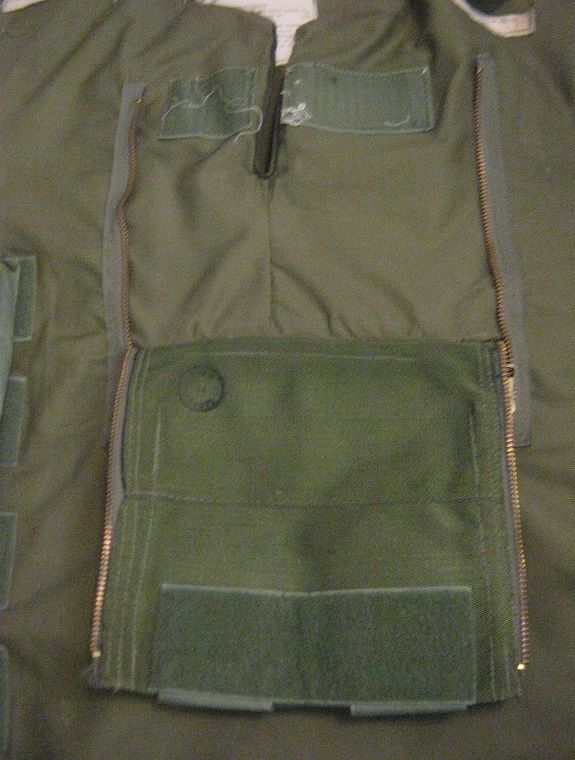
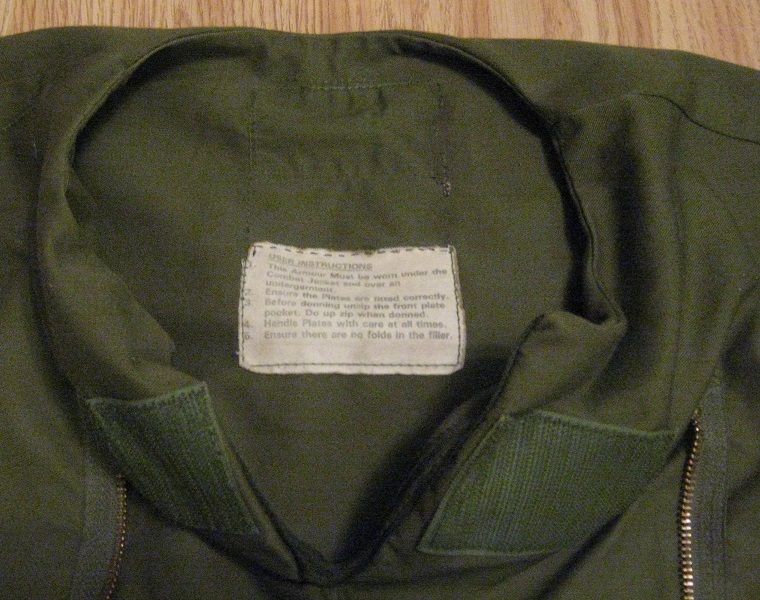
The vest opens on the right side with Velcro, and adjusts to fit a range of sizes. The collar is opened by unzipping the front plate pocket, which also conceals a further Velcro fastener. This makes it simple enough to don, means the fastenings don’t interfere with harnesses etc, and provides an uninterrupted front section for coolant lines, etc. So I figure it makes a good base for the cooling vest. I also like the fact it comes in olive drab rather than a camo scheme – almost no BatteTech pictures show MechWarriors wearing such colour schemes, and I personally think that camo looks somewhat too ‘real’ and contemporary, which is something of an immersion breaker for a 31st Century costume.

Posted Image

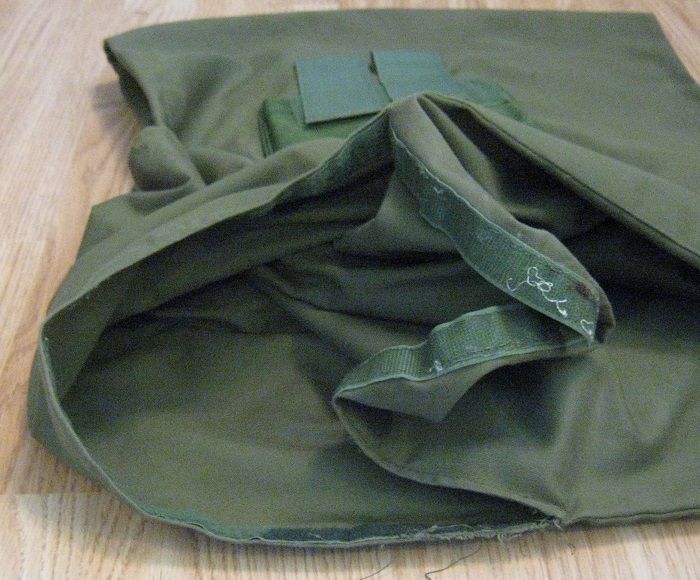
The last main benefit of the Mk2 Cover is that the armour’s insert is fitted via a further Velcro opening around the bottom left seam, which opens pretty much half-way around the cover. This is going to come in very handy, given I somehow have to fit the entire vest with cooling lines.

Posted Image

Edited by LasBlast, 26 April 2014 - 02:42 PM.


#3 LasBlast

    Member

  • PipPip
  • Talon
  • Talon
  • 23 posts
  • LocationNottingham, UK

Posted 26 April 2014 - 03:29 PM

Cooling Vest – Part 2

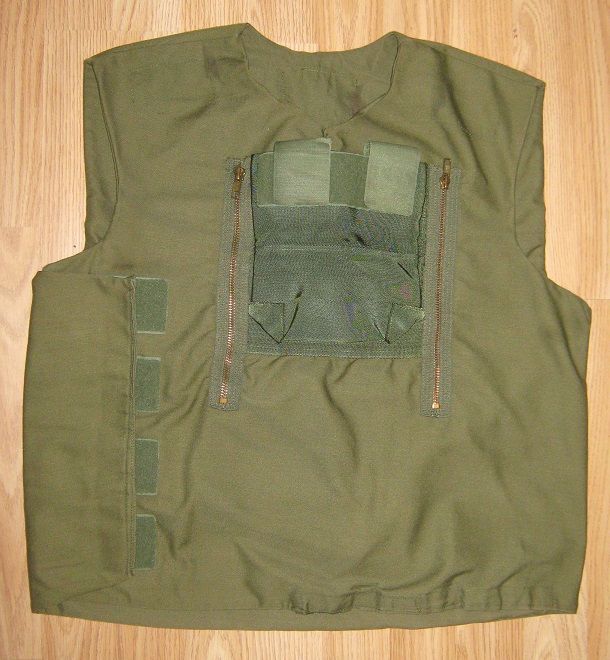
Work on the old Mk2 Vest started with removing some of the old labels, notably those in very poor condition (the Army cut away some parts before discarding the vests as surplus), or those identifying it as belonging to the 20th century. I also had to burn-off a few loose threads, clean the Velcro, and in some cases trim it back where I won’t be having to accommodate full thickness armour plates – this makes the whole thing a little tidier and should stop it snagging on everything else in due course.

Much as the vest was a great start, it had probably been in storage since the mid-1990’s, and was both a little fusty and covered in a few suspicious stains. Nothing major, but a good wash was very much in order.

Posted Image

Happily, this has left it looking well-maintained, but still with a faint patina of wear-and tear. Lots of the time it seems the hardest thing to do with a believable outfit is to weather it appropriately – in this case, I’ll freely admit to cheating and using pre-worn kit to achieve the desired effect.

Although I did remove most of the labels, after some debate I decided to leave part of the collar label which details the original ‘User Instructions’ – I just had to sew one edge of the label back down and tidy up the edges. The retained instructions still seem entirely appropriate for the potential use of armour plates within the vest, and although I doubt I’ll be able to add extra instructions about the coolant system, I might be able to include these elsewhere (we’ll wait and see…)

Posted Image

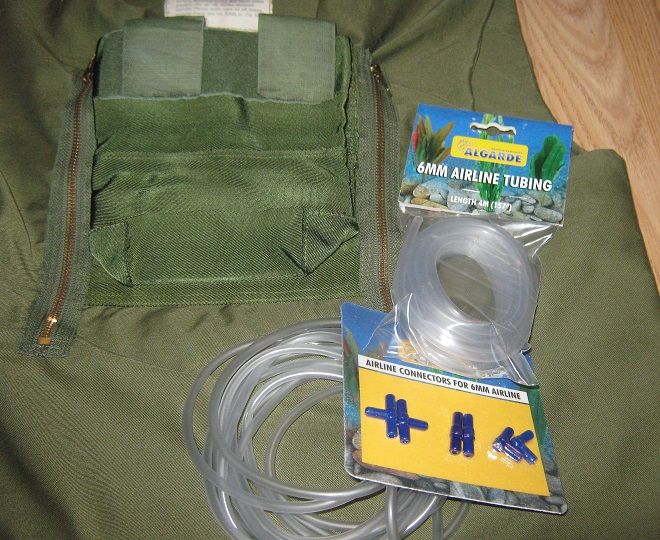
That’s about it for tonight, but looking ahead I have identified the easiest way to add the required coolant lines. I‘ve acquired some cheap 6mm aquarium tubing (about 50p / 0.85 USD per metre). Perhaps surprisingly, I reckon I’m going to about 8m (or 27ft) of the stuff to convincingly fit out the vest. To assist matters, I’ve also got a few connectors, which will allow me to fit the tubing in a few separate sections, and branch the tubes out throughout the vest. This being said, I still reckon it could be quite a tricky job… time will tell.

Posted Image

Edited by LasBlast, 27 April 2014 - 06:14 AM.


#4 LasBlast

    Member

  • PipPip
  • Talon
  • Talon
  • 23 posts
  • LocationNottingham, UK

Posted 27 April 2014 - 06:43 AM

Cooling Vest – Part 3

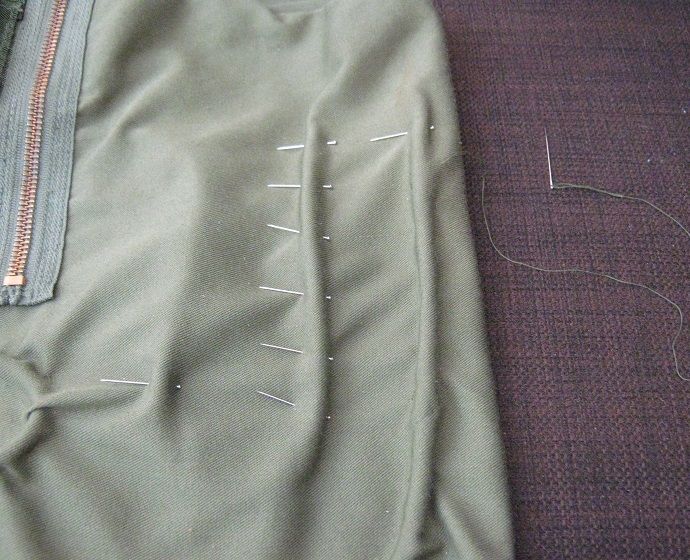
After stabling myself not a few times, I’ve now fitted a coolant line throughout the front of the vest. It basically involved sitting the line inside the insert cavity, pinning it in place, and then sewing behind the line from one side to the other. This does ‘ruck-up’ the fabric somewhat, so there is a limit to how may loops I can practically put into the line – however, I also don’t have forever, or infinite amounts of tubing, so that works out fine.

Posted Image

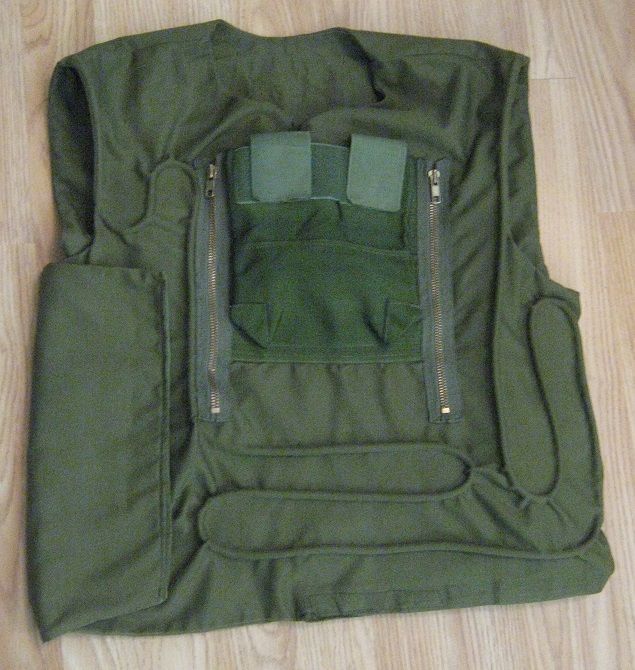
I’m fairly happy with the look, as the line comes out looking fairly well defined. Being soft tubing it also remains comfortable to wear. I’ve avoided looping the lines across the shoulders to make it easier to wear the vest with a harness (or, more likely, a backpack / kit bag), and also to provide an area to mount patches and so forth later on.

Posted Image

I’m less sure about how robust it will be in the long-term, as snapping a thread could pretty quickly lead to things unravelling. However, now the line is in place I can probably do another run of stitches much quicker. I’m also thinking about applying some craft glue to the inside, but getting to some areas is a lot harder than others. It may also mark the fabric around the line if I’m not careful – although some subtle staining could potentially appear to be seepage from the coolant line itself.

Before I worry too much about those details, I’ve still got the back of vest to do...

Edited by LasBlast, 27 April 2014 - 09:32 AM.


#5 Jabilo

    Member

  • PipPipPipPipPipPipPipPip
  • Philanthropist
  • 1,047 posts

Posted 27 April 2014 - 07:12 AM

Great thread, looking forward to seeing it all progress.

#6 9erRed

    Member

  • PipPipPipPipPipPipPipPip
  • Overlord
  • 1,566 posts
  • LocationCanada

Posted 27 April 2014 - 12:20 PM

Greetings all,

Have you tried changing the stich method to a spaced tailors knot or applying a back stitch? That will insure that if a thread does break it will not unravel everything. (especially important due to the stiffness or stress caused by the hose lines.)

- You could try running the hose through the inside of a large boot lace, (several actually) then use that to actually sew into your vest. Just a suggestion.

Great start, I do remember seeing someone actually build a working cooling vest, many small lines attached to a mesh liner. Built in pass through liquid pumps through out the build. The mesh was attached to the inside of the vest. And was referred to as very time consuming and costly.

For fluff wise additions, you may want to look into some components from the "liquid cooling" computer sites. The small add in's like flow indicators, and connection ports may work great on this build. Adding metal or plastic surface hard pieces where appropriate. As the vest is designed to plug into the cockpit command chair, the plugs or connections should be located where they are easy to reach and not in the pilots way.

There are some examples of real active cooling vests on the market that you can use as reference material for tube layout and plumbing. A few names are "AquaVest", "CoolShirt", which use similar methods you have selected for the costume. The NASA full body style suit has rather expensive materials used to compress the lines for maximum exchange of heat or cooling, so probably not a method you can replicate.

You've probably noticed already that sewing the lines into the material has drastically chanced the shape and size of the vest, only way around that is having the lines covered and using that cover to attach them.
Line placement is also a key design issue, just like laying out zoned areas in a heated floor method, doubling the lines and having front and back runs. Looking a the method the real vests lay out the system helps.

Good luck,
9erRed

Edited by 9erRed, 27 April 2014 - 03:55 PM.


#7 LasBlast

    Member

  • PipPip
  • Talon
  • Talon
  • 23 posts
  • LocationNottingham, UK

Posted 27 April 2014 - 03:06 PM

Some very cool ideas there Red - defiantly might give the back stitch a try on the back. Think the boot lace would probably add a little too much bulk to the line, which would in turn ruck up the vest more. Now I have the work part-done I'm going to try and shoot for some consistency, while kicking myself I didn't get 4mm line and some boot laces...

The fact the lines are very soft seems to be cutting me a little slack overall, as they flex rather that lead to a snap, so I'm going to see how everything pans out. Happily, the vest's basic structure means I can always open it back up and reinforce / alter the fixing, and as I'm looking for a worn in / issued look I can actually tolerate a finite amount of visible repair work within the character of the piece. Again, I'll freely admit to working on somewhat forgiving project for my first attempt at costume creation.

As for the extra fluff, I do have some ideas in that direction, and have already picked up a couple of odds and ends - although I hadn't thought of using computer cooling bits. I don't want to get ahead of myself with the blog though, and suspect I'm going to leave the final fittings on the vest to later on in the overall build (so that I can make sure they fit / are compatible with other parts of the costume). So watch this space...

Oh, and I nearly forgot to say - it's very cool to see people watching the build. Feels a bit strange, given this is very much first-go, but hopefully the end results will look good and have ben worth following ;)

#8 9erRed

    Member

  • PipPipPipPipPipPipPipPip
  • Overlord
  • 1,566 posts
  • LocationCanada

Posted 27 April 2014 - 06:20 PM

Greetings,

Thanks for the reply, reference the lace over the tubing;

That method requires the lace to be the surface attaching point and not moulding the vest around the tubing. You only sew the lace to the surface which allows for more custom layouts. And places most of the thread locations behind the tubing and hidden. Changing the lace colour to matching or contrast colours is up to the designer, but that method adds zero material bulk or change to the garment.

Laying out the pattern on the material is normally done with a dress makers wax crayon, which wash's out, that way the material being sewn on has guide lines, and it's easy to apply following the lines you drew.

You may notice that the referenced vests all run the tubing in a vertical pattern, with all exit/entrance lines at the bottom side of the vest. Calumniating in a joined plug adapter. This allows for somewhat easer layout of the lines, but your already well into placement so might be past that point.

Side note: Technically, if it's only a costume and doesn't really have to do anything, you could just as easily use 4, 5 or 6mm cord in place of the tubing within the vest. And switch to tubing where it's visible, just a thought.

I'll keep following this thread,
9erRed

Edited by 9erRed, 27 April 2014 - 09:53 PM.


#9 LasBlast

    Member

  • PipPip
  • Talon
  • Talon
  • 23 posts
  • LocationNottingham, UK

Posted 01 May 2014 - 02:09 AM

Just to keep this up-to-date, I'm away for a few days, but just got a few bit in the mail this morning which will be appearing on my return :)

#10 Nakamura Takeshi

    Member

  • PipPipPipPipPip
  • The Vicious
  • The Vicious
  • 177 posts
  • LocationNew Jersey

Posted 01 May 2014 - 06:59 AM

Great thread I appreciate you posting and giving all the info about your outfit. Gives me prop ideas :rolleyes:. Looking forward how it progresses and see how it looks on you.

#11 LasBlast

    Member

  • PipPip
  • Talon
  • Talon
  • 23 posts
  • LocationNottingham, UK

Posted 06 May 2014 - 02:24 PM

This post isn't going to be over-long, mainly as I've been away for the last few days. I'm still at work on the cooling vest, but on a temporary hold owing to a lack of thread - turns out several meres of cooling line needs several metres of thread to sew it in - who knew! So, pending a run into the nearest fabric shop, I figured I'd post a couple of teasers for other elements of the project.

Cabling - Part 1

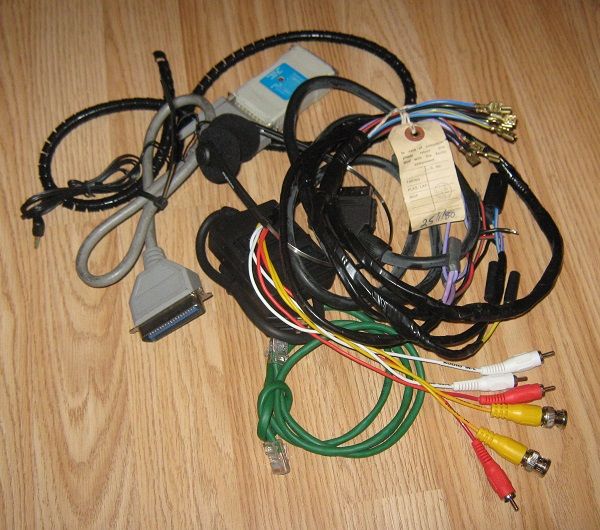
Both the neurohelmet and cooling vest will require some cabling added to them at some point during the project, although in terms of the 'build' I intend these to be added near the end, once I've done the major work - mostly as dangly things tend to get in the way!

However, I have already acquired a good supply of random cables. The same surplus depot I've already mentioned has an electrical section, where-in you can find all manner of odds and sods, including a discount bin. So, I was able to pick up all sorts for very little actual cash.

As an added bonus, lots of the stuff has been put through at least one military career, and has a somewhat battered look. The heap below includes assorted standard SCART, printer and data cables, as well as a wiring loom taken from a 1970's British Army Foden truck.

Posted Image

Patches / ‘Story’ – Part 1

I’m planning to add patches to both the cooling vest, and an under-shirt / T-shirt. At present I’m thinking more ‘formal’ or ‘official’ patches (house / unit / rank etc) will go on the vest, while less formal ones (mech / campaign patches) will go on the undershirt sleeves.

I’d already decided at the start of this build that the costume would have to be specific to ‘my’ MechWarrior, and accordingly that the costume would include references to the pilot’s own BattleMech. In fact, this is more-or-less essential to add detail to the outfit.

Accordingly, I have picked my favourite ‘mech, the Raven 3L. Not only is it iconic but I’ve always liked the more technical, slower light chassis and their EW capabilities, both thematically and in he various gaming adaptions. The Raven isn’t a Davion ‘mech per-se, but as per BattleTech canon the Federated Suns are known to have captured small numbers during the 4th Succession Wars. Some extra details in this regard are likely to follow later, but for now it is safe to say the canon timeframe will therefore be post-3030…

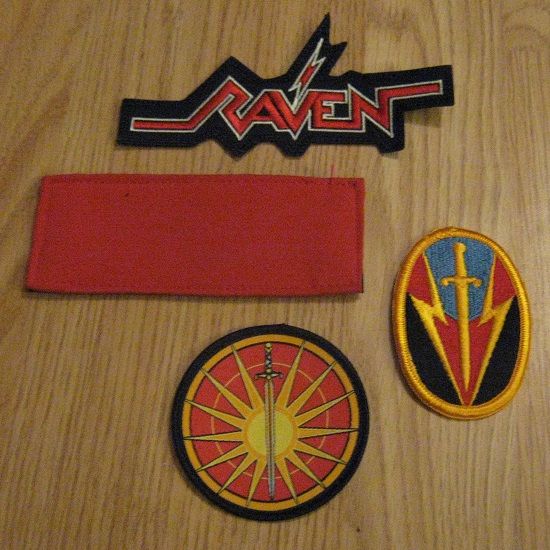
Anyway, all that aside, I’ve so far picked up the patches below from an eclectic range of sources. The Fed Suns patch is one of a range now being reproduced by a German company, while the Raven patch (complete with EW lightning bolt) is actually the logo of an awesome UK heavy metal band (http://en.wikipedia.org/wiki/Raven_(British_band)). The red patch is just a velcro recognition flash, while American readers may recognise the last patch as a historic US Army Combat Surveillance and Electronic Warfare School badge (http://www.usarmypat...com/Schools.htm) – which just so happens to suit the Raven, and have a great looking Fed Susn style sword through it.

Posted Image

That’s it for today, but I hope to post more amateur sewing exploits later in the week…!

Edited by LasBlast, 06 May 2014 - 02:36 PM.


#12 Iqfish

    Member

  • PipPipPipPipPipPipPipPipPip
  • 3,488 posts
  • Google+: Link
  • LocationGermany, CGN

Posted 06 May 2014 - 02:45 PM

Excited to see more.

How much would a custom, Steiner outfit cost me? :)

#13 RotS Targe

    Member

  • PipPipPipPipPipPip
  • Veteran Founder
  • Veteran Founder
  • 319 posts

Posted 09 May 2014 - 07:55 AM

I'm very curious to see how you add the padding for the neurohelmet, loving this so far, keep up the great work!

#14 LasBlast

    Member

  • PipPip
  • Talon
  • Talon
  • 23 posts
  • LocationNottingham, UK

Posted 11 May 2014 - 01:04 PM

Cooling Vest – Part 4

Sorry for the delay getting an update posted – work has been ongoing, but somehow didn’t get round to actually posting. So today we have Cooling Vest Parts 4 and 5 in succession. As for cost, I’d have to charge Steiner double… but I’ll mention a few items as I go along, and try to give a rough estimate on everything by the end.

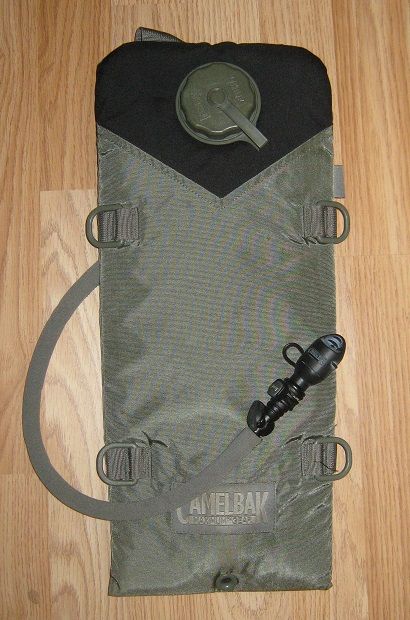
Digging through an old kit bag the other day (looking for green thread), I also turned out my ‘Camelbak’ platypus. Again, for those not familiar with the brand these are soft 2- 3 Litre (65 -100 Fl Oz) plastic bladders used to carry drinking water, often in an insulated cover. They are generically known as platypus due to the strange shaped drinking nozzle on the end of a hose. They are very handy things, much valued by NATO forces for convenient hydration and load-carrying. Prices vary depending on the type, size and quality, but in my case it was effectively 'free', as I didn't buy it recently or with the outfit in mind.
Posted Image

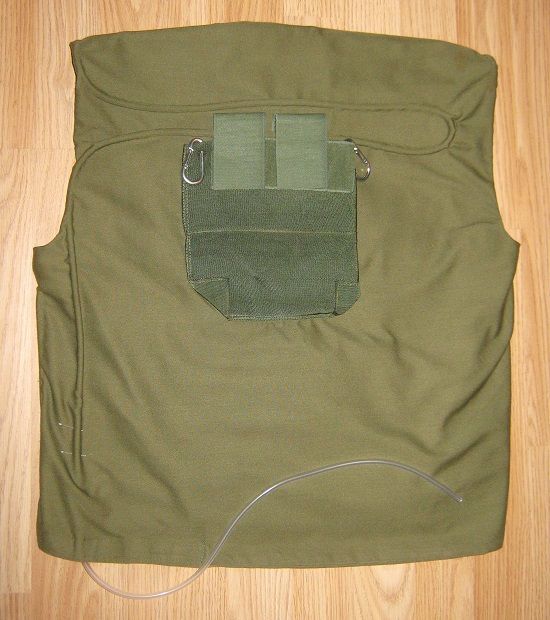
Anyway, having found it, I decided that it would very definitely be of use to a MechWarrior and would also look great as part of the outfit. It’s also a decent colour match to the cooling vest itself, which is a bonus. I’ve therefore added a couple of small carbineers to the rear armour pouch to allow the platypus carrier be attached to the vest.

After some consideration, I decided to simply create small pilot holes with a knife, and push these through the fabric – the pouches are formed from military-grade, tight weave rip-stop nylon, so it is usually possible to attach fixtures directly. Having slipped the carabineers into place, I then used a lighter to melt the frayed edges by heating the metal itself. This creates a nice snug, robust fit you can hand a couple of kilos (4-5 pounds) off without great concern.
Posted Image

While working on the carbineers, and having fiddled with a few layouts, I also decided to run a loop of coolant line across the shoulder blades. This was quite difficult to position, given where the armour plate pouch is, and the fact that the tubing kept trying to ball up again (even after being stretched out).

To be honest, none of the lines in the vest are quite straight, but I’ve decided not to worry – I’m not going to go for perfection first time out, and from past experience most military kit gradually gets somewhat worn, twisted and bent out of shape once worn-in. So… yeah, it’s realistic, sort of.

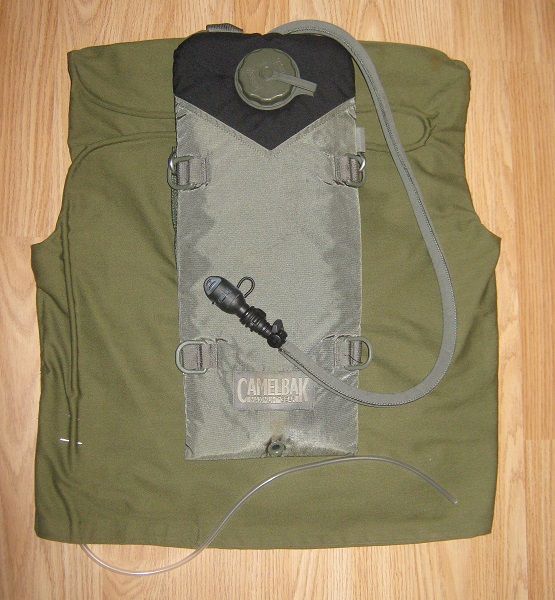
Having completed the above items, the platypus fits neatly in place, connected via its own mounting points (which were originally designed to fit onto the American MOLLE armour system). Having tried it on with the platypus art filled I think I may need to add an extra waist strap or similar, but that can wait for now.
Posted Image

So moving swiftly on…

Cooling Vest – Part 5 & Cabling – Part 2

Finishing the cooling lines in the vest off was pretty much just rinse and repeat, albeit rather time consuming. Having considered whether I wanted to use mainly vertical or horizontal coolant lines, I eventually settled on a mix – not for any particular logical reason, I just preferred the overall look when I sketched it out.

Having added all the tubing, it is harder to make the vest ‘sit’ neatly for a photo, and it has a bit more of a tendency to ‘ruck-to’. However, I can say that having tried it on, it actually stretches out and settles a lot better when worn. I’m saving pictures of the outfit being worn for the end of this blog though!
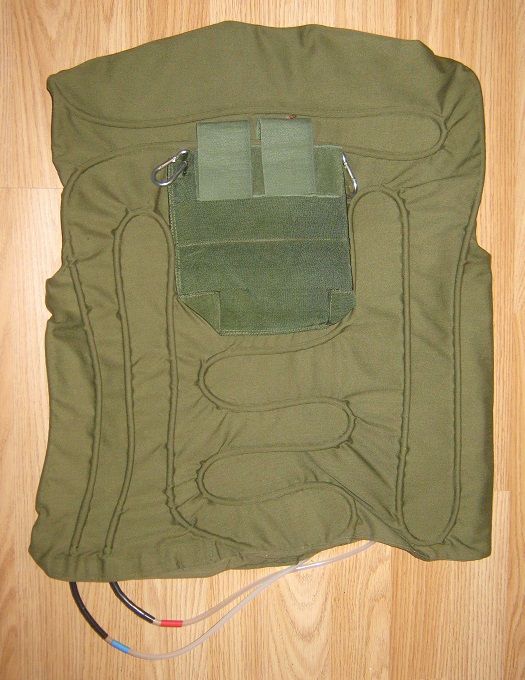
Posted Image

I decided on just running the coolant lines in/out through the opening at the bottom of the vest, with some extra sewing to hold them in place. They are positioned together on my left hip from where they can be easily connected. I did debate a more intricate plastic or metal panel, but this would have required a fair bit of extra effort, and may also be been rather uncomfortable to wear while seated.

For a bit of detailing and variety I wrapped some of the exterior sections in insulation tape, including red/blue tell-tales – I envisage these indicating the direction of flow through the vest. Having randomly thought about this, I decided the vest would initially send coolant my back and across the chest / stomach, before circulating fully across the back panel and out (thus providing more cooling to the front).
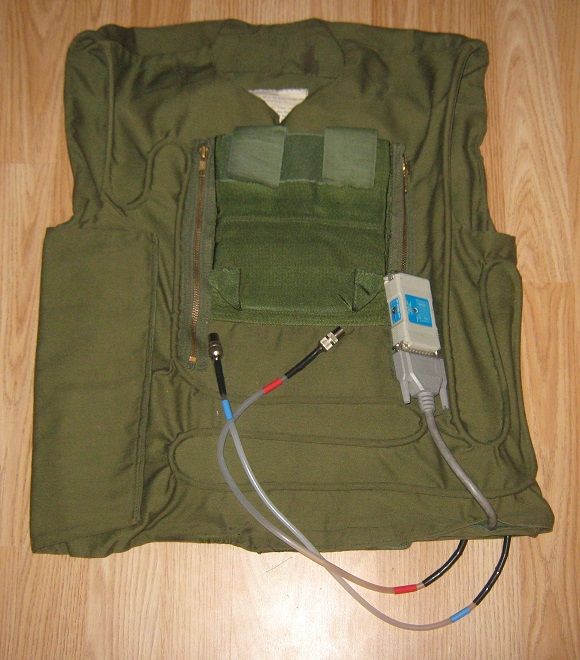
Posted Image

To finish the coolant system off, I used some space TV Aerial cable fittings at the end of each line to act as connectors.
Lastly, I picked out one of my cables with a nice booster box on, and having removed a ‘Made in Taiwan’ label sewed this into the bottom edge of the vest so it hangs down my leg. I imagine it is some sort of thermostat / bio-feedback cable connected to sensors within the vest, perhaps controlling coolant flow as well monitoring pulse, respiration, blood pressure and so forth.

(For the record, I’m not actually going to build the sensors, as you wouldn't see them under the vest, but did want to hint at their presence and add extra detail to the outfit.)

That’s pretty much it for today, and indeed for the vest – all I now need to do is add some patches, and any final details, and it’ll be ready to wear to the Expo.

Edited by LasBlast, 11 May 2014 - 02:02 PM.


#15 LasBlast

    Member

  • PipPip
  • Talon
  • Talon
  • 23 posts
  • LocationNottingham, UK

Posted 27 May 2014 - 01:09 PM

Just a quick one - The project is still very much ongoing, with a last push to pull everything together for the end of the week.

However, posting all the pics and so on has been quite time consuming (and no-one replied to the last post...!) so I expect I'll finish up the blog afterward ;)

#16 Koniving

    Welcoming Committee

  • PipPipPipPipPipPipPipPipPipPipPipPipPip
  • The Guide
  • The Guide
  • 23,384 posts

Posted 27 May 2014 - 01:16 PM

Just be glad...

You aren't Capellan Confederation.

Uniforms.

I know it gets obscenely hot in those mechs... but walking around like this in a crowded area is gonna be a problem.
Posted Image

#17 Alaskan Nobody

    Member

  • PipPipPipPipPipPipPipPipPipPipPip
  • The Determined
  • The Determined
  • 10,358 posts
  • LocationAlaska!

Posted 27 May 2014 - 01:22 PM

View PostKoniving, on 27 May 2014 - 01:16 PM, said:

Just be glad...

You aren't Capellan Confederation.


Kinda beats what I get.

Which for a lone wolf would be whatever I can scrounge.
(IE the stuff even the Cappellan's threw away)

#18 kiriage

    Member

  • PipPipPipPipPip
  • The 1 Percent
  • 119 posts
  • LocationCairns, Australia

Posted 28 May 2014 - 03:32 PM

View PostShar Wolf, on 27 May 2014 - 01:22 PM, said:


(IE the stuff even the Cappellan's threw away)


By the look of it that would be a fair amount since it would seem they threw everything except their jocks and an old cardboard box..kinda like a futuristic vagrant styling..probably coming soon to a Parisian catwalk near you.

#19 LasBlast

    Member

  • PipPip
  • Talon
  • Talon
  • 23 posts
  • LocationNottingham, UK

Posted 30 May 2014 - 04:15 PM

Show Preview

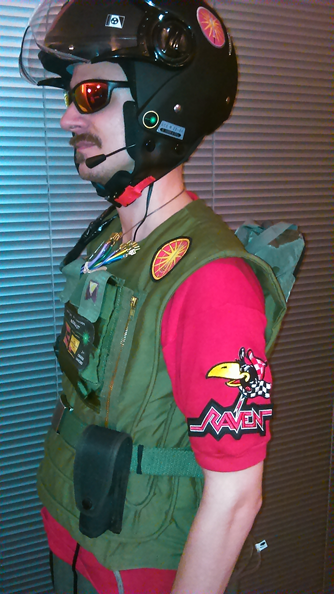
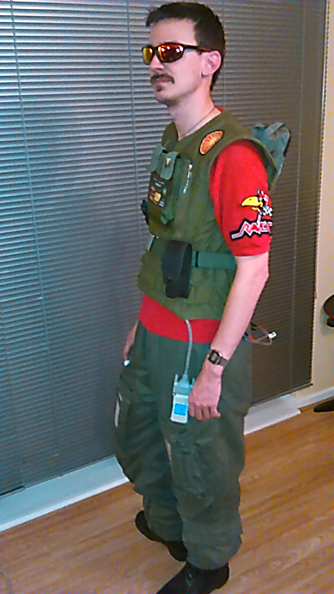
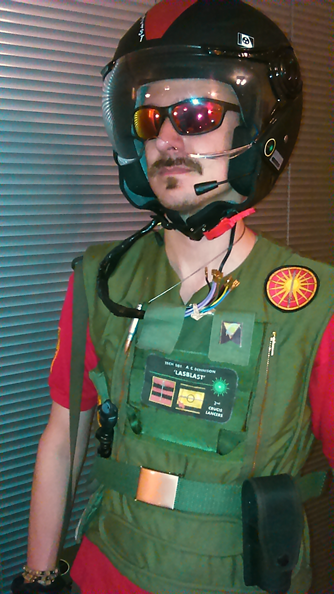
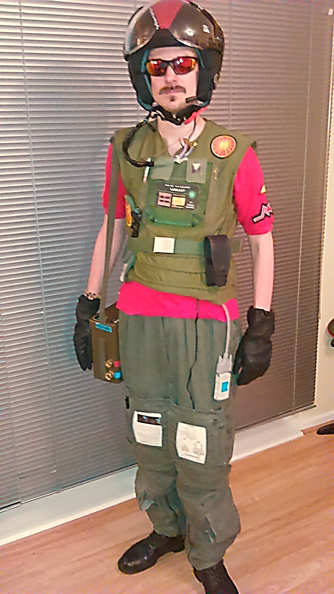
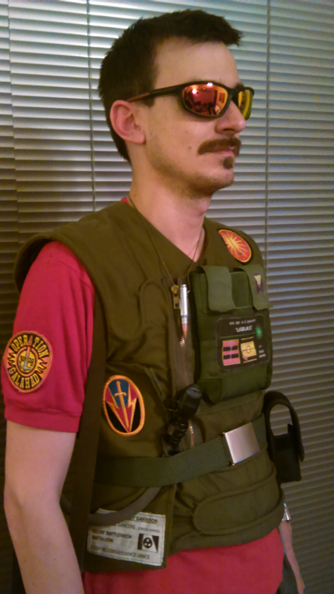
As I posted earlier, I’m still hoping to finish up some extra posts on the various items I’ve built up as part of my MechWarrior outfit. However, since I’m wearing it to the Expo this weekend, I though it only fair to put up some preview pictures for the MWO community (at base of this post). The colour isn’t great, as my fiancée had to shoot them inside after dark for me – hopefully I’ll get some better ones outdoors sometime.

I won’t go into too much detail here, but suffice to say the nuerohelmet is basically some fairly simple modifications to a cheap, open faced scooter helmet. It now has a lightweight, built-in gaming headset (which actually works), additional sensor cabling, a new paint job and various decals. I’m pretty happy with the end result.

As for canon, nuuerohelmets seem to vary wildly in description, but I feel my interpretation is very much in keeping the MW4 intro video, and indeed fairly similar to the Liao Mechwarrior pic above – which given my character drives a salvaged Liao ‘mech seems appropriate. Crucially for actual wear, it’s light, I can see and hear in it, and the open face design is much easier in a social environment.

The cooling vest has basically just had patches added since you last saw it, as has the under-layer / T-shirt. Hunting through canon there are reference to red cooling shirts / layers – I’ll dig out the link some other time. I was especially happy to find the Op Galahad patch on eBay, as it fits really neatly with a 4th Succession Wars backstory.

The trousers are from an old, two-piece RAF flight suit. The knee boards actually contain mocked-up ‘mech datasheets – more on those when I have more time! The suit trousers are probably the greatest departure from canon, as most mechwarriors do seem to wear shorts – however, the weather here is still wet/cold, and again, I’m going to an Expo, so small, tight shorts may not be appropriate… However, they are baggy and have lots of vents, so perhaps not out-of-the-question in cooler battlezones.

The only other major item I’ve built is the cooling unit on my right side. The hose from the cooling vest connect to it around my back, with additional, larger ports on the front face that would connect inside the cockpit, as well as a power cable. Basically it was inspired by the units astronauts carry, and was a neat way to add extra dimensions to the cooling system. The main body is built from a German / NATO rigid plastic carry-case (possibly for CBRN kit?), and handily provides space for a packed lunch and other essentials…

Aside from the above, the outfit is rounded out with various accessories – gauntlets (as seen in lots of canon pictures), military boots, an MG round pendant (made from an inert drill round), a bracelet, watch and so forth. There’s also a belt helping secure the Camelback in place, and mounting a holster (for which there is a prop sidearm currently sat drying on my painting tray).

Anyway, I’m curious what everyone thinks of my efforts – as I say, bit of a first go for me at doing a costume, and very much a balance between true canon and practicality, but overall I’m really pleased with the outcome, and looking forward to wearing it for the Expo.

Also, as I probably didn't say it all ready - kudos to PGI for bringing MechWarrior back to life and inspiring the outfit, if I didn't enjoy the game and the universe so much there is no way this would have got made...!

Posted Image

Posted Image

Posted Image

Posted Image

Posted Image

Posted Image

Edited by LasBlast, 30 May 2014 - 04:17 PM.


#20 LasBlast

    Member

  • PipPip
  • Talon
  • Talon
  • 23 posts
  • LocationNottingham, UK

Posted 30 May 2014 - 04:24 PM

Just in case - I had a couple of browser issues getting this last post up, so apologies for any double-ups / repeat posts! Obviously if any have occurred I'm more than happy for these to be deleted if the Mods need to sort it out...

Cheers!


2 user(s) are reading this topic

0 members, 2 guests, 0 anonymous users